Whispering Pines Market Tote Free Pattern
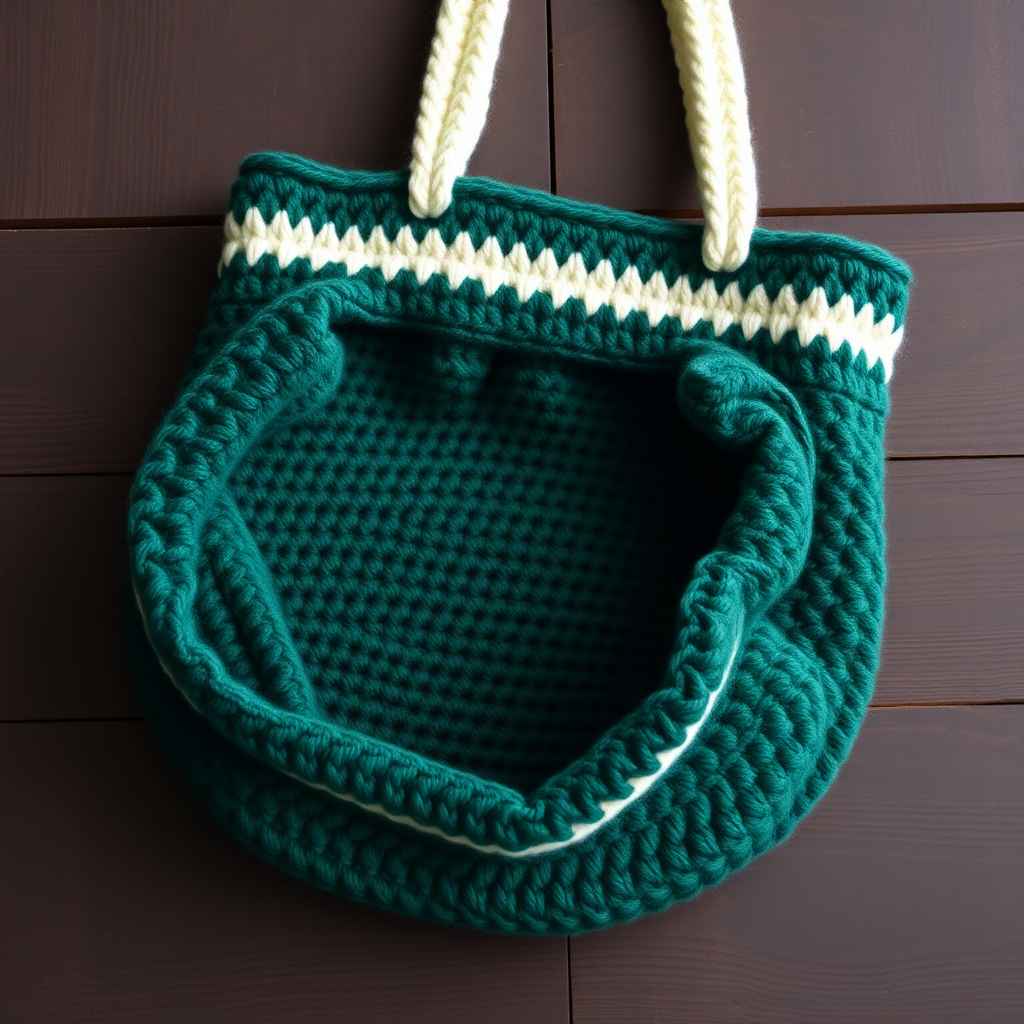
Whispering Pines Market Tote: A Free Crochet Pattern for Woodland Elegance
Imagine strolling through a sun-dappled farmers market, your finds nestled in a bag that whispers of pine forests and woodland charm. The Whispering Pines Market Tote is more than just a carryall—it's a statement of eco-conscious style and handmade warmth. With its deep forest green and cream colorwork, this textured tote brings a touch of nature's elegance to your everyday errands. Whether you're a seasoned crocheter or a confident beginner, this pattern is designed to guide you through creating a sturdy, beautiful bag that's as practical as it is pretty.
This free pattern uses simple single crochet stitches and a clever colorwork technique to create a subtle, geometric stripe effect that mimics the layers of a pine forest. The result is a roomy, durable tote perfect for groceries, library books, or beach essentials. Let's dive into this rewarding project that combines functionality with woodland artistry.
Materials Needed
Before you begin your crochet journey, gather these essential supplies. Using the right materials ensures your tote has the perfect drape and durability.
Yarn
- Main Color (MC): Worsted weight cotton yarn in Forest Green – approximately 300g (about 600-650 yards)
- Contrast Color (CC): Worsted weight cotton yarn in Cream – approximately 150g (about 300-325 yards)
Pro Tip: Cotton yarn is ideal for market bags because it's sturdy, machine-washable, and holds its shape beautifully. The worsted weight ensures your bag is thick enough to carry heavy items without stretching.
Hook and Notions
- Crochet Hook: 5.0 mm (H) crochet hook
- Stitch markers (optional, but helpful for keeping track of rounds)
- Tapestry needle for weaving in ends
- Scissors
Gauge
16 single crochet stitches and 18 rows = 4 inches in single crochet. Always check your gauge before starting to ensure your bag turns out the right size. If your gauge is off, adjust your hook size accordingly—smaller hook for tighter stitches, larger hook for looser ones.
Step-by-Step Instructions
This pattern is worked in continuous rounds from the bottom up. The bag body is created with simple single crochet increases, then worked even, followed by a beautiful colorwork section, and finished with handle openings. Let's break it down into manageable sections.
Part 1: Creating the Bag Base (Rounds 1-10)
The base of your tote is a flat circle that will become the bottom of the bag. We'll use standard increase rounds to create a smooth, flat disc.
Round 1: With MC, make a magic ring. Ch 1 (does not count as a stitch), work 8 single crochet (sc) into the ring. Pull the tail to tighten the ring closed. Slip stitch (sl st) to the first sc to join. (8 stitches)
Round 2: Ch 1, work 2 sc in each stitch around. Sl st to join. (16 stitches)
Round 3: Ch 1, *sc in the next stitch, 2 sc in the next stitch*; repeat from * to * around. Sl st to join. (24 stitches)
Round 4: Ch 1, *sc in the next 2 stitches, 2 sc in the next stitch*; repeat from * to * around. Sl st to join. (32 stitches)
Round 5: Ch 1, *sc in the next 3 stitches, 2 sc in the next stitch*; repeat from * to * around. Sl st to join. (40 stitches)
Round 6: Ch 1, *sc in the next 4 stitches, 2 sc in the next stitch*; repeat from * to * around. Sl st to join. (48 stitches)
Round 7: Ch 1, *sc in the next 5 stitches, 2 sc in the next stitch*; repeat from * to * around. Sl st to join. (56 stitches)
Round 8: Ch 1, *sc in the next 6 stitches, 2 sc in the next stitch*; repeat from * to * around. Sl st to join. (64 stitches)
Round 9: Ch 1, *sc in the next 7 stitches, 2 sc in the next stitch*; repeat from * to * around. Sl st to join. (72 stitches)
Round 10: Ch 1, *sc in the next 8 stitches, 2 sc in the next stitch*; repeat from * to * around. Sl st to join. (80 stitches)
Your base should now measure approximately 8-9 inches in diameter. If it's curling, your tension might be too tight—try using a larger hook. If it's ruffling, your tension might be too loose—switch to a smaller hook.
Part 2: Working the Bag Body (Rounds 11-30)
Now we'll work even to create the vertical walls of the bag. This section is straightforward and meditative—perfect for relaxing crochet time.
Rounds 11-30: Ch 1, sc in each stitch around, sl st to join. (80 stitches each round)
Repeat this round 20 times total. You'll notice the bag starting to take shape as the sides rise up from the base. The single crochet fabric is dense and sturdy, perfect for a market tote.
Helpful Hint: Place a stitch marker at the beginning of each round to keep your place. This is especially helpful during long stretches of even crochet.
Part 3: Adding the Woodland Colorwork (Rounds 31-40)
This is where the magic happens! The colorwork creates a subtle, geometric stripe pattern that evokes the layers of a pine forest. Don't worry—it's simpler than it looks. You'll be alternating between MC and CC in a repeating pattern.
Round 31: With MC, ch 1, sc in each stitch around, sl st to join. (80 stitches)
Round 32: With CC, ch 1, *sc in the next 3 stitches, then sc in the next stitch using MC*; repeat from * to * around, sl st to join. (80 stitches)
How to change colors: When you're ready to switch to MC for that single stitch, insert your hook into the next stitch, yarn over with MC, and pull through. Complete the stitch with MC. Carry the unused yarn loosely along the back of the work, being careful not to pull too tight.
Round 33: With MC, ch 1, sc in each stitch around, sl st to join. (80 stitches)
Round 34: With CC, ch 1, *sc in the next 2 stitches, then sc in the next stitch using MC*; repeat from * to * around, sl st to join. (80 stitches)
Round 35: With MC, ch 1, sc in each stitch around, sl st to join. (80 stitches)
Round 36: With CC, ch 1, *sc in the next stitch, then sc in the next stitch using MC*; repeat from * to * around, sl st to join. (80 stitches)
Round 37: With MC, ch 1, sc in each stitch around, sl st to join. (80 stitches)
Round 38: With CC, ch 1, *sc in the next 2 stitches, then sc in the next stitch using MC*; repeat from * to * around, sl st to join. (80 stitches)
Round 39: With MC, ch 1, sc in each stitch around, sl st to join. (80 stitches)
Round 40: With CC, ch 1, *sc in the next 3 stitches, then sc in the next stitch using MC*; repeat from * to * around, sl st to join. (80 stitches)
This creates a beautiful diamond-like pattern that's subtle yet striking. The cream stitches appear to "float" on the deep green background, mimicking dappled light through pine branches.
Part 4: Finishing the Body (Rounds 41-50)
After the colorwork excitement, we return to the calm, even rhythm of single crochet in the main color.
Rounds 41-50: With MC, ch 1, sc in each stitch around, sl st to join. (80 stitches each round)
Work these 10 rounds even. This section adds height to your bag, giving it that perfect market-tote proportion. The bag should now measure approximately 10-11 inches from the base.
Part 5: Creating the Handle Openings (Rounds 51-54)
Now we'll create the openings for your handles. This clever technique forms two long handle straps as part of the bag body itself—no separate pieces to sew!
Round 51: Ch 1, sc in the next 20 stitches, ch 25, skip the next 20 stitches, sc in the next 20 stitches, ch 25, skip the next 20 stitches, sc in the last 20 stitches, sl st to join. (80 stitches + 2 handle chains of 25 chains each)
Let's break this down: You're working around the bag, creating two gaps of 20 stitches each. Over those gaps, you're chaining 25 stitches. These chains will become your handles.
Round 52: Ch 1, sc in each stitch and each chain around. Sl st to join. (130 stitches total: 80 original stitches + 50 chain stitches)
When you reach the chains, simply work a single crochet into each chain stitch. This creates a sturdy handle base.
Round 53: Ch 1, sc in each stitch around, sl st to join. (130 stitches)
Round 54: Ch 1, sc in each stitch around, sl st to join. Fasten off and weave in all ends securely. (130 stitches)
Your handles are now formed! Each handle is approximately 25 stitches wide and 3 rounds deep, creating a comfortable strap for your shoulder or hand.
Optional: Handle Edging
For a polished, professional finish, add a contrasting edging to your handles. This small detail elevates the entire bag.
Handle Edging: With CC, join yarn at one handle opening. Sc evenly around the entire edge of the handle opening, sl st to join. Fasten off. Repeat for the other handle.
This edging not only looks beautiful but also reinforces the handles, making them extra durable for heavy loads.
Finishing Touches and Care Instructions
Once you've woven in all your ends, give your bag a gentle hand wash in cool water with mild soap. Lay it flat to dry, reshaping if necessary. The cotton yarn will soften slightly with washing, making your bag even more comfortable to carry.
Your Whispering Pines Market Tote is now ready for its debut! Whether you're heading to the farmers market, the beach, or just around town, this bag combines woodland elegance with everyday practicality. The deep green and cream colorwork is sure to draw compliments, and the sturdy single crochet construction will serve you well for years to come.
We'd love to see your finished creation! Share your photos on social media with the hashtag #WhisperingPinesTote and tag us so we can admire your handiwork. Happy crocheting, and may your errands always feel like a walk through the pines!


