Toasted Marshmallow Camp Bag Free Crochet Pattern
Toasted Marshmallow Camp Bag: A Cozy First Crochet Project
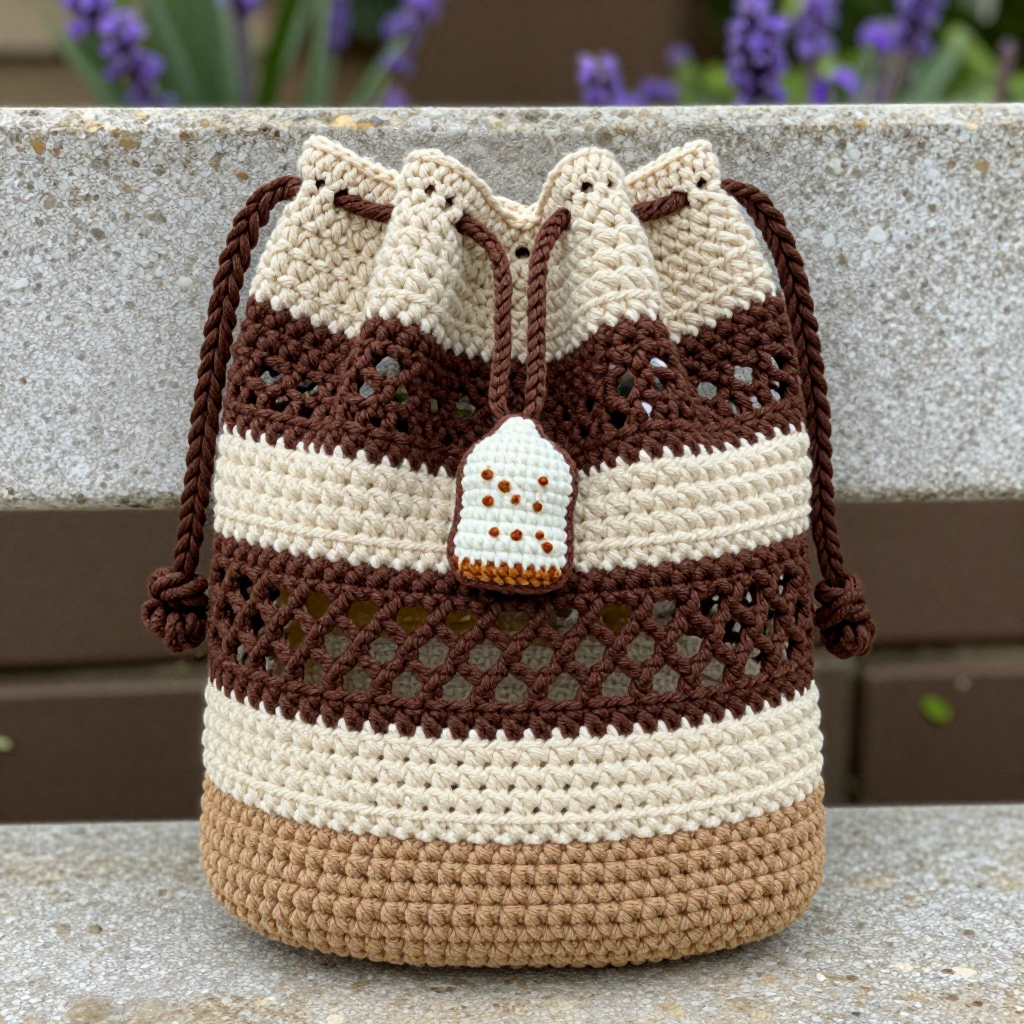
If you have never held a crochet hook before, this is the perfect project to start with. The Toasted Marshmallow Camp Bag is a soft, round drawstring pouch worked in warm toasted-cream and cocoa-brown stripes, with airy mesh rounds that look like little campfire sparks. The finished bag is about 8 inches wide and 9 inches tall — just right for holding small treasures, camp snacks, or your crochet supplies. It feels sturdy but soft, thanks to the cotton yarn, and the tiny marshmallow appliqué on the front adds a sweet, whimsical touch. Every stitch is simple, every round is explained, and by the end you will have a bag you are proud to carry.
Materials Needed
- Yarn: Worsted weight (category 4) cotton or cotton-blend yarn, approximately 200 yards total — 130 yards toasted-cream (Color A) and 70 yards cocoa-brown (Color B).
- Main hook: US I/9 (5.5 mm) crochet hook.
- Appliqué hook: US G/6 (4.0 mm) crochet hook.
- Stitch marker (or a safety pin) to mark the first stitch of each round.
- Yarn needle (also called a tapestry needle) — a large, blunt needle with a big eye for weaving in ends.
- Scissors for cutting yarn.
- Small scrap of Color A yarn for stuffing the marshmallow appliqué.
- Finished size: Approximately 8 inches (20 cm) in diameter and 9 inches (23 cm) tall, not counting the drawstring cords.
Abbreviations and Beginner Glossary
Every abbreviation used in this pattern is listed here with a plain-English explanation. Read through this list once before you begin — you do not need to memorize it.
- ch – chain. Make a loop with the yarn on your hook, then pull the yarn through that loop. Each loop you pull through is one chain stitch.
- sl st – slip stitch. Insert your hook into the stitch, wrap yarn over the hook, and pull it through both the stitch and the loop on your hook at the same time. It makes a flat, invisible join.
- sc – single crochet. Insert hook into the stitch, wrap yarn over hook, pull up a loop (you now have 2 loops on your hook), wrap yarn over again, and pull through both loops. One single crochet made.
- dc – double crochet. Wrap yarn over hook first, insert hook into stitch, pull up a loop (3 loops on hook), wrap yarn over, pull through 2 loops, wrap yarn over, pull through remaining 2 loops.
- sc2tog – single crochet 2 together (a decrease). Insert hook into the first stitch, pull up a loop, insert hook into the next stitch, pull up a loop (3 loops on hook), wrap yarn over, pull through all 3 loops. This turns two stitches into one.
- ch-1 sp – chain-1 space. The little gap created when you made one chain and skipped a stitch. You will work into this gap on the next round.
- st(s) – stitch(es).
- rnd – round. One complete circle of stitches worked around the bag.
- magic ring – an adjustable loop of yarn that you crochet into to start a circle. Make a loop, hold the crossing point, and work your stitches into the loop; then pull the tail tight to close the hole.
- join – finish a round by making a slip stitch into the first stitch of that round.
- fasten off – cut the yarn leaving a 6-inch tail, pull the tail all the way through the last loop on your hook, and pull tight.
Gauge
Gauge: 14 single crochet stitches x 16 rounds = 4 inches (10 cm) in solid single crochet using the 5.5 mm hook.
Gauge means how many stitches and rounds fit into a square of fabric. It matters because it controls the finished size: if your stitches are bigger than the gauge, your bag will be too large and floppy; if they are smaller, the bag will be too tight and stiff. To check your gauge, crochet a flat swatch: chain 20, then work single crochet rows until the piece is about 4 inches tall. Lay a ruler across the middle and count how many stitches fit in 4 inches, then count how many rows fit in 4 inches. If you have more stitches than 14, try a larger hook; if you have fewer, try a smaller hook. Wash and dry your swatch the way you plan to wash the bag, because cotton can change size slightly.
Beginner Tips Before You Start
- Use a stitch marker. Place it in the first stitch of each round so you always know where the round begins and ends. Move it up as you go.
- Do not pull the yarn too tight. Keep your tension relaxed and even. Tight stitches make the hook hard to insert and make the bag stiff.
- Count your stitches at the end of every round. The stitch count in parentheses tells you exactly how many you should have. If you are off, fix it before moving on.
- Carry the unused color loosely. When you change colors, let the yarn you are not using rest gently up the inside of the bag. Do not pull it tight or the bag will pucker.
- The chain 1 at the start of each round does not count as a stitch. Always work your first single crochet into the very first stitch of the round, not into the chain.
- Work the mesh rounds slowly. The (sc, ch 1, skip next st) repeat is simple but easy to lose track of — say the repeat out loud as you go.
Step-by-Step Instructions
Notes: The bag is worked in the round from the base upward without turning. Join each round with a slip stitch to the first stitch, then chain 1 (this chain does not count as a stitch). Carry the unused color loosely up the inside; do not cut between stripes until the color change is final. Mesh rounds are worked as (sc, ch 1) repeats, and the chain-1 spaces create the open texture.
Base (solid, Color A)
Rnd 1: With A and the 5.5 mm hook, make a magic ring, ch 1, work 8 sc into the ring, join with sl st to the first sc. (8 sc)
Rnd 2: Ch 1, 2 sc in each st around, join. (16 sc)
Rnd 3: Ch 1, [2 sc in next st, sc in next st] around, join. (24 sc)
Rnd 4: Ch 1, [2 sc in next st, sc in next 2 sts] around, join. (32 sc)
Rnd 5: Ch 1, [2 sc in next st, sc in next 3 sts] around, join. (40 sc)
Rnd 6: Ch 1, [2 sc in next st, sc in next 4 sts] around, join. (48 sc)
Rnd 7: Ch 1, [2 sc in next st, sc in next 5 sts] around, join. (56 sc)
Rnd 8: Ch 1, [2 sc in next st, sc in next 6 sts] around, join. (64 sc)
Rnd 9: Ch 1, [2 sc in next st, sc in next 7 sts] around, join. (72 sc)
Rnd 10: Ch 1, [2 sc in next st, sc in next 8 sts] around, join. (80 sc)
Rnd 11: Ch 1, sc in each st around, join. (80 sc) The base now measures approximately 8 inches across.
Body Stripe Sequence
Rnds 12–14 (A, solid): Ch 1, sc in each st around, join. (80 sc)
Rnds 15–16 (B, mesh): Change to B on the last sl st of Rnd 14. Ch 1, [sc in next st, ch 1, skip next st] around, join to first sc. (40 sc, 40 ch-1 sps)
Rnds 17–19 (A, solid): Change to A. Ch 1, sc in each st and in each ch-1 sp around, join. (80 sc)
Rnds 20–21 (B, mesh): Change to B. Ch 1, [sc in next st, ch 1, skip next st] around, join. (40 sc, 40 ch-1 sps)
Rnds 22–24 (A, solid): Change to A. Ch 1, sc in each st and in each ch-1 sp around, join. (80 sc)
Rnds 25–26 (B, mesh): Change to B. Ch 1, [sc in next st, ch 1, skip next st] around, join. (40 sc, 40 ch-1 sps)
Rnds 27–29 (A, solid): Change to A. Ch 1, sc in each st and in each ch-1 sp around, join. (80 sc)
Rnd 30 (B, solid): Change to B. Ch 1, sc in each st around, join. (80 sc)
Drawcord Casing (Color A)
Rnd 31: Change to A. Ch 1, sc in each st around, join. (80 sc)
Rnd 32: Ch 1, [sc in next 3 sts, ch 1, skip next st] around, join to first sc. (60 sc, 20 ch-1 sps)
Rnd 33: Ch 1, sc in each st and in each ch-1 sp around, join. (80 sc)
Rnd 34: Ch 1, sc in each st around, join. Fasten off A and weave in ends.
Top Edging (Color B)
Rnd 35: Join B with a sl st in any st, ch 1, sc in each st around, join. Fasten off B and weave in ends. The bag now measures approximately 9 inches tall.
Drawcord (make 2, Color B)
With B and the 5.5 mm hook, leave a 6-inch tail, ch 60, fasten off leaving a 6-inch tail. Thread one cord through the ch-1 spaces of Rnd 32 starting at the front center, going all the way around and exiting where it began. Thread the second cord in the opposite direction through the same spaces. Knot the ends of each cord together to form two loops. Pull both loops to cinch the bag closed.
Marshmallow Appliqué (with G/6 4.0 mm hook)
Use A for the body and B for the toasted edges.
Rnd 1: With A, make a magic ring, ch 1, work 6 sc into the ring, join. (6 sc)
Rnd 2: Ch 1, 2 sc in each st around, join. (12 sc)
Rnd 3: Ch 1, [2 sc in next st, sc in next st] around, join. (18 sc)
Rnd 4: Ch 1, sc in each st around, join. (18 sc)
Rnd 5: Ch 1, [sc2tog, sc in next st] around, join. (12 sc) Stuff lightly with a small scrap of A.
Rnd 6: Ch 1, sc2tog around, join. (6 sc) Fasten off and close the remaining hole with the yarn needle.
Toasted edges: With B, work a sl st border around the marshmallow by inserting the hook through the outer edge stitches of Rnds 2–4 at random intervals, creating small cocoa-brown "toast" marks. Fasten off and weave in ends.
Assembly and Finishing
Sew on the appliqué. Thread a yarn needle with a length of Color A. Place the marshmallow on the front of the bag just below the drawcord casing. Take small stitches through the back of the appliqué and into the bag fabric, going all the way around. Do not pull too tight or the marshmallow will dent. Fasten off on the inside.
Weave in the ends. Thread each loose yarn tail onto the yarn needle and run it through the inside of several stitches in one direction, then back through a few stitches in the other direction. Trim the tail close to the fabric. This hides the end securely so it will not work loose in the wash.
Block the bag. Lightly dampen the bag with water in a spray bottle. Stuff the bag with a clean towel or a small pillow to hold its round shape, then set it on a dry towel and let it air-dry completely. This smooths the stitches and helps the bag hold its shape. Do not wring or twist the bag.
Pro Tips and Variations
- Change the colors. Try sage green and cream for a woodland look, or bright pink and white for a candy-stripe bag. Keep one color light and one dark so the stripes stand out.
- Make it bigger or smaller. To make a larger bag, add one more increase round to the base (Rnd 12: [2 sc in next st, sc in next 9 sts] around = 88 sc) and work a few extra solid rounds in the body. To make a smaller bag, stop the base after Rnd 9 (72 sc).
- Substitute the yarn. Any worsted weight (category 4) yarn works — acrylic is softer and cheaper, cotton is sturdier and washable. Always crochet a gauge swatch with the new yarn first.
- Add a lining. Cut a circle and a rectangle of cotton fabric slightly smaller than the bag, sew them into a simple pouch, and stitch it inside the bag just below the casing for a finished, no-peek look.