Whispering Pines Forest Phone Sleeve Free Pattern
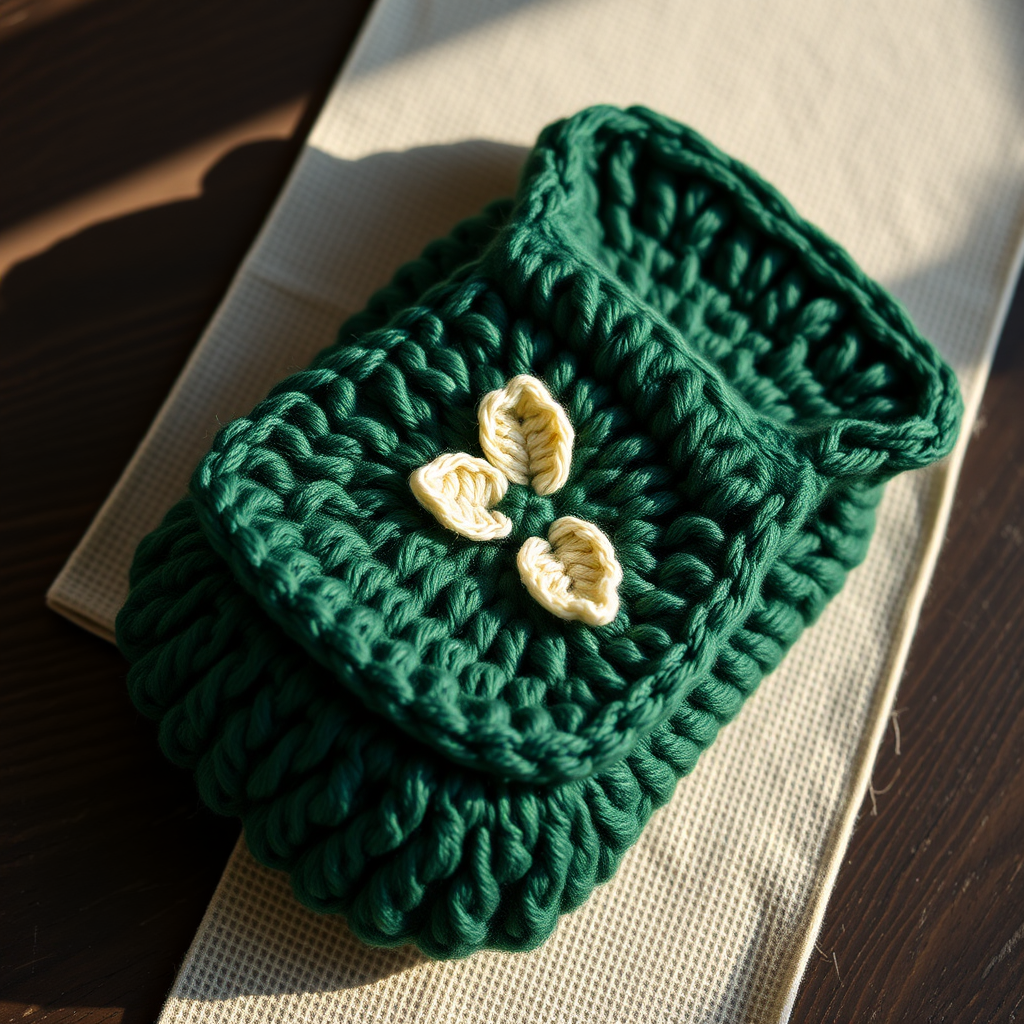
Whispering Pines Forest Phone Sleeve: A Free Beginner-Friendly Crochet Pattern
Imagine slipping your phone into a cozy, handcrafted pouch that feels like a tiny piece of a pine forest in your pocket. The Whispering Pines Forest Phone Sleeve is a delightful crochet project that combines simple stitches with a rich, textured design. Using a deep forest green yarn and a delicate cream leaf accent, this pouch is both protective and beautiful. Whether you're looking for a quick handmade gift or a personal project to brighten your everyday carry, this pattern is perfect for beginners and experienced crocheters alike. Let's dive into creating this woodland treasure together!
Materials Needed
Before you begin, gather the following materials to ensure a smooth and enjoyable crochet session:
- Yarn: Worsted weight (4) cotton or cotton-blend yarn in forest green (approx. 100g) and a small amount of cream for the leaf accent.
- Crochet Hook: 3.25 mm (D/3) crochet hook.
- Gauge: 17.5 stitches x 8.5 rows = 4 inches in single crochet. (Check your gauge to ensure the correct size.)
- Extras: Yarn needle for weaving in ends, scissors, and optionally a button for closure.
Step-by-Step Instructions
This pattern is worked in continuous rounds for the main body, then the flap is worked back and forth. The leaf accent is created separately and sewn on. Follow along carefully, and you'll have a beautiful phone sleeve in no time!
Abbreviations
- ch = chain
- sc = single crochet
- hdc = half double crochet
- dc = double crochet
- sl st = slip stitch
- st(s) = stitch(es)
Pattern Notes
Finished Size: Approximately 4 inches wide x 7 inches tall (fits most smartphones). The main body is worked in a spiral, so there's no need to join rounds. The flap is worked flat, and the leaf accent is sewn on at the end.
Main Body (Worked in Spiral)
- Round 1: With forest green yarn, make a magic ring. Work 8 sc into the ring. Pull the ring tight to close. (8 sts)
- Round 2: Work 2 sc in each stitch around. (16 sts)
- Round 3: *Sc in the next st, 2 sc in the next st* repeat around. (24 sts)
- Round 4: *Sc in the next 2 sts, 2 sc in the next st* repeat around. (32 sts)
- Round 5: *Sc in the next 3 sts, 2 sc in the next st* repeat around. (40 sts)
- Round 6: Sc in each stitch around. (40 sts)
- Rounds 7-18: Continue working sc in each stitch around until the piece measures approximately 5 inches from the center of the magic ring. Do not fasten off. This forms the body of the pouch.
Flap (Worked Back and Forth)
Now, you'll create the flap that folds over the top of your phone. This section is worked in rows, turning at the end of each row.
- Row 1: Ch 1, turn. Sc in the next 20 sts. Leave the remaining 20 sts unworked. (20 sts)
- Row 2: Ch 1, turn. Sc in each st across. (20 sts)
- Row 3: Ch 1, turn. Sc in the next 8 sts, 2 sc in the next st, sc in the next 2 sts, 2 sc in the next st, sc in the last 8 sts. (22 sts)
- Row 4: Ch 1, turn. Sc in each st across. (22 sts)
- Row 5: Ch 1, turn. Sc in the next 9 sts, 2 sc in the next st, sc in the next 2 sts, 2 sc in the next st, sc in the last 9 sts. (24 sts)
- Row 6: Ch 1, turn. Sc in each st across. (24 sts)
- Row 7: Ch 1, turn. Sc in the next 10 sts, 2 sc in the next st, sc in the next 2 sts, 2 sc in the next st, sc in the last 10 sts. (26 sts)
- Row 8: Ch 1, turn. Sc in each st across. (26 sts)
- Row 9: Ch 1, turn. Sc in the next 11 sts, 2 sc in the next st, sc in the next 2 sts, 2 sc in the next st, sc in the last 11 sts. (28 sts)
- Row 10: Ch 1, turn. Sc in each st across. (28 sts)
- Row 11: Ch 1, turn. Sc in the next 12 sts, 2 sc in the next st, sc in the next 2 sts, 2 sc in the next st, sc in the last 12 sts. (30 sts)
- Row 12: Ch 1, turn. Sc in each st across. (30 sts)
- Row 13: Ch 1, turn. Sc in the next 13 sts, 2 sc in the next st, sc in the next 2 sts, 2 sc in the next st, sc in the last 13 sts. (32 sts)
- Row 14: Ch 1, turn. Sc in each st across. (32 sts)
- Row 15: Ch 1, turn. Sc in the next 14 sts, 2 sc in the next st, sc in the next 2 sts, 2 sc in the next st, sc in the last 14 sts. (34 sts)
- Row 16: Ch 1, turn. Sc in each st across. (34 sts)
- Row 17: Ch 1, turn. Sc in the next 15 sts, 2 sc in the next st, sc in the next 2 sts, 2 sc in the next st, sc in the last 15 sts. (36 sts)
- Row 18: Ch 1, turn. Sc in each st across. (36 sts)
- Row 19: Ch 1, turn. Sc in the next 16 sts, 2 sc in the next st, sc in the next 2 sts, 2 sc in the next st, sc in the last 16 sts. (38 sts)
- Row 20: Ch 1, turn. Sc in each st across. (38 sts)
- Row 21: Ch 1, turn. Sc in the next 17 sts, 2 sc in the next st, sc in the next 2 sts, 2 sc in the next st, sc in the last 17 sts. (40 sts)
- Row 22: Ch 1, turn. Sc in each st across. (40 sts)
Fasten off and weave in all loose ends with your yarn needle.
Leaf Accent (Make 1)
This delicate leaf adds the perfect forest-inspired touch. Use your cream yarn for contrast.
- With cream yarn, ch 10.
- Row 1: Sc in the 2nd ch from the hook, hdc in the next ch, dc in the next 5 chs, hdc in the next ch, sc in the last ch. (9 sts)
- Row 2: Ch 1, turn. Sc in the first st, hdc in the next st, dc in the next 5 sts, hdc in the next st, sc in the last st. (9 sts)
Fasten off, leaving a long tail for sewing.
Finishing Touches
- Position the leaf accent on the center of the flap, just above the point where the flap begins to curve. Sew it securely using the long tail and your yarn needle.
- Weave in all remaining ends to keep your pouch neat and tidy.
- For extra security, you can add a button and a ch-loop closure on the front of the pouch. Simply sew a button to the front and create a small chain loop on the flap to fasten it.
And there you have it—a beautiful, textured Whispering Pines Forest Phone Sleeve that's as functional as it is charming. This project is a wonderful way to practice your crochet skills while creating something you'll use every day. Whether you keep it for yourself or gift it to a loved one, this little pouch is sure to bring a touch of woodland magic to anyone's daily routine. Happy crocheting!


