Sunset Meadow Market Tote Free Pattern
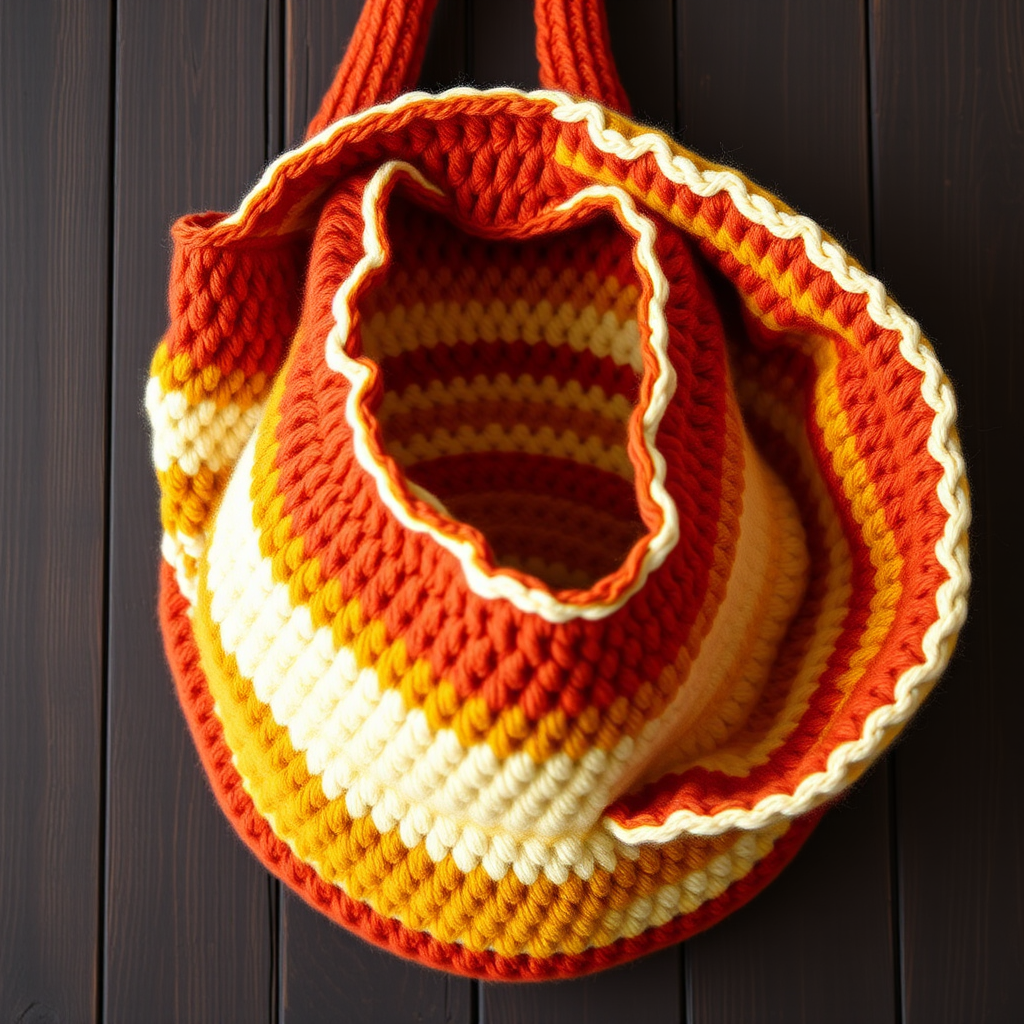
Sunset Meadow Market Tote Free Crochet Pattern
Imagine strolling through a sun-drenched farmers market or along a sandy beach with a bag that captures the warm, golden hues of a summer sunset. The Sunset Meadow Market Tote is a stunning, boho-inspired accessory that brings together the rich tones of terracotta, mustard, and cream in a beautiful, textured design. This free crochet pattern is perfect for intermediate beginners looking to create a stylish, functional, and eye-catching bag that will turn heads wherever you go.
With its soft, slouchy shape and subtle open mesh texture, this tote is as practical as it is beautiful. The integrated handles make it comfortable to carry, while the sturdy single crochet construction ensures it can handle your weekly groceries, beach essentials, or favorite books. Let's dive into this delightful project and create your very own piece of wearable sunset art!
Materials Needed
Before we begin our crochet journey, let's gather all the necessary supplies. Having everything ready will make the process smooth and enjoyable.
Yarn
- Color A (Terracotta): Worsted weight cotton yarn – approximately 250g (about 500-550 yards)
- Color B (Mustard): Worsted weight cotton yarn – approximately 250g (about 500-550 yards)
- Color C (Cream): Worsted weight cotton yarn – approximately 250g (about 500-550 yards)
Pro Tip: Cotton yarn is ideal for this project because it's durable, washable, and holds its shape beautifully. Look for a soft yet sturdy worsted weight cotton like Lion Brand 24/7 Cotton or Paintbox Yarns Cotton Aran.
Hook and Notions
- Crochet Hook: 5.5 mm (I-9) crochet hook
- Stitch Markers: At least 1 (to track the beginning of rounds)
- Yarn Needle: For weaving in ends and sewing seams
- Scissors: For cutting yarn
Gauge
14 single crochet (sc) x 16 rows = 4 inches in single crochet. Always check your gauge to ensure your bag turns out the correct size. If your gauge is off, adjust your hook size accordingly.
Step-by-Step Instructions
This beautiful tote is worked in continuous rounds from the bottom up, which means you won't join rounds with a slip stitch. Instead, you'll work in a spiral, using a stitch marker to track the beginning of each round. Place your marker in the first stitch of each round and move it up as you go.
Crochet Abbreviations
- sc: Single crochet
- ch: Chain
- st(s): Stitch(es)
- BLO: Back loop only
- sk: Skip
Part 1: Creating the Base
The base of your tote is a flat circle that will form the bottom of the bag. We'll start with Color A (terracotta).
Round 1: With Color A, make a magic ring. Work 8 single crochet (sc) into the ring. Pull the tail to close the ring tightly. (8 sts)
Round 2: Work 2 sc in each stitch around. (16 sts)
Round 3: *Sc in the next stitch, 2 sc in the next stitch* – repeat from * to * around. (24 sts)
Round 4: *Sc in the next 2 stitches, 2 sc in the next stitch* – repeat from * to * around. (32 sts)
Round 5: *Sc in the next 3 stitches, 2 sc in the next stitch* – repeat from * to * around. (40 sts)
Round 6: *Sc in the next 4 stitches, 2 sc in the next stitch* – repeat from * to * around. (48 sts)
Round 7: *Sc in the next 5 stitches, 2 sc in the next stitch* – repeat from * to * around. (56 sts)
Round 8: *Sc in the next 6 stitches, 2 sc in the next stitch* – repeat from * to * around. (64 sts)
Round 9: *Sc in the next 7 stitches, 2 sc in the next stitch* – repeat from * to * around. (72 sts)
Round 10: *Sc in the next 8 stitches, 2 sc in the next stitch* – repeat from * to * around. (80 sts)
Round 11: *Sc in the next 9 stitches, 2 sc in the next stitch* – repeat from * to * around. (88 sts)
Round 12: *Sc in the next 10 stitches, 2 sc in the next stitch* – repeat from * to * around. (96 sts)
Your base should now be a flat circle measuring approximately 8-9 inches in diameter. If it's curling up, your tension might be too tight; if it's ruffling, your tension might be too loose.
Part 2: Building the Body
Now we'll start building the sides of the bag. This is where the beautiful color gradient and textured pattern begin to emerge.
Round 13: With Color A, single crochet in the back loop only around. This creates a crisp, clean edge that helps the bag stand up nicely. (96 sts)
Round 14-16: With Color A, single crochet in both loops around. (96 sts each round)
Round 17: Switch to Color B (mustard). Single crochet in both loops around. (96 sts)
Round 18: With Color B, *sc in the next 3 stitches, chain 1, skip 1 stitch* – repeat from * to * around. This creates the first decorative mesh row. (96 sts, 24 ch-1 spaces)
Round 19: With Color B, sc in each sc and in each ch-1 space around. (96 sts)
Round 20-21: With Color B, single crochet in both loops around. (96 sts each round)
Round 22: Switch to Color C (cream). Single crochet in both loops around. (96 sts)
Round 23: With Color C, *sc in the next 3 stitches, chain 1, skip 1 stitch* – repeat from * to * around. (96 sts, 24 ch-1 spaces)
Round 24: With Color C, sc in each sc and in each ch-1 space around. (96 sts)
Round 25-26: With Color C, single crochet in both loops around. (96 sts each round)
Round 27: Switch to Color A (terracotta). Single crochet in both loops around. (96 sts)
Round 28: With Color A, *sc in the next 3 stitches, chain 1, skip 1 stitch* – repeat from * to * around. (96 sts, 24 ch-1 spaces)
Round 29: With Color A, sc in each sc and in each ch-1 space around. (96 sts)
Round 30-31: With Color A, single crochet in both loops around. (96 sts each round)
Round 32: Switch to Color B (mustard). Single crochet in both loops around. (96 sts)
Round 33: With Color B, *sc in the next 3 stitches, chain 1, skip 1 stitch* – repeat from * to * around. (96 sts, 24 ch-1 spaces)
Round 34: With Color B, sc in each sc and in each ch-1 space around. (96 sts)
Round 35-36: With Color B, single crochet in both loops around. (96 sts each round)
Round 37: Switch to Color C (cream). Single crochet in both loops around. (96 sts)
Round 38: With Color C, *sc in the next 3 stitches, chain 1, skip 1 stitch* – repeat from * to * around. (96 sts, 24 ch-1 spaces)
Round 39: With Color C, sc in each sc and in each ch-1 space around. (96 sts)
Round 40-41: With Color C, single crochet in both loops around. (96 sts each round)
Round 42: Switch to Color A (terracotta). Single crochet in both loops around. (96 sts)
Round 43: With Color A, *sc in the next 3 stitches, chain 1, skip 1 stitch* – repeat from * to * around. (96 sts, 24 ch-1 spaces)
Round 44: With Color A, sc in each sc and in each ch-1 space around. (96 sts)
Round 45-46: With Color A, single crochet in both loops around. (96 sts each round)
At this point, your bag body should measure approximately 10-11 inches tall from the base. The beautiful gradient of terracotta at the bottom, mustard in the middle, and cream at the top is now visible, with the subtle mesh rows adding lovely texture and breathability.
Part 3: Creating the Handle Openings
Now we'll create the integrated handles by working chain spaces that will become the armholes of your tote.
Round 47: With Color A, sc in the next 20 stitches, chain 25, skip 25 stitches, sc in the next 26 stitches, chain 25, skip 25 stitches, sc in the next 6 stitches. (96 sts + 50 ch)
Let's break this down: You're essentially dividing your 96 stitches into three sections: 20 stitches for the front panel, 26 stitches for the back panel, and the remaining 50 stitches (25 on each side) will be skipped to create the handle openings. The chain 25 bridges each gap.
Round 48: With Color A, sc in each sc and in each chain around. (146 sts)
Round 49: With Color A, single crochet in each stitch around. (146 sts)
Round 50: Switch to Color B (mustard). Single crochet in each stitch around. (146 sts)
Round 51: With Color B, single crochet in each stitch around. (146 sts)
Round 52: Switch to Color C (cream). Single crochet in each stitch around. (146 sts)
Round 53: With Color C, single crochet in each stitch around. (146 sts)
Fasten off and weave in all ends securely using your yarn needle. The contrasting color bands at the top add a beautiful finishing touch to the handles.
Part 4: Finishing Touches
Your Sunset Meadow Market Tote is almost complete! Here are the final steps to give it that polished, professional look.
Step 1: Shape the Base
Fold the bag flat so the handle openings align on top of each other. To create a flat, sturdy base, you can sew the bottom corners together. Simply thread your yarn needle with Color A yarn and stitch through the corners at the bottom of the bag, creating small triangles on each side. This will give your tote a nice, flat bottom that sits upright when placed on a surface.
Step 2: Weave in All Ends
Take your yarn needle and carefully weave in any remaining loose ends along the inside of the bag. Make sure to weave them through the stitches in a way that they're invisible from the outside and secure enough that they won't come undone with use.
Step 3: Optional Lining
While not required, adding a fabric lining can give your bag extra durability and prevent small items from slipping through the mesh openings. To add a lining, measure the interior dimensions of your bag, cut a fabric rectangle accordingly, sew it into a bag shape, and hand-stitch it to the inside top edge of your crochet work.
Step 4: Block Your Bag (Optional)
If your bag seems a bit wobbly or the stitches look uneven, you can gently block it. Mist the bag with water, shape it as desired, and let it dry completely. This will help the stitches relax and settle into place.
Care Instructions
To keep your Sunset Meadow Market Tote looking beautiful for years to come, hand wash it in cool water with a mild detergent. Gently squeeze out excess water (don't wring!) and lay it flat to dry, reshaping as needed. Avoid machine washing and drying, as this can cause the cotton to shrink or lose its shape.
Customization Ideas
One of the wonderful things about this pattern is how easily it can be customized to suit your personal style:
- Color Variations: Try ocean-inspired blues and teals, or soft pastels for a spring vibe. The pattern works beautifully with any three-color gradient.
- Size Adjustments: To make a smaller bag, stop increasing the base at Round 10 (80 sts) and adjust the body rounds accordingly. For a larger bag, continue increasing the base following the pattern's logic.
- Handle Length: Adjust the chain length in Round 47 to make longer shoulder straps or shorter handbag handles. Just remember to adjust the stitch count in Round 48 accordingly.
Your Sunset Meadow Market Tote is now complete! This beautiful, functional accessory is perfect for carrying your market finds, beach essentials, or everyday items in style. The warm gradient colors and textured mesh pattern make it a true statement piece that reflects the beauty of a golden sunset meadow.
We'd love to see your finished creation! Share your photos on social media with the hashtag #SunsetMeadowTote and tag us so we can admire your handiwork. Happy crocheting!


