Nora Lace Shawl Free Pattern – Heirloom Knitted Crescent Wrap
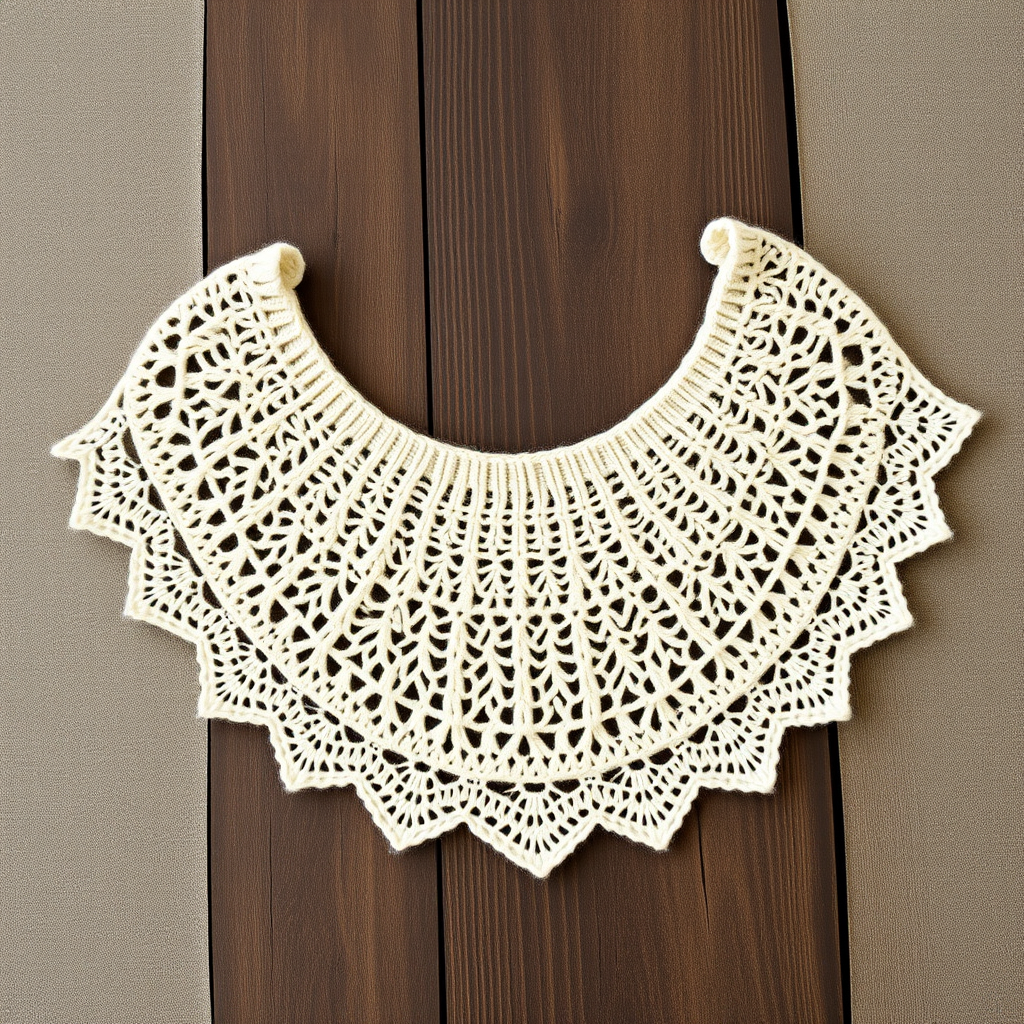
The Nora Lace Shawl: A Heirloom Crescent Wrap You Can Knit
There are certain knitting patterns that feel like more than just a project—they feel like a legacy. The Nora Lace Shawl is exactly that. This exquisite crescent-shaped wrap features cascading lace panels, a smooth garter stitch center, and a romantic scalloped edge that catches the light with every movement. Whether you're dressing up for a special occasion or simply want to add a touch of vintage elegance to your everyday wardrobe, this heirloom-quality pattern is surprisingly approachable for knitters ready to try lace for the first time.
Worked from the top center outward, the shawl grows gently with increases at the edges and center, creating that beautiful crescent curve that drapes so gracefully over the shoulders. The delicate, airy fabric is perfect for cool evenings, and the finished piece makes a thoughtful, handmade gift that will be treasured for generations. Let's dive into this free knitting pattern and create something truly special together.
Materials Needed
Before you begin, gather these supplies to ensure a smooth knitting experience:
- Yarn: Fingering weight yarn (approximately 400–450 yards). A merino-silk blend is ideal for its softness and subtle sheen, but any fingering weight yarn will work beautifully.
- Needles: US 6 (4.0 mm) circular knitting needle, 32 inches or longer. The long cord is essential to accommodate the growing number of stitches.
- Gauge: 20 stitches and 28 rows = 4 inches in stockinette stitch (blocked). Gauge is important for achieving the correct drape and size, so take a moment to swatch.
- Other tools: Stitch markers (at least 2), a tapestry needle for weaving in ends, and blocking pins or wires for finishing.
Understanding the Pattern Structure
This shawl is worked from the top center outwards in a crescent shape. You'll increase at the edges and center to create a gentle curve. The pattern uses simple lace stitches—yarn overs and decreases—that become rhythmic and meditative once you get going. Don't be intimidated by the lace; the repeats are short and logical.
Abbreviations
- k = knit
- p = purl
- yo = yarn over
- k2tog = knit two together (right-leaning decrease)
- ssk = slip, slip, knit (left-leaning decrease)
- pm = place marker
- sm = slip marker
- RS = right side
- WS = wrong side
Step-by-Step Instructions
Setup: Casting On and Marking Sections
Cast on 3 stitches. Knit 6 rows in garter stitch (knit every row). This creates a small tab.
Now, turn your work 90 degrees and pick up and knit 3 stitches along the side edge of the tab. Turn again and pick up and knit 3 stitches from the cast-on edge. You should now have 9 stitches total on your needle.
Place markers as follows: k3, pm, k3, pm, k3. The markers divide the shawl into three sections: left edge, center, and right edge. The center 3 stitches will remain in garter stitch throughout the entire pattern, providing a lovely structural contrast to the lace.
Increase Rows (RS)
Now we'll establish the shaping that creates the crescent form. The increases happen on right-side rows only, at the edges and on either side of the center marker.
Row 1 (RS): k3, yo, knit to marker, yo, sm, k3, sm, yo, knit to last 3 stitches, yo, k3. (4 increases made)
Row 2 (WS): k3, purl to last 3 stitches, k3. (No increases)
Repeat these two rows until you have 45 stitches total (approximately 9 repeats). The garter stitch edges and center will naturally form, and your shawl will begin to take shape.
Lace Pattern
Now the magic begins! You'll continue the edge increases on RS rows while working the lace pattern between the markers. The lace creates delicate eyelets and diagonal lines that give the shawl its airy, heirloom quality.
Row 1 (RS): k3, yo, *k2tog, yo* repeat from * to * until 2 stitches before marker, k2, sm, k3, sm, k2, *yo, ssk* repeat from * to * until 3 stitches before end, yo, k3. (Note: the center 3 stitches remain in garter stitch.)
Row 2 (WS): k3, purl to last 3 stitches, k3.
Row 3 (RS): k3, yo, *k1, yo, k2tog* repeat from * to * until 2 stitches before marker, k2, sm, k3, sm, k2, *ssk, yo, k1* repeat from * to * until 3 stitches before end, yo, k3.
Row 4 (WS): k3, purl to last 3 stitches, k3.
Repeat rows 1–4 until the shawl measures approximately 20 inches from the center cast-on edge, ending with a WS row. The shawl should have a gentle crescent shape, with the wings extending outward gracefully.
Scalloped Edge
The scalloped border is the crowning glory of the Nora Lace Shawl. It flares gently and adds a romantic, feminine finish. Work the scalloped edge on the RS as follows:
Row 1 (RS): k3, yo, *k2tog, yo* repeat to marker, sm, k3, sm, *yo, ssk* repeat to last 3 stitches, yo, k3.
Row 2 (WS): k3, purl to last 3 stitches, k3.
Row 3 (RS): k3, yo, *k1, yo, k2tog* repeat to marker, sm, k3, sm, *ssk, yo, k1* repeat to last 3 stitches, yo, k3.
Row 4 (WS): k3, purl to last 3 stitches, k3.
Row 5 (RS): k3, yo, *k2tog, yo* repeat to marker, sm, k3, sm, *yo, ssk* repeat to last 3 stitches, yo, k3.
Row 6 (WS): Bind off loosely in purl. This loose bind-off is crucial—it allows the scallops to flare beautifully and prevents the edge from pulling.
Finishing and Blocking
Weave in all ends with your tapestry needle, being careful to keep them hidden within the garter stitch edges.
Now for the most important step: blocking. This is what transforms your knitting from a crumpled fabric into a stunning lace shawl. Soak the shawl in lukewarm water with a gentle wool wash for 20 minutes. Gently squeeze out excess water—do not wring or twist.
Lay the shawl flat on a clean towel and roll it up to remove more water. Then, pin out the shawl to shape on a blocking mat or padded surface. Stretch the lace points and scallops to open up the pattern and define the holes. Allow it to dry completely, preferably overnight. Blocking is essential to reveal the true beauty of the lace—the yarn overs will open into delicate, defined holes that catch the light beautifully.
Tips for Success
- Count your stitches after each lace repeat to catch mistakes early. The pattern is forgiving, but a stitch count check keeps everything aligned.
- Use lifelines if you're new to lace. Thread a contrasting piece of waste yarn through your stitches after each repeat. If you make a mistake, you can easily rip back to the lifeline without losing your work.
- Block generously—the lace needs room to open up. Don't be shy about stretching the scallops and points.
The Nora Lace Shawl is more than just a knitting project; it's an heirloom in the making. Whether you keep it for yourself or gift it to someone special, this crescent wrap will be cherished for years to come. The combination of classic lace and modern simplicity makes it a timeless piece that transcends trends. So pour yourself a cup of tea, settle into your favorite chair, and let the rhythm of the yarn overs and decreases carry you to a place of calm creativity. Happy knitting!


