Meadow Breeze Market Tote Free Crochet Pattern
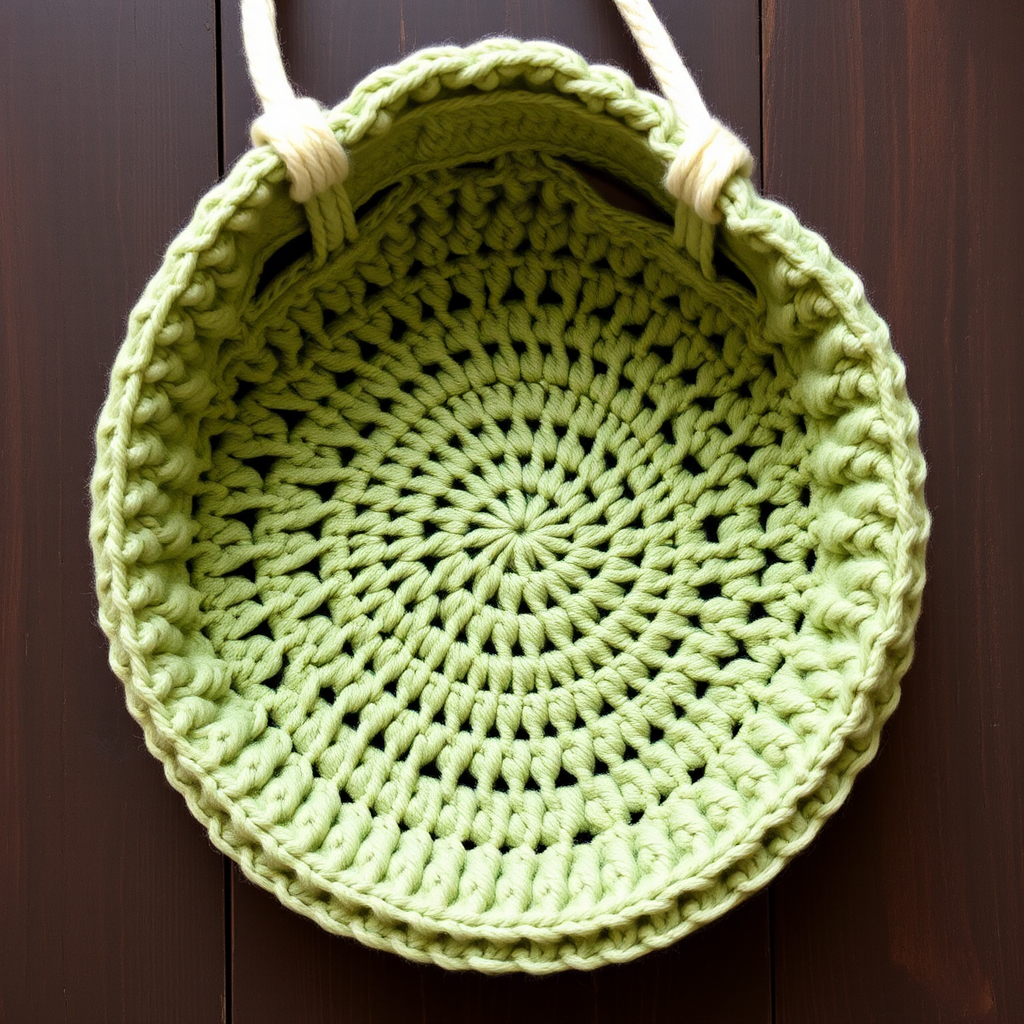
Introducing the Meadow Breeze Market Tote
Imagine strolling through a sun-drenched farmers' market, your hands free to sample fresh berries and pick out the perfect bouquet, all while carrying your essentials in a bag that's as beautiful as it is practical. That's the magic of the Meadow Breeze Market Tote. This free crochet pattern combines an airy, textured body with a sturdy, solid base, creating a functional and fashionable accessory you'll reach for all summer long.
Using a simple combination of shell stitches and basic double crochet, this pattern is surprisingly beginner-friendly while still producing a professional, "boho-chic" result. The soft sage green and cream colorway evokes a sense of calm, natural elegance, but this tote is a blank canvas—feel free to experiment with your own favorite hues to match your personal style. Whether you're heading to the beach, the bookstore, or the local co-op, this roomy, cylindrical bag is the perfect companion. Let's get started on crafting your new favorite carryall!
Materials Needed
Before you begin, gather your supplies. This project is portable and quick to work up, making it ideal for on-the-go crafting.
- Yarn: Worsted weight cotton yarn (e.g., Lily Sugar'n Cream) in two colors:
- Main Color (MC): Sage Green – approximately 250-300 yards
- Contrast Color (CC): Cream – approximately 100-150 yards
- Crochet Hook: 5.0 mm (H/8) crochet hook
- Other: Yarn needle for weaving in ends, scissors
Gauge: 14 dc x 8 rows = 4 inches. Gauge is not critical for this project, but maintaining consistent tension throughout will ensure your bag is even and well-shaped.
Step-by-Step Instructions
This bag is worked in continuous rounds from the bottom up. We'll start with a solid, circular base, then transition to the beautiful, lacy shell stitch body. Don't be intimidated—we'll take it one step at a time.
Part 1: Creating the Sturdy Base
We'll begin with a magic ring or a simple chain ring to form the center of the bag's bottom.
Foundation: With MC, ch 4, sl st to form a ring.
- Rnd 1: Ch 3 (counts as dc), 11 dc in ring, sl st to top of ch-3. (12 dc)
- Rnd 2: Ch 3, dc in same st, 2 dc in each st around, sl st to top of ch-3. (24 dc)
- Rnd 3: Ch 3, dc in same st, dc in next st, *2 dc in next st, dc in next st* repeat around, sl st to top of ch-3. (36 dc)
- Rnd 4: Ch 3, dc in same st, dc in next 2 sts, *2 dc in next st, dc in next 2 sts* repeat around, sl st to top of ch-3. (48 dc)
- Rnd 5: Ch 3, dc in same st, dc in next 3 sts, *2 dc in next st, dc in next 3 sts* repeat around, sl st to top of ch-3. (60 dc)
- Rnd 6: Ch 1, sc in each st around, sl st to first sc. (60 sc) – This single crochet round creates a clean, crisp edge to separate the base from the body.
Part 2: Working the Lacy Body
Now we'll switch to the shell stitch pattern that gives the Meadow Breeze Tote its airy, textured look. This section is where the bag truly comes to life.
- Rnd 7: Ch 3 (counts as dc), dc in next 4 sts, ch 2, skip 2 sts, *dc in next 5 sts, ch 2, skip 2 sts* repeat around, sl st to top of ch-3. (You will have 10 groups of 5 dc, with ch-2 spaces between them.)
- Rnd 8: Ch 3, 4 dc in the first ch-2 space (this makes a 5-dc shell), ch 1, *skip the next 5 dc group, 5 dc in the next ch-2 space, ch 1* repeat around, sl st to top of ch-3. (10 shells)
- Rnd 9: Ch 3, 4 dc in the ch-1 space (between shells), ch 1, *5 dc in the next ch-1 space, ch 1* repeat around, sl st to top of ch-3. (10 shells)
- Rnd 10-20: Repeat Rnd 9. (You can adjust the number of rounds for your desired depth. 20 rounds total for the body will give you a bag approximately 12 inches deep.)
Pro Tip: As you work, you'll see the shells naturally stagger, creating a beautiful, interlocking diamond pattern. This is the signature look of the Meadow Breeze Tote.
Part 3: Finishing the Top Edge
Once your bag reaches the desired depth, we'll add a few solid rounds of single crochet to create a sturdy, clean top edge.
- Rnd 21: Ch 1, sc in each dc and in each ch-1 space around, sl st to first sc. (You will have 60 sc)
- Rnd 22: Ch 1, sc in each st around, sl st to first sc. (60 sc)
Part 4: Adding the Handles
Now for the final touch—creating the sturdy, comfortable handles. We'll use a chain to create the handle openings, then reinforce them with single crochet.
- Rnd 23: Ch 1, sc in next 15 sts, ch 30 (for handle), skip 15 sts, sc in next 15 sts, ch 30, skip 15 sts, sl st to first sc. (You now have two handle openings.)
- Rnd 24: Ch 1, sc in each sc and in each ch across the handle, sl st to first sc. (For handle: sc in each of the 30 ch, then sc in the 15 sc on the other side, repeat for second handle.)
- Rnd 25: Ch 1, sc in each st around, sl st to first sc. Fasten off and weave in all ends securely.
Finishing Touches
Your Meadow Breeze Market Tote is almost complete! To give it a professional, polished look, take a moment to block the bag. Lightly mist it with water and shape it to your desired dimensions, then let it air dry completely. This will help even out your stitches and give the bag a beautiful drape.
Optional: If you prefer a more structured bag or want to carry smaller items without them slipping through the lacy holes, you can sew in a fabric lining. Simply create a simple tube of fabric that fits inside the bag, sew it to the top edge, and you're done!
Weave in any remaining ends, and your beautiful, handmade Meadow Breeze Market Tote is ready for its debut. Enjoy your new favorite accessory, and happy crocheting!


