Grey Cat Granny Square Tote: Free Crochet Pattern
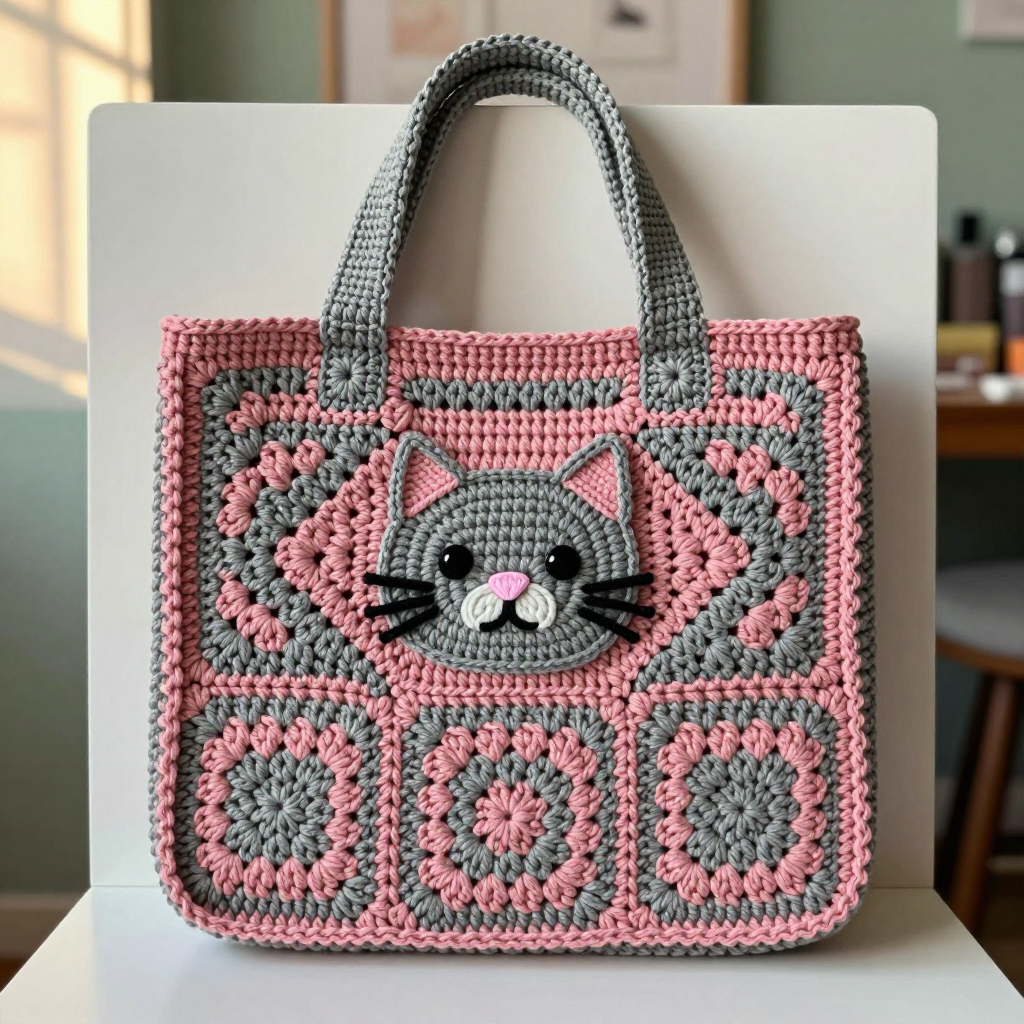
Grey Cat Granny Square Tote: Free Crochet Pattern
Introduction
If you have never held a crochet hook before, this tote is the perfect first project to fall in love with. It is made from four simple granny squares — the most famous and forgiving crochet shape in the world — joined into a sturdy little bag and topped with two short handles. The finished tote is about 10 inches wide and 10 inches tall, soft but strong enough for everyday errands, and it looks like a boutique find with its dusty rose and grey diagonal checkerboard. Best of all, a flat kawaii cat face gets stitched on the front at the very end, turning your practice piece into something you will actually want to carry everywhere. Every stitch is explained below, so you can start today with zero experience.
Materials Needed
- Yarn: Worsted weight (medium, CYC #4) acrylic or cotton-blend yarn — approximately 220 yd (200 m) dusty rose and 220 yd (200 m) medium grey. Small amounts of black (about 10 yd) and pale pink (about 5 yd) for the cat face.
- Crochet hook: US H-8 / 5.0 mm (or whatever size you need to match gauge).
- Stitch markers (at least 4) — small clips or safety pins work fine.
- Tapestry needle — a big-eyed, blunt-tipped needle for sewing seams and weaving in ends.
- Scissors — sharp, small ones are easiest.
- Finished size: Bag body 10 in (25.4 cm) wide x 10 in (25.4 cm) tall (2 squares wide x 2 squares tall). Each square is 5 x 5 in (12.7 x 12.7 cm). Handles are 6 in (15.2 cm) long and about 1 in (2.5 cm) wide. Cat appliqué is about 4 in (10.2 cm) wide.
Abbreviations and Beginner Glossary
- ch – chain. Make a loop of yarn on the hook, wrap yarn over the hook, and pull it through the loop. That is one chain stitch.
- sl st – slip stitch. Insert hook into the stitch, wrap yarn over, and pull it through both the stitch and the loop on your hook at once. It makes a nearly invisible join.
- sc – single crochet. Insert hook into stitch, wrap yarn over, pull up a loop (2 loops on hook), wrap yarn over again, pull through both loops. One sc made.
- dc – double crochet. Wrap yarn over hook first, insert into stitch, pull up a loop (3 loops on hook), wrap yarn over, pull through 2 loops, wrap yarn over, pull through last 2 loops.
- hdc – half double crochet. Wrap yarn over, insert into stitch, pull up a loop (3 loops on hook), wrap yarn over, pull through all 3 loops at once.
- tr – treble crochet. Wrap yarn over twice, insert into stitch, pull up a loop, then pull through 2 loops three times. (Not used in this pattern, but good to know.)
- sp – space. The little gap formed by a chain (a "ch-2 sp" is the gap made by two chains).
- st(s) – stitch(es).
- beg – beginning.
- rep – repeat. Do the instruction again the number of times stated.
- MR – magic ring. A loop of yarn you crochet into that pulls closed tight, leaving no hole. If it feels tricky, you can chain 4 and join into a ring instead.
- turn – flip your work over so you crochet back the other way.
- fasten off – cut the yarn a few inches from the work and pull the tail through the last loop to lock it.
- right sides together – the "pretty" outside faces of two pieces touching each other, with the messy backs facing out.
Gauge
Gauge: 1 granny square = 5 x 5 in (12.7 x 12.7 cm) after blocking. Each round of the square adds about 0.5 in (1.3 cm) per side.
Why gauge matters: Gauge is how big your stitches come out. If your stitches are bigger than the pattern expects, your bag will be larger than 10 inches and the handles may not line up; if smaller, the bag shrinks. How to check: Crochet one complete granny square (Rounds 1–5 below) and lay it flat. Measure across the middle. If it is bigger than 5 inches, try a smaller hook (US G-6 / 4.0 mm); if smaller, try a larger hook (US I-9 / 5.5 mm). Your square does not need to be perfect — close is fine for a tote.
Beginner Tips Before You Start
- Count every round. Granny squares grow by threes, so the stitch count in parentheses is your safety net. If a count is off, fix it before moving on.
- Do not pull your yarn tight. Tension should feel relaxed. Tight stitches make a stiff, small bag and sore hands.
- Use a stitch marker in the first stitch of each round so you always know where to join.
- Keep your chains loose. The ch-2 corner spaces need room for the next round's hook to slide in.
- Weave in ends as you go. It is much easier to hide a tail now than at the very end.
- Block before joining. A quick steam or spritz-and-pin makes all four squares the same size so seams lie flat.
Step-by-Step Instructions
Granny Square (make 4: 2 dusty rose, 2 grey)
Work in joined rounds; you do not turn. Each round begins with a ch-3, which counts as your first dc.
Round 1: With chosen square color, make a MR. Ch 3 (counts as first dc), 2 dc into ring, [ch 2, 3 dc into ring] 3 times, ch 2, join with sl st to top of beg ch-3. (12 dc, 4 ch-2 sps)
Round 2: Sl st into next 2 dc and into first ch-2 sp. Ch 3, (2 dc, ch 2, 3 dc) into same ch-2 sp, ch 1, *(3 dc, ch 2, 3 dc) into next ch-2 sp, ch 1; rep from * around, join with sl st to top of beg ch-3. (24 dc, 4 ch-2 corner sps, 4 ch-1 sps)
Round 3: Sl st into next 2 dc and into first ch-2 sp. Ch 3, (2 dc, ch 2, 3 dc) into same sp, ch 1, 3 dc into next ch-1 sp, ch 1, *(3 dc, ch 2, 3 dc) into next corner ch-2 sp, ch 1, 3 dc into next ch-1 sp, ch 1; rep from * around, join with sl st to top of beg ch-3. (36 dc, 4 corner sps, 8 ch-1 sps)
Round 4: Sl st into next 2 dc and into first ch-2 sp. Ch 3, (2 dc, ch 2, 3 dc) into same sp, ch 1, [3 dc into next ch-1 sp, ch 1] twice, *(3 dc, ch 2, 3 dc) into next corner ch-2 sp, ch 1, [3 dc into next ch-1 sp, ch 1] twice; rep from * around, join with sl st to top of beg ch-3. (48 dc, 4 corner sps, 12 ch-1 sps)
Round 5: Sl st into next 2 dc and into first ch-2 sp. Ch 3, (2 dc, ch 2, 3 dc) into same sp, ch 1, [3 dc into next ch-1 sp, ch 1] 3 times, *(3 dc, ch 2, 3 dc) into next corner ch-2 sp, ch 1, [3 dc into next ch-1 sp, ch 1] 3 times; rep from * around, join with sl st to top of beg ch-3. (60 dc, 4 corner sps, 16 ch-1 sps)
Fasten off and weave in ends. Square should measure about 5 x 5 in (12.7 x 12.7 cm). Block lightly if needed.
Joining the Squares
Arrange your four squares in a 2 x 2 grid, alternating colors diagonally: top row = dusty rose, grey; bottom row = grey, dusty rose.
Seams: Hold two squares with right sides together. Work sc evenly through both layers along the edge, placing about 1 sc per dc or ch-1 sp. Join the vertical seams first, then the horizontal seams. Fasten off and weave in ends.
Border
Round 1: With dusty rose, join yarn at any corner of the joined panel. Ch 1, sc evenly around the entire outer edge, working 3 sc in each corner to keep corners flat. Join with sl st to first sc. (Work 1 sc per stitch or space along the edges.)
Round 2: Ch 1, sc in each sc around, 3 sc in each corner. Join with sl st. Fasten off and weave in ends.
Handles (make 2)
With grey, leave a 6-in (15.2 cm) tail. Ch 41.
Row 1: Sc in 2nd ch from hook and in each ch across. (40 sc)
Row 2: Ch 1, turn, sc in each sc across. (40 sc)
Fasten off, leaving a long tail for sewing. Handle measures about 6 in (15.2 cm) long and 1 in (2.5 cm) wide. Make the second handle identically.
Cat-Face Appliqué
Work the head in grey, features in black, nose in pale pink.
Head (make 1, grey):
Round 1: MR, ch 1, 6 sc into ring, join with sl st to first sc. (6 sc)
Round 2: Ch 1, 2 sc in each sc around, join with sl st. (12 sc)
Round 3: Ch 1, [2 sc in next sc, sc in next sc] 6 times, join with sl st. (18 sc)
Round 4: Ch 1, [2 sc in next sc, sc in next 2 sc] 6 times, join with sl st. (24 sc)
Round 5: Ch 1, [2 sc in next sc, sc in next 3 sc] 6 times, join with sl st. (30 sc)
Fasten off, leaving a long tail for sewing. Head measures about 2.5 in (6.4 cm) across.
Ears (make 2, grey): Ch 2.
Row 1: 2 sc in 2nd ch from hook. (2 sc)
Row 2: Ch 1, turn, 2 sc in each sc across. (4 sc)
Row 3: Ch 1, turn, sc in each sc across. (4 sc)
Fasten off, leaving a tail. Sew one ear to each upper side of the head, slightly angled outward.
Eyes (make 2, black): MR, ch 1, 5 sc into ring, join with sl st to first sc. Fasten off, leaving a tail. (5 sc)
Nose (make 1, pale pink): Ch 2.
Row 1: 2 sc in 2nd ch from hook. (2 sc)
Row 2: Ch 1, turn, sc in each sc across. (2 sc)
Fasten off, leaving a tail.
Whiskers (black yarn): Cut 6 strands of black yarn, each about 2 in (5.1 cm) long. Using the tapestry needle, thread 3 strands through each side of the face near the nose, knotting on the back to secure. Trim ends evenly.
Assembly and Finishing
Attach the handles: Lay the bag flat. Measure 2 in (5.1 cm) in from each side edge along the top. Pin one handle end at each mark, with the handle ends about 1 in (2.5 cm) overlapping the top edge on the inside. Using matching yarn and the tapestry needle, sew the handle ends securely to the bag with a box-and-X stitch (sew a square around the end, then an X across it — this spreads the strain so the handle will not pull out). Repeat for the second handle on the opposite side.
Attach the cat face: Pin the head to the center front of the bag, about 2 in (5.1 cm) below the top edge. Sew in place with matching grey yarn using small, neat stitches around the edge. Sew the eyes in place, then the nose.
Weave in ends: Thread each tail onto the tapestry needle and run it through the back of several stitches, changing direction once, then trim close.
Block: Lightly steam or spritz the bag and pat it into shape (10 x 10 in). Let it dry flat. This settles the stitches and makes the squares lie flat.
Pro Tips and Variations
- Change the colors: Swap dusty rose for mustard or sage, or make all four squares the same color for a calmer, modern look. The cat can be any color too — a black cat on a cream bag is adorable.
- Resize the bag: Add a sixth round to each square for a bigger tote (about 12 x 12 in), or use a 3 x 3 grid for a market bag. Just add more yarn — about 55 yd per extra round across four squares.
- Substitute yarn: Cotton or cotton-blend gives a crisper, washable bag; acrylic is softer and cheaper. Always match the worsted weight and check your gauge square again.
- Make it sturdier: Add a fabric lining sewn in by hand, or work the handles in hdc instead of sc for a thicker, stronger strap.


