Free Pattern: Grey Basket Band Knit Cap with Rose Lemon Appliqué for Babies
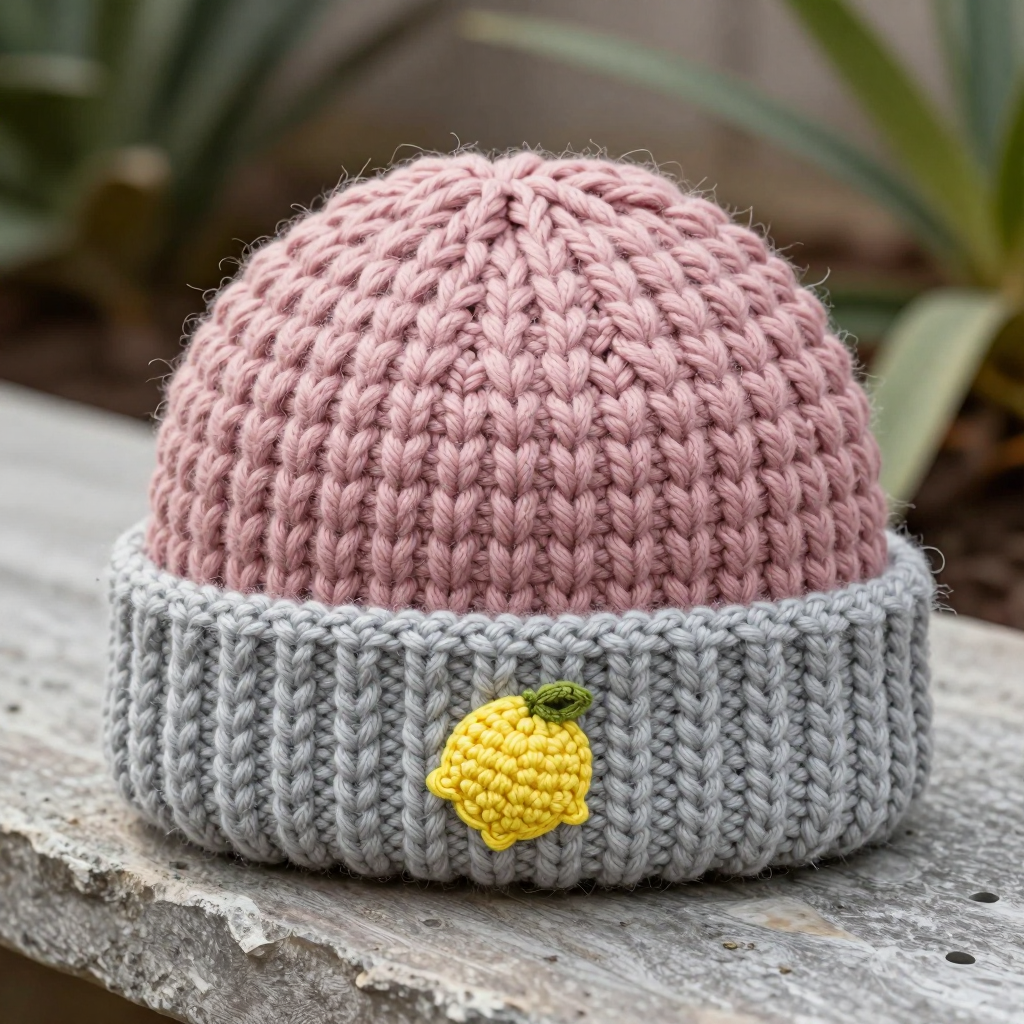
Free Pattern: Grey Basket Band Knit Cap with Rose Lemon Appliqué for Babies
Introduction
This cozy little cap is the perfect first "real" knitting project for anyone who has just learned to knit and purl. It is worked almost entirely in a simple basketweave texture — a chunky checkerboard of knit and purl blocks — so you only ever need two stitches to make something that looks impressively woven. The hat features a dusty rose crown, a wide medium grey cuff that folds up for extra warmth, and one tiny soft lemon appliqué crocheted in sunny yellow and stitched onto the front. Made from plush chenille yarn, the finished cap feels velvety and cloud-soft against a baby's head, with a rounded dome shape that sits snugly and stretches gently to fit. Sized for 6–12 months, it is a quick weekend gift that looks boutique-made but is genuinely beginner-friendly.
Materials Needed
- Yarn: Chenille plush yarn, super bulky (weight category 6), approx. 120 yds total: 70 yds dusty rose, 40 yds medium grey, 10 yds soft lemon yellow.
- Knitting needles: US 10 (6.0 mm) 16" circular needle, plus a set of US 10 (6.0 mm) double-pointed needles (DPNs) for the top of the crown.
- Crochet hook: US G-6 (4.0 mm) for the lemon appliqué.
- Stitch marker (one, to mark the beginning of the round).
- Tapestry needle (blunt-tipped, large eye) for seaming and weaving in ends.
- Scissors.
- Finished size: 6–12 months. Circumference approx. 16" (40.5 cm) unstretched, stretching to fit a 17–18" (43–46 cm) head; height approx. 7" (18 cm) with the cuff turned up.
Abbreviations and Beginner Glossary
- K (knit): Insert the right needle into the front of the stitch from left to right, wrap the yarn around, and pull a loop through. This makes a smooth "V" bump.
- P (purl): Insert the right needle into the front of the stitch from right to left, wrap the yarn around, and pull a loop through. This makes a bumpy texture.
- k2tog (knit 2 together): Insert your needle through the next two stitches at once and knit them as one. This decreases your stitch count by one.
- p2tog (purl 2 together): Purl the next two stitches together as one. This also decreases by one stitch.
- sts (stitches): The loops on your needle.
- rep (repeat): Do the instruction again.
- round: One complete circle of knitting when working in the round (in a tube).
- sc (single crochet): Insert hook into stitch, pull up a loop, yarn over, pull through both loops on the hook.
- ch (chain): Yarn over and pull through the loop on your hook — makes one chain.
- sl st (slip stitch): Insert hook, yarn over, pull through both the stitch and the loop on your hook at once.
- magic ring: A loop of yarn you crochet into, then pull closed to make a tight center with no hole.
- dec (decrease): A row/round where you reduce the number of stitches.
Gauge
12 sts and 14 rows = 4" (10 cm) in basketweave pattern on US 10 needles, slightly stretched.
Why gauge matters: Gauge is how many stitches and rows fit into one inch. If your stitches are bigger than mine, the hat will be too big; if smaller, it may not fit. How to swatch: Cast on 24 sts, work 16 rows of basketweave (K4, P4 for 4 rows, then P4, K4 for 4 rows, repeat), and measure a 4" section in the middle. If you have more than 12 sts, go up a needle size; if fewer, go down.
Beginner Tips Before You Start
- Use a stitch marker. Place it at the join so you always know where each round begins — it prevents accidental spiraling.
- Don't pull the yarn tight. Chenille is fuzzy and grippy; keep your tension relaxed so the fabric stays plush and stretchy.
- Count your blocks, not your stitches. Basketweave is just groups of 4 knits and 4 purls — check that each block is 4 wide.
- Switch to DPNs early. When the hat gets too small to stretch around the circular needle, move to double-pointed needles before it feels tight.
- Keep the first round untwisted. Before joining, lay the cast-on edge flat and make sure no stitch is twisted around the needle.
Step-by-Step Instructions
Basketweave Stitch (multiple of 8 sts)
Rounds 1–4: *K4, P4; rep from * around.
Rounds 5–8: *P4, K4; rep from * around.
Repeat Rounds 1–8 for the pattern.
Band (worked in grey)
With grey chenille and the circular needle, cast on 48 sts. Join in the round, being careful not to twist; place marker.
Rounds 1–4: *K4, P4; rep from * around. (48 sts)
Rounds 5–8: *P4, K4; rep from * around. (48 sts)
Rounds 9–16: Repeat Rounds 1–8 once more. (48 sts — 16 rounds total, approx. 4.5"/11.5 cm)
Break grey, leaving a 6" tail.
Crown (worked in dusty rose)
Join dusty rose. Work in basketweave pattern as established for 12 rounds (approx. 3.5"/9 cm). (48 sts)
Shape Crown
Change to double-pointed needles when the stitches no longer fit comfortably on the circular needle.
Round 1 (dec): *K2, k2tog, P4; rep from * around — (42 sts)
Round 2: *K3, P4; rep from * around. (42 sts)
Round 3 (dec): *K3, P2, p2tog; rep from * around — (36 sts)
Round 4: *K3, P3; rep from * around. (36 sts)
Round 5 (dec): *K1, k2tog, P3; rep from * around — (30 sts)
Round 6: *K2, P3; rep from * around. (30 sts)
Round 7 (dec): *K2, P1, p2tog; rep from * around — (24 sts)
Round 8: *K2, P2; rep from * around. (24 sts)
Round 9 (dec): *k2tog, P2; rep from * around — (18 sts)
Round 10 (dec): *K1, p2tog; rep from * around — (12 sts)
Round 11 (dec): *k2tog; rep from * around — (6 sts)
Break yarn, thread through the remaining 6 sts, pull tight, and secure on the wrong side.
Lemon Appliqué (crocheted in soft lemon yellow)
With the 4.0 mm hook, make a magic ring.
Round 1: Ch 1, 6 sc into ring, join with sl st — (6 sc)
Round 2: Ch 1, 2 sc in each sc around, join — (12 sc)
Round 3: Ch 1, *2 sc in next sc, sc in next sc; rep from * around, join — (18 sc)
Round 4: Ch 1, sc in each sc around, join. Fasten off, leaving a 10" tail. (18 sc)
Shape lemon: Pinch the circle into a slight oval and use the tail to sew a tiny 3-stitch nub at each end to suggest lemon tips. Weave in ends.
Assembly and Finishing
Turn the cuff: Fold the grey band up about 2" (5 cm) so the basketweave texture shows on the outside.
Attach the lemon: Center the lemon appliqué on the front of the cuff. Thread a tapestry needle with matching yellow yarn and stitch it in place with small, even stitches, catching only the surface of the knit so the stitches don't show on the inside.
Weave in ends: Thread each tail onto the tapestry needle and weave it back and forth through the wrong side of the fabric for about 1", then trim close.
Block lightly: Mist the hat with water, shape it flat into a dome, and let it dry. Do not press with an iron — heat will crush the chenille pile.
Pro Tips and Variations
- Color swap: Try a sage green cuff with a cream crown, or a mustard cuff with a rust crown for a warmer desert-boho look.
- Size up or down: For a newborn, cast on 40 sts (multiple of 8) and stop the crown shaping one round earlier; for 12–24 months, cast on 56 sts and add 4 extra rounds before shaping.
- Yarn substitution: Any super bulky (category 6) yarn works — just swatch first, since chenille and wool behave differently.
- Appliqué options: Swap the lemon for a tiny crocheted star, heart, or flower to match a nursery theme.


