Boho Bloom Market Tote Free Pattern
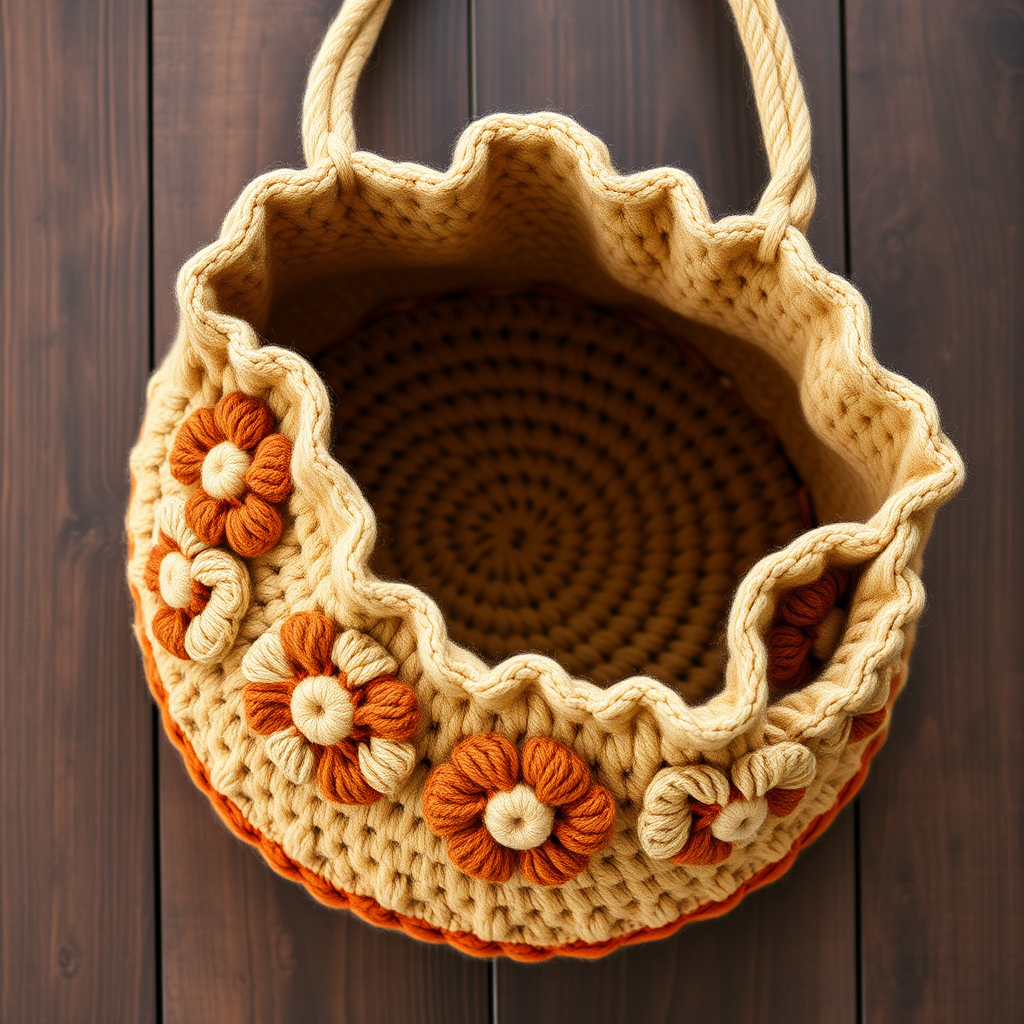
Boho Bloom Market Tote: A Free Crochet Pattern for Your Everyday Style
There's something truly special about carrying a handmade bag—it's not just an accessory, it's a statement of creativity, patience, and personal style. Today, I'm thrilled to share a pattern that has captured my heart: the Boho Bloom Market Tote. This stunning, textured crochet bag combines earthy, warm tones with a delicate floral motif that adds a touch of bohemian charm to any outfit. Whether you're heading to the farmer's market, the beach, or simply running errands, this tote is the perfect companion. The best part? It's a free pattern designed with beginners in mind, so you can create a beautiful, functional piece even if you're just starting your crochet journey.
This pattern is a joy to work up. The base is worked in a continuous spiral, creating a sturdy, flat circle that forms the foundation of the bag. From there, the body rises in simple single crochet rounds before blossoming into a gorgeous floral panel featuring terracotta petals and olive green accents. The result is a bag that feels both rustic and refined, with a soft, textured surface that begs to be touched. Let's dive into everything you'll need to create your very own Boho Bloom Market Tote.
Materials Needed
Before we begin, let's gather all the supplies you'll need. This pattern calls for simple, accessible materials that you can find at any craft store or online. Here's your complete shopping list:
Yarn
- Main Color (MC) - Sand: Worsted weight cotton yarn (approximately 400-450 yards). This will be the primary color of your bag, providing a warm, neutral base.
- Accent Color 1 (AC1) - Terracotta: Worsted weight cotton yarn (approximately 100-120 yards). This beautiful earthy orange-brown will be used for the main flower petals.
- Accent Color 2 (AC2) - Olive Green: Worsted weight cotton yarn (approximately 50-60 yards). This muted green adds the perfect touch of nature to your floral motif.
Pro tip: Cotton yarn is ideal for this project because it's durable, washable, and holds its shape beautifully. The worsted weight ensures your bag is sturdy enough to carry your essentials without stretching out of shape.
Hook and Notions
- 5.5 mm crochet hook (I/9) - This hook size pairs perfectly with worsted weight yarn to create a tight, dense fabric.
- Stitch markers - Essential for keeping track of your rounds, especially when working in continuous spirals.
- Yarn needle - For weaving in ends and sewing the handles securely.
- Scissors - A sharp pair for clean cuts.
Gauge
14 single crochet stitches x 16 rows = 4 inches square
While gauge isn't critical for a bag (a little looser or tighter won't ruin the project), it's always good practice to check. If your gauge is significantly off, your bag may end up larger or smaller than intended. Adjust your hook size if needed to match the gauge.
Step-by-Step Instructions
Now, let's get to the fun part! This pattern is worked from the bottom up, starting with a magic ring and building outward. I've broken down each section to make it as clear and easy to follow as possible. Remember to work in continuous rounds unless otherwise stated, and use your stitch marker to mark the beginning of each round.
Part 1: The Base
The base of your tote is a flat circle that will become the bottom of your bag. We'll be increasing in each round to keep the circle flat and even. Here's how to create it:
Round 1: With MC, make a magic ring, chain 1, work 8 single crochet (sc) into the ring. Pull the tail to tighten the ring closed. (8 stitches)
Round 2: Work 2 sc in each stitch around. (16 stitches)
Round 3: *Sc in the next stitch, 2 sc in the next stitch* repeat from * to * around. (24 stitches)
Round 4: *Sc in the next 2 stitches, 2 sc in the next stitch* repeat around. (32 stitches)
Round 5: *Sc in the next 3 stitches, 2 sc in the next stitch* repeat around. (40 stitches)
Round 6: *Sc in the next 4 stitches, 2 sc in the next stitch* repeat around. (48 stitches)
Round 7: *Sc in the next 5 stitches, 2 sc in the next stitch* repeat around. (56 stitches)
Round 8: *Sc in the next 6 stitches, 2 sc in the next stitch* repeat around. (64 stitches)
Round 9: *Sc in the next 7 stitches, 2 sc in the next stitch* repeat around. (72 stitches)
Round 10: *Sc in the next 8 stitches, 2 sc in the next stitch* repeat around. (80 stitches)
Round 11: *Sc in the next 9 stitches, 2 sc in the next stitch* repeat around. (88 stitches)
Round 12: *Sc in the next 10 stitches, 2 sc in the next stitch* repeat around. (96 stitches)
Round 13: *Sc in the next 11 stitches, 2 sc in the next stitch* repeat around. (104 stitches)
Round 14: *Sc in the next 12 stitches, 2 sc in the next stitch* repeat around. (112 stitches)
Round 15: *Sc in the next 13 stitches, 2 sc in the next stitch* repeat around. (120 stitches)
Round 16: *Sc in the next 14 stitches, 2 sc in the next stitch* repeat around. (128 stitches)
Round 17: *Sc in the next 15 stitches, 2 sc in the next stitch* repeat around. (136 stitches)
Round 18: *Sc in the next 16 stitches, 2 sc in the next stitch* repeat around. (144 stitches)
Round 19: *Sc in the next 17 stitches, 2 sc in the next stitch* repeat around. (152 stitches)
Round 20: *Sc in the next 18 stitches, 2 sc in the next stitch* repeat around. (160 stitches)
Round 21: *Sc in the next 19 stitches, 2 sc in the next stitch* repeat around. (168 stitches)
Round 22: *Sc in the next 20 stitches, 2 sc in the next stitch* repeat around. (176 stitches)
Round 23: *Sc in the next 21 stitches, 2 sc in the next stitch* repeat around. (184 stitches)
Round 24: *Sc in the next 22 stitches, 2 sc in the next stitch* repeat around. (192 stitches)
Round 25: *Sc in the next 23 stitches, 2 sc in the next stitch* repeat around. (200 stitches)
Round 26: *Sc in the next 24 stitches, 2 sc in the next stitch* repeat around. (208 stitches)
Round 27: *Sc in the next 25 stitches, 2 sc in the next stitch* repeat around. (216 stitches)
Round 28: *Sc in the next 26 stitches, 2 sc in the next stitch* repeat around. (224 stitches)
Round 29: *Sc in the next 27 stitches, 2 sc in the next stitch* repeat around. (232 stitches)
Round 30: *Sc in the next 28 stitches, 2 sc in the next stitch* repeat around. (240 stitches)
Your base should now measure approximately 10-11 inches in diameter. If it's curling up at the edges, you may need to check your tension. If it's ruffling, you might be increasing too quickly. But don't worry—this pattern is forgiving, and the next section will help stabilize everything.
Part 2: The Body
Now that we have our flat base, it's time to build the walls of the bag. This section creates the main body of the tote, which will rise up to form a roomy, cylindrical shape.
Round 31: Working in the back loops only, sc in each stitch around. (240 stitches)
This is a crucial step! By working in the back loops only, you create a crisp, defined edge where the base meets the body of the bag. This gives the tote a professional, structured look.
Rounds 32-40: Sc in each stitch around. (240 stitches)
Continue working these simple single crochet rounds until the body of your bag measures about 5 inches from the base. This creates a solid, sturdy foundation for the floral motif that's coming next.
Part 3: The Floral Motif Panel
This is where the magic happens! The floral panel adds that beautiful, textured boho element to your bag. We'll be working with all three colors to create a repeating pattern of flowers. Take your time with this section—the results are absolutely worth it.
Round 41 (AC1): *Skip 2 stitches, work 5 double crochet (dc) in the next stitch, skip 2 stitches, sc in the next stitch* repeat from * to * around. (40 petals)
This round creates the large terracotta petals. The 5 double crochet clusters form each petal, and the single crochet between them anchors the pattern.
Round 42 (MC): *Sc in the sc from the previous round, chain 3, skip the 5 dc group* repeat around. (40 chain-3 spaces)
Here, we're creating the sand-colored chain spaces that will frame our flowers. The single crochet stitches sit on top of the previous round's single crochet, and the chains bridge over the petals.
Round 43 (AC2): *Sc in the next chain-3 space, chain 3, sc in the same space, chain 1, skip the next sc* repeat around. (40 small petals)
This round adds the delicate olive green accents. Each chain-3 space gets two single crochet with a chain between them, creating a small petal shape that peeks out from behind the main flowers.
Round 44 (MC): *Sc in the next chain-1 space, chain 3, skip the next sc* repeat around. (40 chain-3 spaces)
We're back to sand for this round, creating another set of chain spaces that will support the next layer of flowers.
Round 45 (AC1): *5 dc in the next chain-3 space, sc in the next sc* repeat around. (40 petals)
This is the second layer of terracotta petals. Notice how they're offset from the first layer, creating a beautiful, staggered floral pattern.
Round 46 (MC): *Sc in the next sc, chain 3, skip the 5 dc group* repeat around. (40 chain-3 spaces)
Another round of sand-colored chains to frame the new petals.
Rounds 47-50 (MC): Sc in each stitch around. (240 stitches)
These final rounds of the floral panel stabilize the pattern and prepare the bag for the top edge. The single crochet stitches fill in the spaces, creating a smooth transition.
Part 4: The Top Edge
Now we'll finish the top of the bag with a decorative scalloped edge. This adds a lovely, finished look while also creating small openings that could be used for a drawstring if you choose.
Round 51: *Sc in the next 3 stitches, chain 2, skip 2 stitches* repeat around. (48 chain-2 spaces)
Round 52: *Sc in the next 3 stitches, 2 sc in the chain-2 space* repeat around. (240 stitches)
Round 53: Sc in each stitch around. (240 stitches)
Round 54: Slip stitch (sl st) in each stitch around. Fasten off and weave in the end.
The slip stitch round creates a neat, finished edge that won't stretch out of shape. Your bag body is now complete!
Part 5: The Handles
Every good tote needs sturdy handles. We'll make two identical straps and attach them securely to the bag. These handles are designed to be strong enough to carry your groceries, books, or whatever else you need.
Handle 1:
Row 1: With MC, chain 90. Sc in the 2nd chain from the hook and in each chain across. (89 stitches)
Row 2: Chain 1, turn, sc in each stitch across. (89 stitches)
Row 3: Chain 1, turn, sc in each stitch across. (89 stitches) Fasten off.
Handle 2:
Repeat the same instructions to create the second handle.
These handles are worked flat in rows, creating a dense, sturdy fabric. The three rows of single crochet give them plenty of strength for everyday use.
Part 6: Assembly
Now for the final step—bringing it all together! This is where your bag truly comes to life.
Step 1: Fold each handle in half lengthwise, with the right sides together. Sew the long edges together using your yarn needle and MC yarn. This creates a double-thickness strap that's extra durable and comfortable to carry.
Step 2: Turn the handles right side out so the seam is hidden on the inside. You now have two sturdy, braided-looking straps.
Step 3: Position one handle on the inside of the bag at the front, and the other at the back. Place them about 4 inches from the side seams. This spacing ensures the bag hangs evenly and comfortably on your shoulder.
Step 4: Sew each handle securely to the inside of the bag using your yarn needle and MC yarn. Make sure to catch both the handle and the bag fabric with your stitches, going back and forth several times to create a strong attachment. Weave in all loose ends.
Finishing Touches
Congratulations! Your Boho Bloom Market Tote is complete. But before you head out the door, here are a few optional finishing touches to consider:
- Weave in all ends: Take your time to weave in every loose end carefully. This not only makes your bag look more professional but also ensures it will hold up to regular use and washing.
- Add a fabric lining: If you plan to carry small items like keys or a phone, consider adding a fabric lining to the inside of the bag. This prevents items from slipping through the stitches and adds extra durability. Simply cut a piece of fabric to fit the interior, sew it into a bag shape, and hand-stitch it in place.
- Block your bag: If your bag seems a bit wobbly, you can block it by gently wetting it and shaping it while it dries. This helps the stitches settle into place and gives your bag a more polished appearance.
I hope you've enjoyed creating your very own Boho Bloom Market Tote. This pattern is perfect for using up scrap yarn in your stash, and it makes a wonderful gift for friends and family. The textured floral motif is sure to turn heads wherever you go, and the sturdy construction means you'll be carrying this bag for years to come.
Remember, crochet is all about the journey as much as the destination. Take your time, enjoy each stitch, and don't be afraid to make it your own. You


