Bleach Spot Half-Moon Crochet Bag Free Pattern: A Grunge Crescent Crossbody
Bleach Spot Half-Moon Crochet Bag: A Grunge Crescent Crossbody
Introduction
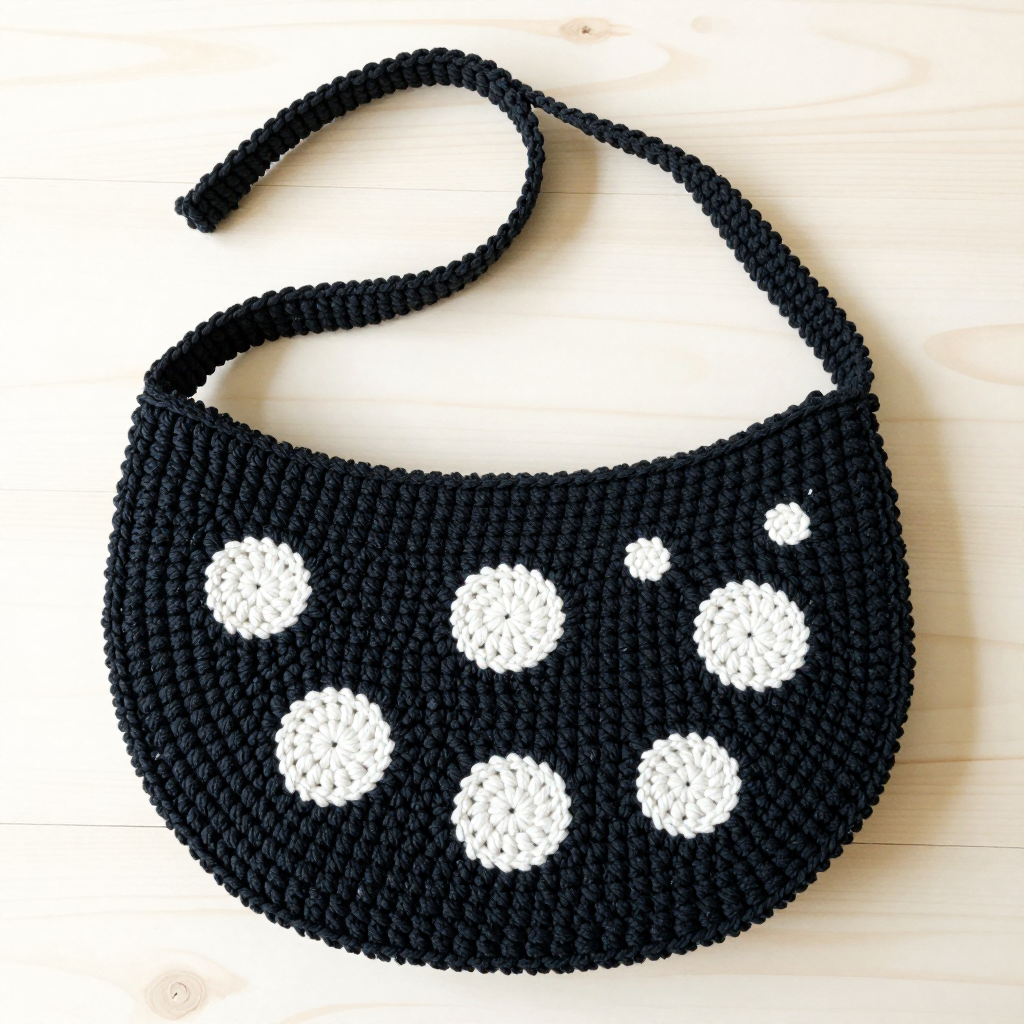
If you have never held a crochet hook before, this is the perfect first "real" project to fall in love with. The Bleach Spot Half-Moon Bag is worked almost entirely in one simple stitch, so you only need to learn a single motion to make the whole thing. It is a flat semicircle panel that folds into a roomy crescent crossbody, then gets scattered with chalk-white "bleach spot" circles for that worn-in, grungy look. The finished bag is about 15.5 inches wide, 8 inches tall, and 4.5 inches deep, with a long strap that sits comfortably across your body. The fabric comes out dense, matte, and slightly nubby, like your favorite faded band tee turned into something you can carry every day.
Materials Needed
- Yarn (main color, MC): Worsted weight (category 4) acrylic/cotton blend, approx 220 yds per 100g skein, in faded black — approx 300 yards (about 1.5 skeins).
- Yarn (contrast color, CC): Same weight yarn in chalk white — approx 40 yards.
- Main hook: 5.0 mm (US H/8) crochet hook — for the bag body and gussets.
- Smaller hook: 4.5 mm (US G/7) crochet hook — for the strap and the appliqués.
- Stitch markers (at least 4) — small clips or safety pins work fine.
- Tapestry needle — a big blunt needle with a large eye for sewing seams and hiding ends.
- Scissors — sharp, for cutting yarn.
- Optional: a small piece of fabric for lining, and a magnetic snap for a closure.
- Finished size: approx 15.5 in (39.5 cm) wide x 8 in (20 cm) tall x 4.5 in (11.5 cm) deep when folded. Strap drop approx 22 in (56 cm).
Abbreviations and Beginner Glossary
- ch — chain. Make a loop of yarn over the hook and pull it through the loop already on your hook. This creates a small "V" of yarn and is how you start almost everything.
- sc — single crochet. Insert your hook into the next stitch, wrap yarn over the hook and pull up a loop (2 loops on hook), wrap yarn over again and pull through both loops. One loop remains. That is one single crochet.
- sl st — slip stitch. Insert hook into the stitch, wrap yarn over, and pull it straight through both the stitch and the loop on your hook at the same time. It makes a nearly invisible joining stitch.
- sc2tog — single crochet 2 together (a decrease). Insert hook into the first stitch, pull up a loop; insert hook into the next stitch, pull up a loop (3 loops on hook); wrap yarn over and pull through all 3 loops. Two stitches become one.
- st(s) — stitch(es). One completed loop or "V" in your fabric.
- RS — right side. The "good" side of the fabric that faces out when the bag is finished.
- BLO — back loop only. Each stitch has two top loops (a front one and a back one). Working in the back loop only means you insert your hook under just the loop farther from you.
- MR — magic ring. An adjustable loop you crochet into, then pull tight so there is no hole in the center. (If it feels tricky, you can chain 2 and work your stitches into the first chain instead.)
- Rnd — round. A row that goes all the way around in a circle and is joined at the end.
- Row — a straight line of stitches worked back and forth, turning at the end of each row.
- Turn — flip your work over so you can work back along the row you just made.
- Fasten off — cut the yarn a few inches from your work, pull the tail all the way through the last loop, and tug gently to lock it.
Gauge
16 sc x 18 rows = 4 inches (10 cm) in single crochet with the 5.0 mm hook.
Gauge means how many stitches and rows fit into a square of fabric. It matters here because the flat panel must fold into the correct crescent shape — if your stitches are too big, the bag will be floppy and oversized; too small, and it will be stiff and tiny. To make a gauge swatch: with your 5.0 mm hook, chain 22, single crochet into the second chain from the hook and in each chain across (21 sc). Work 20 rows of single crochet, then lay the swatch flat and measure a 4-inch square in the middle. If you have more than 16 stitches in 4 inches, your stitches are too small — try a larger hook. If you have fewer, try a smaller hook. Always check gauge before you begin.
Beginner Tips Before You Start
- Count every row. The panel shrinks by 2 stitches on every decrease row. Place a stitch marker in the first and last stitch of each row so you never lose your place.
- Do not pull your yarn too tight. Tension is the number-one beginner struggle. Hold the yarn loosely enough that your hook slides in easily. Tight stitches make a stiff, small bag.
- Always chain 1 at the start of a row. This little chain gives your edge height and keeps the sides straight. It does not count as a stitch.
- Work your decreases at the very edges. The first sc2tog uses the first two stitches of the row; the last sc2tog uses the last two. This is what creates the smooth curve.
- Keep your turning chain out of the count. When you count stitches, skip the chain-1 at the beginning of the row.
- Make the appliqués last. Finish and stuff nothing — just crochet the bag body first, then make the spots while you relax. They are tiny and fast.
Step-by-Step Instructions
Part 1: Half-Moon Panel (make 1)
Worked flat in rows from the flat top edge downward, shaping the semicircle with paired decreases at both ends of every other row.
With the 5.0 mm hook and MC, ch 62.
Row 1 (RS): Sc in 2nd ch from hook and in each ch across. (61 sc)
Row 2: Ch 1, turn. Sc2tog over first 2 sts, sc in each st across to last 2 sts, sc2tog. (59 sc)
Row 3: Ch 1, turn. Sc in each st across. (59 sc)
Row 4: Ch 1, turn. Sc2tog, sc across to last 2 sts, sc2tog. (57 sc)
Row 5: Ch 1, turn. Sc in each st across. (57 sc)
Row 6: Ch 1, turn. Sc2tog, sc across to last 2 sts, sc2tog. (55 sc)
Row 7: Ch 1, turn. Sc in each st across. (55 sc)
Row 8: Ch 1, turn. Sc2tog, sc across to last 2 sts, sc2tog. (53 sc)
Row 9: Ch 1, turn. Sc in each st across. (53 sc)
Row 10: Ch 1, turn. Sc2tog, sc across to last 2 sts, sc2tog. (51 sc)
Row 11: Ch 1, turn. Sc in each st across. (51 sc)
Row 12: Ch 1, turn. Sc2tog, sc across to last 2 sts, sc2tog. (49 sc)
Row 13: Ch 1, turn. Sc in each st across. (49 sc)
Row 14: Ch 1, turn. Sc2tog, sc across to last 2 sts, sc2tog. (47 sc)
Row 15: Ch 1, turn. Sc in each st across. (47 sc)
Row 16: Ch 1, turn. Sc2tog, sc across to last 2 sts, sc2tog. (45 sc)
Row 17: Ch 1, turn. Sc in each st across. (45 sc)
Row 18: Ch 1, turn. Sc2tog, sc across to last 2 sts, sc2tog. (43 sc)
Row 19: Ch 1, turn. Sc in each st across. (43 sc)
Row 20: Ch 1, turn. Sc2tog, sc across to last 2 sts, sc2tog. (41 sc)
Row 21: Ch 1, turn. Sc in each st across. (41 sc)
Row 22: Ch 1, turn. Sc2tog, sc across to last 2 sts, sc2tog. (39 sc)
Row 23: Ch 1, turn. Sc in each st across. (39 sc)
Row 24: Ch 1, turn. Sc2tog, sc across to last 2 sts, sc2tog. (37 sc)
Row 25: Ch 1, turn. Sc in each st across. (37 sc)
Row 26: Ch 1, turn. Sc2tog, sc across to last 2 sts, sc2tog. (35 sc)
Row 27: Ch 1, turn. Sc in each st across. (35 sc)
Row 28: Ch 1, turn. Sc2tog, sc across to last 2 sts, sc2tog. (33 sc)
Row 29: Ch 1, turn. Sc in each st across. (33 sc)
Row 30: Ch 1, turn. Sc2tog, sc across to last 2 sts, sc2tog. (31 sc)
Row 31: Ch 1, turn. Sc in each st across. (31 sc)
Row 32: Ch 1, turn. Sc2tog, sc across to last 2 sts, sc2tog. (29 sc)
Row 33: Ch 1, turn. Sc in each st across. (29 sc)
Row 34: Ch 1, turn. Sc2tog, sc across to last 2 sts, sc2tog. (27 sc)
Row 35: Ch 1, turn. Sc in each st across. (27 sc)
Row 36: Ch 1, turn. Sc2tog, sc across to last 2 sts, sc2tog. (25 sc)
Row 37: Ch 1, turn. Sc in each st across. (25 sc)
Row 38: Ch 1, turn. Sc2tog, sc across to last 2 sts, sc2tog. (23 sc)
Row 39: Ch 1, turn. Sc in each st across. (23 sc)
Row 40: Ch 1, turn. Sc2tog, sc across to last 2 sts, sc2tog. (21 sc)
Row 41: Ch 1, turn. Sc in each st across. (21 sc)
Row 42: Ch 1, turn. Sc2tog, sc across to last 2 sts, sc2tog. (19 sc)
Row 43: Ch 1, turn. Sc in each st across. (19 sc)
Row 44: Ch 1, turn. Sc2tog, sc across to last 2 sts, sc2tog. (17 sc)
Row 45: Ch 1, turn. Sc in each st across. (17 sc)
Row 46: Ch 1, turn. Sc2tog, sc across to last 2 sts, sc2tog. (15 sc)
Row 47: Ch 1, turn. Sc in each st across. (15 sc)
Row 48: Ch 1, turn. Sc2tog, sc across to last 2 sts, sc2tog. (13 sc)
Row 49: Ch 1, turn. Sc in each st across. (13 sc)
Row 50: Ch 1, turn. Sc2tog, sc across to last 2 sts, sc2tog. (11 sc)
Row 51: Ch 1, turn. Sc in each st across. (11 sc)
Row 52: Ch 1, turn. Sc2tog, sc across to last 2 sts, sc2tog. (9 sc)
Row 53: Ch 1, turn. Sc in each st across. (9 sc)
Row 54: Ch 1, turn. Sc2tog, sc across to last 2 sts, sc2tog. (7 sc)
Row 55: Ch 1, turn. Sc in each st across. (7 sc)
Row 56: Ch 1, turn. Sc2tog, sc across to last 2 sts, sc2tog. (5 sc)
Row 57: Ch 1, turn. Sc in each st across. (5 sc)
Row 58: Ch 1, turn. Sc2tog, sc across to last 2 sts, sc2tog. (3 sc)
Row 59: Ch 1, turn. Sc2tog over first 2 sts, sc in last st. (2 sc)
Row 60: Ch 1, turn. Sc2tog. (1 sc) Fasten off.
The panel measures approx 15.5 in (39.5 cm) wide at the top edge and 8 in (20 cm) tall at center. Do not block aggressively; a gentle steam is enough.
Part 2: Side Gussets (make 2)
These give the bag its 4.5 in depth. With the 5.0 mm hook and MC, ch 19.
Row 1: Sc in 2nd ch from hook and each ch across. (18 sc)
Rows 2–20: Ch 1, turn. Sc in each st across. (18 sc)
Fasten off, leaving a long tail. Each gusset measures approx 4.5 in (11.5 cm) x 5 in (12.5 cm).
Part 3: Top Edging
With the 5.0 mm hook and MC, join yarn at one top corner of the folded bag.
Rnd 1: Sc evenly around the entire top opening (approx 62 sc). Join with sl st.
Rnd 2: Ch 1, sc in each st around. Join with sl st. Fasten off and weave in ends.
Part 4: Crossbody Strap
With the 4.5 mm hook and MC, ch 6.
Row 1: Sc in 2nd ch from hook and each ch across. (5 sc)
Rows 2–176: Ch 1, turn. Sc in each st across. (5 sc)
The strap measures approx 44 in (112 cm) long x 1.25 in (3 cm) wide, giving a 22 in drop when attached at both top corners. Fasten off.
Part 5: Bleach-Spot Appliqués (make 7 in assorted sizes)
Worked in chalk white (CC) with the 4.5 mm hook. Make spots in three sizes.
Small Spot (make 3): With CC, MR. Rnd 1: 6 sc into ring. Join with sl st. (6 sc) Fasten off, leaving a 6 in tail. Spot measures approx 0.75 in (2 cm).
Medium Spot (make 3): With CC, MR. Rnd 1: 6 sc into ring. Rnd 2: 2 sc in each st around. Join with sl st. (12 sc) Fasten off, leaving a 6 in tail. Spot measures approx 1.25 in (3 cm).
Large Spot (make 1): With CC, MR. Rnd 1: 6 sc into ring. Rnd 2: 2 sc in each st around. (12 sc) Rnd 3: [Sc in next st, 2 sc in next st] around. Join with sl st. (18 sc) Fasten off, leaving a 6 in tail. Spot measures approx 1.75 in (4.5 cm).
Assembly and Finishing
1. Fold the panel. Fold the half-moon panel in half along its vertical center line, right sides together, so the straight top edges meet and the curved bottom forms the crescent.
2. Attach the gussets. Place one gusset between the two side edges of the folded panel, aligning the gusset's long edge with the curved side seam. Whipstitch (a simple over-and-over stitch with your tapestry needle) or single crochet the gusset in place along both sides of the curve. Repeat for the second gusset on the opposite side.
3. Turn right side out. Turn the bag RS out. The top opening should measure approx 15.5 in across, and the bag should stand 8 in tall with 4.5 in depth.
4. Attach the strap. Attach each end of the strap securely to the inside of the top edge at the side seams using a tapestry needle and matching yarn, reinforcing with several passes so it will not pull loose.
5. Place the appliqués. Arrange the spots randomly across the front of the bag, keeping them at least 1 in apart and avoiding the top 1.5 in of the bag. A suggested layout: large spot slightly left of center, two medium spots upper right and lower left, three small spots scattered between. Pin each spot in place, then stitch around the outer edge of each spot with matching CC yarn and a tapestry needle, using small whipstitches.
6. Weave in ends. Thread each yarn tail onto the tapestry needle and run it back and forth through the back of the fabric for about 2 inches, then trim close.
7. Block gently. Lightly steam the bag to settle the stitches; do not press flat. Optional: sew a magnetic snap to the inside top edge, or add a simple fabric lining.
Care: Hand wash cold, reshape, and dry flat.
Pro Tips and Variations
- Change the colors. Swap the faded black for charcoal grey or deep olive, and the chalk white for cream or pale pink. Any two-color combo works — just keep the contrast strong so the spots read clearly.
- Adjust the size. To make a wider bag, add 6 chains to the starting chain (each 6 chains adds about 1.5 inches of width). To make it taller, add extra plain rows before you begin decreasing.
- Substitute yarn. A cotton or cotton-blend worsted gives a sturdier, more structured bag; a soft acrylic gives a squishier, lighter one. Always re-check your gauge with the new yarn.
- Make it your own. Add a BLO (back loop only) ridge row every few rows for texture, or work the strap in a contrasting color for a bolder grunge look.