Whispering Pines Lace Motif Square Free Pattern
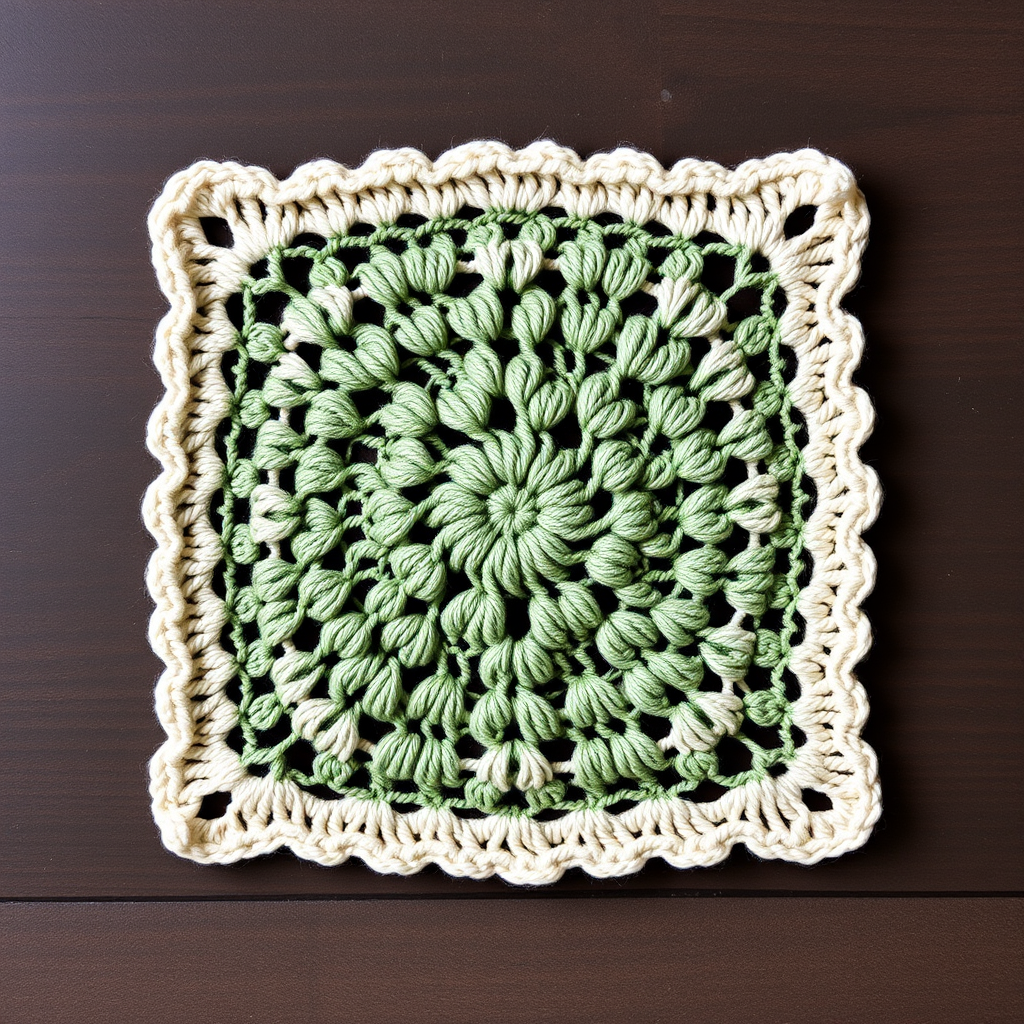
Whispering Pines Lace Motif Square: A Free Crochet Pattern
Embrace the serene beauty of a forest-inspired crochet square, featuring a delicate lace texture that mimics dappled sunlight through pine needles. This versatile motif is perfect for creating elegant afghans, pillow covers, or table runners with a touch of woodland charm. The pattern builds from a simple magic ring into a geometric, pinecone-like design that captures the quiet essence of a misty forest floor.
This intermediate-level pattern is worked in the round, making it a satisfying project that grows quickly. The finished square measures 6 inches (15 cm) after 8 rounds, making it ideal for joining into larger projects or using as a standalone coaster or decorative element. The cotton-bamboo blend yarn provides a beautiful drape and subtle sheen that enhances the lacework.
Materials Needed
Before you begin, gather the following supplies to ensure a smooth crochet experience:
- Yarn: Lion Brand Coboo (cotton/bamboo blend, DK weight) in Sage Green and Cream (approximately 30 yards of each for one square)
- Hook: 4.0 mm crochet hook (or size needed to obtain gauge)
- Notions: Stitch markers, yarn needle for weaving in ends, scissors
Gauge: First 4 rounds measure 3 inches (7.5 cm) across; final square measures 6 inches (15 cm) after 8 rounds. Gauge is important for ensuring your squares match when joining multiple motifs together.
Abbreviations Used
- ch = chain
- dc = double crochet
- sc = single crochet
- sl st = slip stitch
- sp = space
Step-by-Step Instructions
This square is worked in the round, starting from the center. Use a stitch marker to keep track of rounds. The pattern builds progressively, with each round adding more texture and structure to the design.
Round 1: Foundation Ring
With Sage Green, make a magic ring. Chain 4 (counts as first dc + ch 1). Work (dc, ch 1) 7 times into the ring. Join with a slip stitch to the third chain of the beginning ch-4. You should have 8 dc and 8 ch-1 spaces. Pull the magic ring tight to close the center hole.
Round 2: Building Clusters
Slip stitch into the first ch-1 space. Chain 3 (counts as dc). Work 2 dc in the same space. Chain 1. *Work 3 dc in the next ch-1 space. Chain 1.* Repeat from * to * around. Join with a slip stitch to the top of the beginning ch-3. You should have 8 clusters of 3 dc and 8 ch-1 spaces. This round begins to establish the radiating pattern.
Round 3: Creating V-Stitches
Slip stitch to the first ch-1 space. Chain 4 (counts as dc + ch 1). Work (dc, ch 1, dc) in the same space. This forms a V-stitch. *Skip the next 3 dc. In the next ch-1 space, work (dc, ch 1, dc, ch 1, dc).* Repeat from * to * around, ending with a slip stitch to the third chain of the beginning ch-4. You should have 8 V-stitches, each with 3 dc and 2 ch-1 spaces. The V-stitches create the open, airy texture reminiscent of pine needles.
Round 4: Expanding the Pattern
Slip stitch to the first ch-1 space (the center of the first V-stitch). Chain 3 (counts as dc). Work 2 dc in the same space. Chain 2. *Work 3 dc in the center ch-1 space of the next V-stitch. Chain 2.* Repeat from * to * around. Join with a slip stitch to the top of the beginning ch-3. You should have 8 clusters of 3 dc and 8 ch-2 spaces. The larger ch-2 spaces begin to open up the design.
Round 5: Adding Height
Slip stitch to the first ch-2 space. Chain 3 (counts as dc). Work 3 dc in the same space. Chain 1. *Work 4 dc in the next ch-2 space. Chain 1.* Repeat from * to * around. Join with a slip stitch to the top of the beginning ch-3. You should have 8 clusters of 4 dc and 8 ch-1 spaces. This round adds more substance to each cluster, creating a fuller texture.
Round 6: Forming the Square Shape
Slip stitch to the first ch-1 space. Chain 3 (counts as dc). Work 2 dc in the same space. Chain 2. Work 3 dc in the same space. This forms a corner. *Chain 1. Skip the next 4 dc. Work 3 dc in the next ch-1 space. Chain 1. Skip the next 4 dc. In the next ch-1 space, work (3 dc, ch 2, 3 dc) for the corner.* Repeat from * to * around, but for the last side, after the corner, chain 1, skip 4 dc, work 3 dc in the next ch-1 space, chain 1, and join with a slip stitch to the top of the beginning ch-3. You should have 4 corners and 4 side clusters of 3 dc. This is the pivotal round where the circular motif transforms into a square shape.
Round 7: Defining the Corners
Slip stitch to the first ch-2 corner space. Chain 3 (counts as dc). Work 2 dc in the same space. Chain 2. Work 3 dc in the same space. *Chain 1. Work 3 dc in the next ch-1 space. Chain 1. Work 3 dc in the next ch-1 space. Chain 1. In the next ch-2 corner space, work (3 dc, ch 2, 3 dc).* Repeat from * to * around, ending with a slip stitch to the top of the beginning ch-3. You should have 4 corners and 8 side clusters of 3 dc. The corners become more pronounced as the square takes shape.
Round 8: Final Expansion
Slip stitch to the first ch-2 corner space. Chain 3 (counts as dc). Work 2 dc in the same space. Chain 2. Work 3 dc in the same space. *Chain 1. Work 3 dc in the next ch-1 space. Chain 1. Work 3 dc in the next ch-1 space. Chain 1. Work 3 dc in the next ch-1 space. Chain 1. In the next ch-2 corner space, work (3 dc, ch 2, 3 dc).* Repeat from * to * around, ending with a slip stitch to the top of the beginning ch-3. Fasten off and weave in ends. You should have 4 corners and 12 side clusters of 3 dc. Your square should now measure approximately 6 inches (15 cm) across.
Optional Edging: Adding a Cream Border
With Cream yarn, join with a slip stitch in any corner ch-2 space. Chain 1. Work (sc, ch 2, sc) in the same corner space. *Work 1 sc in each dc across the side, and 1 sc in each ch-1 space. In the next corner space, work (sc, ch 2, sc).* Repeat from * to * around. Join with a slip stitch to the first sc. Fasten off and weave in ends.
This delicate edging adds a beautiful contrast and helps define the square's shape, making it perfect for joining multiple motifs together or finishing the piece as a standalone item.
Tips for Success
- Stitch Markers: Always use a stitch marker to mark the beginning of each round. This will prevent you from losing your place, especially in the later rounds when the pattern becomes more complex.
- Count Your Stitches: After each round, take a moment to count your stitches and spaces. Catching an error early is much easier than frogging multiple rounds.
- Blocking: For best results, block your finished square to open up the lace pattern and ensure perfectly straight edges. Simply wet the square, gently squeeze out excess water, and pin it to the desired dimensions until dry.
- Color Variations: While this pattern uses Sage Green and Cream, feel free to experiment with other color combinations. Earthy tones like moss, bark, and stone would also evoke a beautiful forest aesthetic.
Once you've mastered this pattern, you can create multiple squares and join them together for a stunning afghan, or use a single square as a decorative coaster, trivet, or wall hanging. The Whispering Pines Lace Motif Square brings a touch of tranquil woodland beauty to any project. Happy crocheting!


