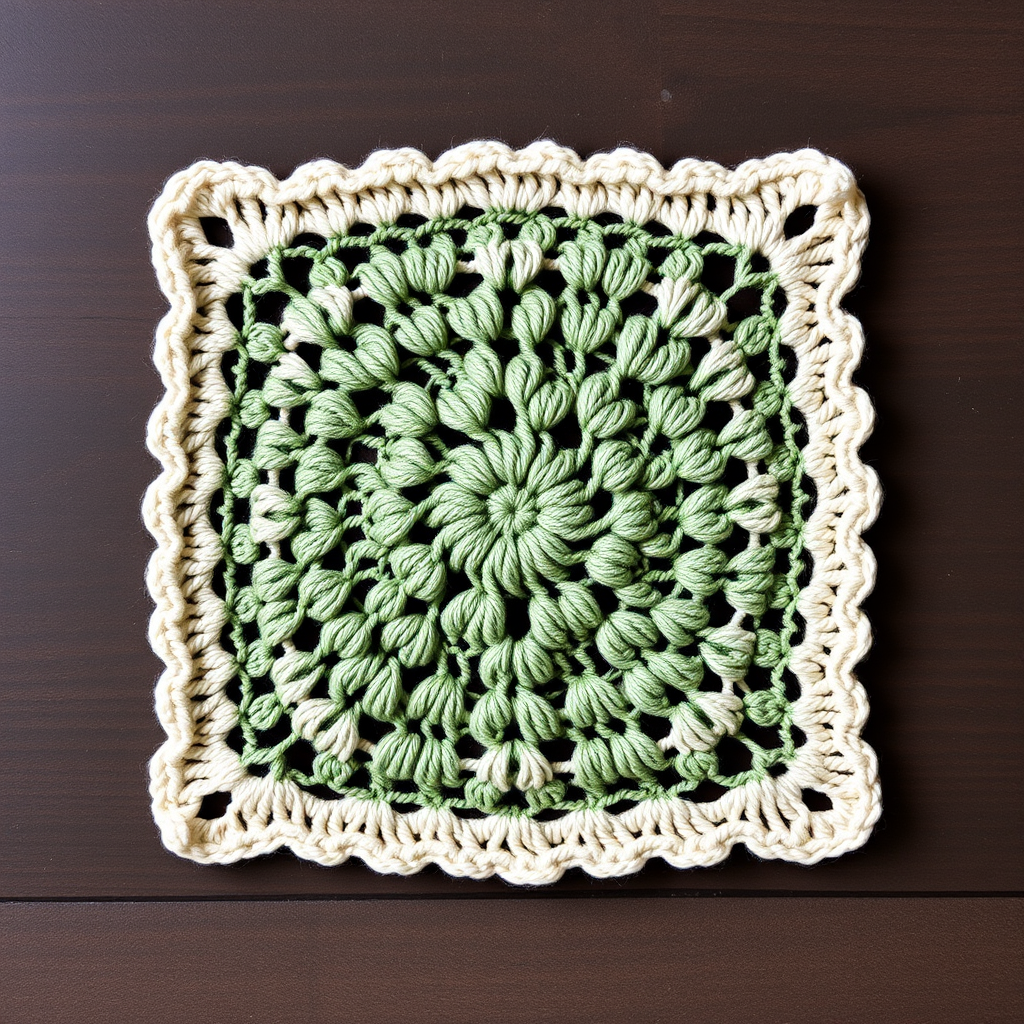
Whispering Pines Granny Square Free Pattern

Whispering Pines Granny Square: A Modern Crochet Pattern for Cozy Creations
Are you ready to elevate your crochet game with a square that's anything but ordinary? The Whispering Pines Granny Square is a stunning, modern take on the classic granny square, featuring a textured pine forest motif that brings a cozy, rustic charm to any project. This pattern is perfect for crafting beautiful blankets, decorative pillows, or even stylish scarves. Despite its intricate, dimensional look, this pattern is surprisingly accessible, making it a rewarding project for both confident beginners and seasoned crocheters looking for a new favorite.
With a harmonious palette of forest green, cream, and soft gold, this square evokes the serene beauty of a pine forest in autumn. The unique stitch pattern creates a beautiful, dimensional design that will have you hooked from the very first round. Let's dive into this free pattern and start creating something magical!
Materials Needed
Before we begin, let's gather all the necessary supplies. Having everything ready will make your crocheting experience smooth and enjoyable.
- Yarn: Worsted weight yarn in three shades:
- Forest Green (approx. 50g)
- Cream (approx. 50g)
- Soft Gold (approx. 50g)
- Crochet Hook: 5mm (H/8) crochet hook
- Other: Yarn needle for weaving in ends, scissors
Gauge: One finished square measures approximately 6.5 inches (16.5 cm) after blocking. Gauge is important for consistent sizing if you plan to join multiple squares.
Step-by-Step Instructions
This pattern uses a few special stitches that create the beautiful texture. Don't worry—they're easier than they look! Let's review them before we start.
Special Stitches
- Puff Stitch (PS): Yarn over, insert hook into stitch, yarn over and pull up a loop (3 loops on hook). Repeat this 3 more times into the same stitch (you will have 7 loops on hook). Yarn over and pull through all 7 loops, then chain 1 to close the stitch.
- Front Post Double Crochet (FPdc): Yarn over, insert hook from front to back around the post of the stitch in the row below, yarn over and pull up a loop, then complete it as a regular double crochet.
Note: The chain 3 at the beginning of each round counts as your first double crochet (dc).
Round 1: The Foundation
With forest green, make a magic ring. Chain 3 (counts as first dc), work 2 dc into the ring, chain 2, then work (3 dc, chain 2) three times into the ring. Join with a slip stitch to the top of the beginning chain 3. Fasten off. (You should have 12 dc and 4 ch-2 spaces).
Round 2: Adding Cream
Join cream yarn in any ch-2 corner space. Chain 3, work (2 dc, chain 2, 3 dc) in the same space to create a corner. *Chain 1, work (3 dc, chain 2, 3 dc) in the next corner space. Repeat from * around, ending with a chain 1. Join with a slip stitch to the top of the beginning chain 3. Fasten off. (24 dc, 4 corners, 4 ch-1 spaces).
Round 3: Back to Green
Join forest green in any corner space. Chain 3, work (2 dc, chain 2, 3 dc) in the same corner. *Chain 1, work 3 dc in the next ch-1 space, chain 1, work (3 dc, chain 2, 3 dc) in the next corner. Repeat from * around, ending with chain 1, 3 dc in the last ch-1 space, chain 1. Join with a slip stitch. Fasten off. (36 dc).
Round 4: Introducing Gold
Join gold in any corner space. Chain 3, work (2 dc, chain 2, 3 dc) in the same corner. *Chain 1, work 3 dc in the next ch-1 space, chain 1, work 3 dc in the next ch-1 space, chain 1, work (3 dc, chain 2, 3 dc) in the next corner. Repeat from * around, ending with chain 1, 3 dc in each of the last two ch-1 spaces, chain 1. Join with a slip stitch. Fasten off. (48 dc).
Round 5: Cream Returns
Join cream in any corner space. Chain 3, work (2 dc, chain 2, 3 dc) in the same corner. *Chain 1, work 3 dc in the next ch-1 space, chain 1, work 3 dc in the next ch-1 space, chain 1, work 3 dc in the next ch-1 space, chain 1, work (3 dc, chain 2, 3 dc) in the next corner. Repeat from * around, ending with chain 1, 3 dc in each of the last three ch-1 spaces, chain 1. Join with a slip stitch. Fasten off. (60 dc).
Round 6: Green Foundation
Join forest green in any corner space. Chain 3, work (2 dc, chain 2, 3 dc) in the same corner. *Chain 1, work 3 dc in the next ch-1 space, chain 1, work 3 dc in the next ch-1 space, chain 1, work 3 dc in the next ch-1 space, chain 1, work 3 dc in the next ch-1 space, chain 1, work (3 dc, chain 2, 3 dc) in the next corner. Repeat from * around, ending with chain 1, 3 dc in each of the last four ch-1 spaces, chain 1. Join with a slip stitch. Fasten off. (72 dc).
Round 7: Pine Tree Border Begins
Join gold in any corner space. Chain 3, work (2 dc, chain 2, 3 dc) in the same corner. *Chain 1, work 3 dc in the next ch-1 space, chain 1, work 3 dc in the next ch-1 space, chain 1, work 3 dc in the next ch-1 space, chain 1, work 3 dc in the next ch-1 space, chain 1, work 3 dc in the next ch-1 space, chain 1, work (3 dc, chain 2, 3 dc) in the next corner. Repeat from * around, ending with chain 1, 3 dc in each of the last five ch-1 spaces, chain 1. Join with a slip stitch. Fasten off. (84 dc).
Round 8: Textured Pine Stitch
Join forest green in any corner space. Chain 3, work (2 dc, chain 2, 3 dc) in the same corner. *Chain 1, work 3 dc in the next ch-1 space, chain 1, work 3 dc in the next ch-1 space, chain 1, work 3 dc in the next ch-1 space, chain 1, work 3 dc in the next ch-1 space, chain 1, work 3 dc in the next ch-1 space, chain 1, work 3 dc in the next ch-1 space, chain 1, work (3 dc, chain 2, 3 dc) in the next corner. Repeat from * around, ending with chain 1, 3 dc in each of the last six ch-1 spaces, chain 1. Join with a slip stitch. Fasten off. (96 dc).
Round 9: Final Pine Tree Ridge
Join cream in any corner space. Chain 3, work (2 dc, chain 2, 3 dc) in the same corner. *Chain 1, work 3 dc in the next ch-1 space, chain 1, work 3 dc in the next ch-1 space, chain 1, work 3 dc in the next ch-1 space, chain 1, work 3 dc in the next ch-1 space, chain 1, work 3 dc in the next ch-1 space, chain 1, work 3 dc in the next ch-1 space, chain 1, work 3 dc in the next ch-1 space, chain 1, work (3 dc, chain 2, 3 dc) in the next corner. Repeat from * around, ending with chain 1, 3 dc in each of the last seven ch-1 spaces, chain 1. Join with a slip stitch. Fasten off. (108 dc).
Round 10: Puff Stitch Border
Join forest green in any corner space. Chain 3, work (2 dc, chain 2, 3 dc) in the same corner. *Chain 1, work 3 dc in the next ch-1 space, chain 1, work 3 dc in the next ch-1 space, chain 1, work 3 dc in the next ch-1 space, chain 1, work 3 dc in the next ch-1 space, chain 1, work 3 dc in the next ch-1 space, chain 1, work 3 dc in the next ch-1 space, chain 1, work 3 dc in the next ch-1 space, chain 1, work 3 dc in the next ch-1 space, chain 1, work (3 dc, chain 2, 3 dc) in the next corner. Repeat from * around, ending with chain 1, 3 dc in each of the last eight ch-1 spaces, chain 1. Join with a slip stitch. Fasten off. (120 dc).
Round 11: Puff Stitch Detail
Join gold in any corner space. Chain 3, work (2 dc, chain 2, 3 dc) in the same corner. *Chain 1, work 3 dc in the next ch-1 space, chain 1, work 3 dc in the next ch-1 space, chain 1, work 3 dc in the next ch-1 space, chain 1, work 3 dc in the next ch-1 space, chain 1, work 3 dc in the next ch-1 space, chain 1, work 3 dc in the next ch-1 space, chain 1, work 3 dc in the next ch-1 space, chain 1, work 3 dc in the next ch-1 space, chain 1, work 3 dc in the next ch-1 space, chain 1, work (3 dc, chain 2, 3 dc) in the next corner. Repeat from * around, ending with chain 1, 3 dc in each of the last nine ch-1 spaces, chain 1. Join with a slip stitch. Fasten off. (132 dc).
Round 12: Final Border
Join cream in any corner space. Chain 3, work (2 dc, chain 2, 3 dc) in the same corner. *Chain 1, work 3 dc in the next ch-1 space, chain 1, work 3 dc in the next ch-1 space, chain 1, work 3 dc in the next ch-1 space, chain 1, work 3 dc in the next ch-1 space, chain 1, work 3 dc in the next ch-1 space, chain 1, work 3 dc in the next ch-1 space, chain 1, work 3 dc in the next ch-1 space, chain 1, work 3 dc in the next ch-1 space, chain 1, work 3 dc in the next ch-1 space, chain 1, work 3 dc in the next ch-1 space, chain 1, work (3 dc, chain 2, 3 dc) in the next corner. Repeat from * around, ending with chain 1, 3 dc in each of the last ten ch-1 spaces, chain 1. Join with a slip stitch. Fasten off. (144 dc).
Finishing Touches
Once you've completed all 12 rounds, it's time to finish your square beautifully.
- Weave in all ends: Use your yarn needle to carefully weave in all loose ends on the back of your work. This ensures your square is neat and durable.
- Block your square: Blocking is essential for achieving that crisp, professional look. Pin your square to a blocking mat, shaping it to 6.5 inches and ensuring the corners are sharp and defined. Mist with water or use a steam iron (without touching the yarn) and allow it to dry completely.
Once dry, your Whispering Pines Granny Square is ready to be admired! Whether you're creating a cozy blanket, a decorative pillow, or any other project, this square is sure to be a standout piece. Happy crocheting!