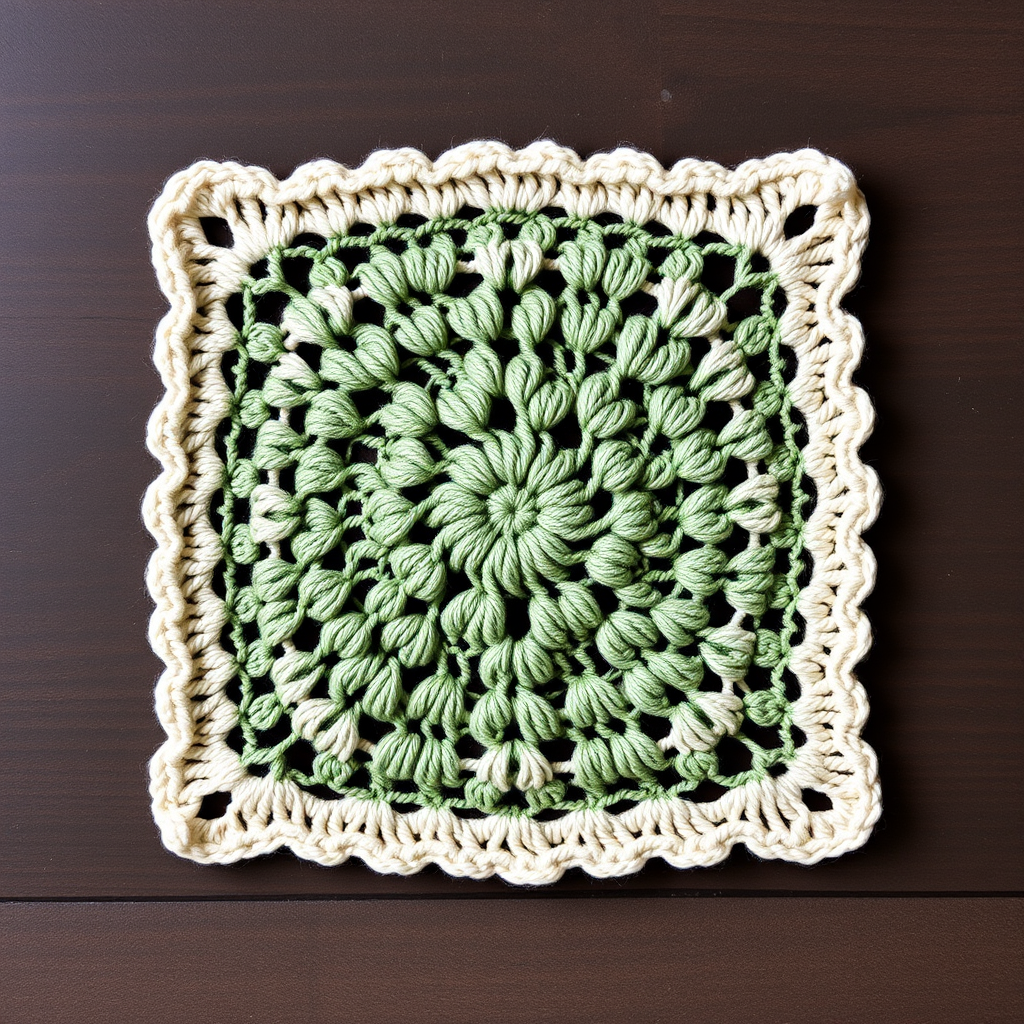
Whispering Petal Bloom Square Free Pattern

Whispering Petal Bloom Square: A Free Crochet Pattern for a Modern Floral Garden
Imagine capturing the soft, romantic essence of a spring garden and transforming it into a cozy, handmade treasure. The Whispering Petal Bloom Square does exactly that. This delicate floral crochet square is designed to bring a touch of modern elegance to your home, whether you're crafting a snuggly blanket, a decorative pillow, or any project that calls for a textured, beautiful motif. With its gentle color transitions and dimensional, ruffled petals, this pattern is a joy to create and a stunning addition to any maker's repertoire.
This pattern is worked in the round from the center outward, building a layered flower that evolves from a soft blush center to a cool sage green outer edge. The result is a plush, tactile square that lies flat and even, perfect for joining into larger projects. Let’s dive into this step-by-step guide and start creating your own blooming masterpiece.
Materials Needed
Before you begin, gather the following materials to ensure a smooth and enjoyable crochet experience. This project is perfect for using up scrap yarn or selecting a fresh, coordinated palette.
- Yarn: Worsted weight cotton or acrylic in three colors:
- Color A: Soft blush pink (for the center and final edging)
- Color B: Cream (for the middle petals)
- Color C: Sage green (for the outer petals)
- Hook: 4.5 mm crochet hook (or size needed to obtain gauge)
- Other: Yarn needle for weaving in ends, scissors, and blocking mats with pins (optional but recommended).
Gauge: One completed square measures 6 inches x 6 inches after blocking. Gauge is important for consistent sizing if you plan to join multiple squares.
Step-by-Step Instructions
This square is worked in the round, starting from the center and building outward. Use a 4.5 mm hook throughout. The pattern uses standard US crochet terminology. Let's begin!
Round 1: The Magic Center
With Color A (blush pink), make a magic ring. Work 8 single crochet (sc) into the ring. Pull the tail tight to close the ring completely. Slip stitch (sl st) to the first sc to join the round. (8 sc)
Round 2: Increasing the Base
Chain 3 (this counts as your first double crochet, dc). Work 1 dc into the same stitch. Now, work 2 dc into each sc around. Slip stitch to the top of the beginning chain-3 to join. (16 dc)
Round 3: Creating the Petal Spaces
Chain 1. Work 1 sc into the same stitch. *Chain 3, skip 1 dc, sc into the next dc.* Repeat from * around, ending with chain 3, skip the last dc, and sl st to the first sc to join. You should now have 8 chain-3 spaces.
Round 4: The First Petal Layer (Blush Pink)
Slip stitch into the first chain-3 space. Chain 1. Work a petal group into the same chain-3 space: (1 sc, 1 half double crochet (hdc), 3 dc, 1 hdc, 1 sc). *Skip the next sc, work the same petal group (1 sc, 1 hdc, 3 dc, 1 hdc, 1 sc) into the next chain-3 space.* Repeat from * around. Sl st to the first sc to join. Fasten off Color A. (8 petals created)
Round 5: Setting Up for the Cream Layer
Join Color B (cream) with a sl st in the sc between any two petals. Chain 1. Work 1 sc into the same stitch. *Chain 5, skip the entire petal (which is 5 stitches), sc into the next sc between petals.* Repeat from * around, ending with chain 5, and sl st to the first sc to join. (8 chain-5 spaces)
Round 6: The Second Petal Layer (Cream)
Slip stitch into the first chain-5 space. Chain 1. Work a larger petal group into the same space: (1 sc, 1 hdc, 5 dc, 1 hdc, 1 sc). *Skip the next sc, work the same petal group (1 sc, 1 hdc, 5 dc, 1 hdc, 1 sc) into the next chain-5 space.* Repeat from * around. Sl st to the first sc to join. Fasten off Color B. (8 larger petals)
Round 7: Setting Up for the Sage Layer
Join Color C (sage green) with a sl st in the sc between any two larger petals. Chain 1. Work 1 sc into the same stitch. *Chain 7, skip the entire petal (which is 9 stitches), sc into the next sc between petals.* Repeat from * around, ending with chain 7, and sl st to the first sc to join. (8 chain-7 spaces)
Round 8: The Third Petal Layer (Sage Green)
Slip stitch into the first chain-7 space. Chain 1. Work the final petal group into the same space: (1 sc, 1 hdc, 7 dc, 1 hdc, 1 sc). *Skip the next sc, work the same petal group (1 sc, 1 hdc, 7 dc, 1 hdc, 1 sc) into the next chain-7 space.* Repeat from * around. Sl st to the first sc to join. Fasten off Color C. (8 final petals)
Round 9: Shaping the Square (Corner Shaping)
This is the crucial round that transforms your circle into a square. Join Color A (blush pink) with a sl st in the sc between any two final petals. Chain 1. Work 1 sc into the same stitch.
For the straight sides: *Chain 3, skip the next 3 dc of the petal, work 3 dc into the next dc (the center of the petal), chain 3, skip the next 3 dc, sc into the next sc between petals.*
For the corners (every other petal): Instead of the side sequence, you will work: chain 3, skip 3 dc, work 3 dc into the center dc, chain 3, skip 3 dc, sc into the next sc.
Repeat this pattern around, alternating between side petals and corner petals. Sl st to the first sc to join. This creates a square shape with straight sides and defined corners.
Round 10: Final Edging and Finish
Chain 1. Work 1 sc into the same stitch. *Work 3 sc into the next chain-3 space, work 1 sc into each of the next 3 dc, work 3 sc into the next chain-3 space, work 1 sc into the next sc.* Repeat from * around, but at each corner, work 3 sc into the corner chain-3 space to ensure the corner stays defined. Sl st to the first sc to join.
Fasten off and weave in all ends securely.
Blocking for Perfection
To achieve the perfect 6-inch square and to open up the lace-like details, blocking is highly recommended. Pin the square to a blocking mat at 6x6 inches, spray with water, and allow to dry completely. This will flatten the petals and give your square a professional, polished finish.
Your Whispering Petal Bloom Square is complete! Repeat this pattern to create a beautiful, cohesive blanket or a set of elegant pillow covers. The muted, natural colors and plush texture are sure to bring a sense of calm and organic beauty to your space. Happy crocheting!