Whimsical Meadow Blossom Free Pattern
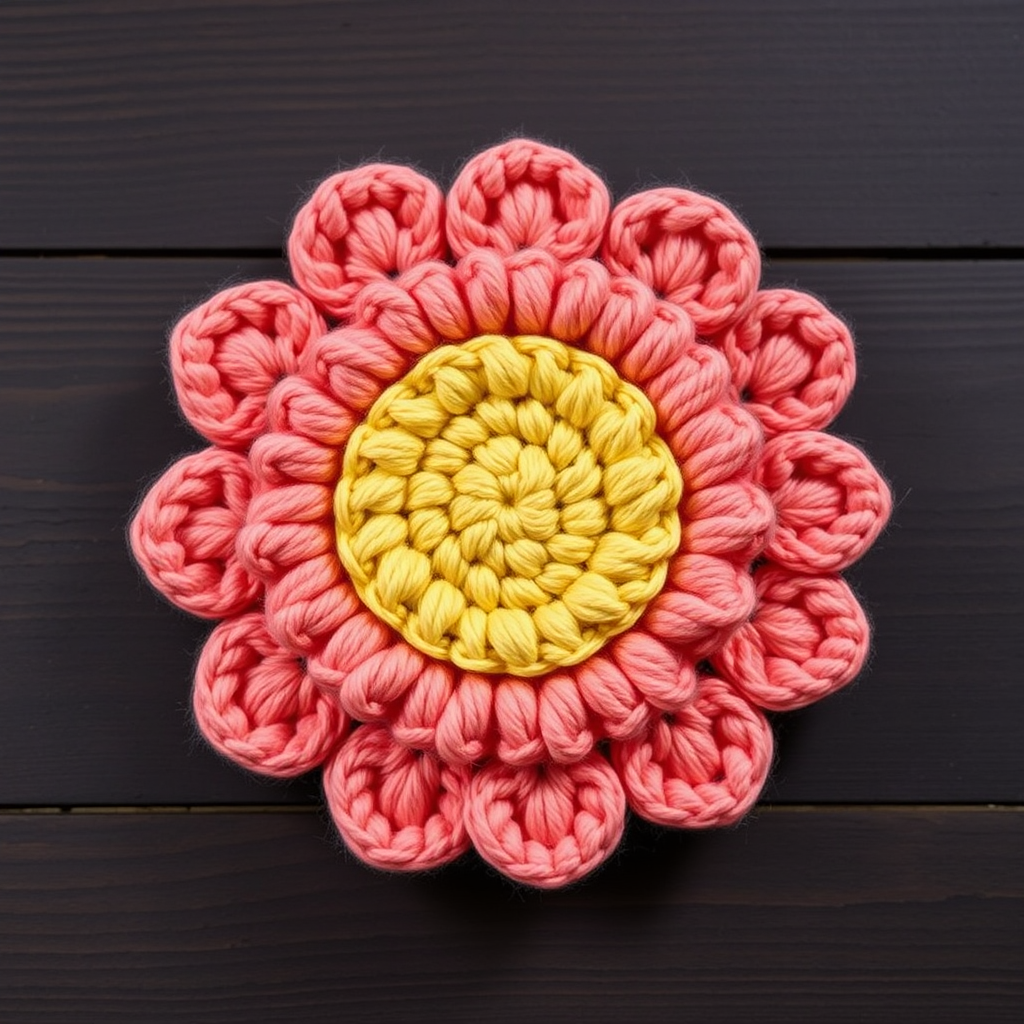
Whimsical Meadow Blossom: A Beginner-Friendly Crochet Flower Pattern
There is something truly magical about transforming a simple strand of yarn into a beautiful, textured flower. This Whimsical Meadow Blossom pattern captures the cheerful essence of a sunlit field, and it is the perfect project for crocheters of all skill levels—especially beginners looking to expand their repertoire. Whether you want to adorn a favorite sun hat, add a handmade touch to a tote bag, or create a lovely standalone decoration for your home, this quick and satisfying project delivers stunning results in under an hour.
With its two-layer design—featuring a soft coral petal layer and a golden yellow center—this flower measures approximately 3 inches in diameter, making it the perfect size for a variety of applications. The combination of single, half-double, and double crochet stitches creates a lovely cupped shape on each petal, giving the blossom a dimensional, lifelike quality. Let’s dive into this delightful pattern and create something beautiful together!
Materials Needed
Before we begin, gather the following materials to ensure a smooth and enjoyable crochet experience:
- Yarn: DK weight yarn in two colors:
- Color A (Petal Color): Soft coral or any shade you prefer
- Color B (Center Color): Golden yellow or a contrasting hue
- Crochet Hook: G/6 (4.0 mm) crochet hook
- Yarn Needle: For weaving in ends and sewing the center to the petals
- Scissors: For cutting yarn
- Optional: A small button or bead for extra charm in the center
Note on gauge: Gauge is not crucial for this project. The finished flower will measure approximately 3 inches (7.5 cm) in diameter, but slight variations are perfectly fine and will not affect the overall look.
Step-by-Step Instructions
Petal Layer (Color A)
We’ll begin by creating the foundation and petal layer of our meadow blossom. Follow these steps carefully, and you’ll have a beautiful petal base in no time.
Step 1: Create the Magic Ring
Hold the yarn tail in your palm and wrap the working yarn around your index and middle fingers twice. Insert your hook under both loops, yarn over, and pull through to create a loop on your hook. Chain 1 to secure the ring. (If you’re new to magic rings, you can also chain 4 and slip stitch to form a ring as an alternative.)
Step 2: Round 1 – Foundation Circle
Work 6 single crochet (sc) into the magic ring. Pull the yarn tail gently to close the ring tightly. Join with a slip stitch (sl st) to the first single crochet. You should now have 6 stitches.
Step 3: Round 2 – Increase Round
Chain 1 (this does not count as a stitch). Work 2 single crochet into each stitch around. Join with a slip stitch to the first single crochet. You should now have 12 stitches.
Step 4: Round 3 – Continue Increasing
Chain 1. *Work 2 single crochet in the next stitch, then 1 single crochet in the following stitch.* Repeat from * to * around the circle. Join with a slip stitch. You should now have 18 stitches.
Step 5: Round 4 – Final Increase Round
Chain 1. *Work 2 single crochet in the next stitch, then 1 single crochet in each of the next 2 stitches.* Repeat from * to * around. Join with a slip stitch. You should now have 24 stitches.
Step 6: Create the Petal Loops
Now we’ll create the foundation loops for our petals. *Chain 5, skip the next stitch, and slip stitch into the following stitch.* Repeat from * to * around the entire circle. You will create 12 chain loops in total. Join with a slip stitch to the first stitch to complete this round.
Step 7: Round 5 – Petal Shaping
This is where the magic happens! Working into each chain loop, you will create a beautiful, cupped petal. In each chain loop, work the following sequence:
- 1 single crochet (sc)
- 1 half double crochet (hdc)
- 3 double crochet (dc)
- 1 half double crochet (hdc)
- 1 single crochet (sc)
After completing each petal, slip stitch between petals to separate them. Continue this pattern for all 12 chain loops. Once all petals are complete, fasten off and weave in the ends with your yarn needle.
Pro Tip: The combination of stitches in each petal creates a lovely rounded, cupped shape. The single crochets at the edges keep the petals neat, while the double crochets in the middle give them fullness and dimension.
Center (Color B)
Now let’s create the golden center that will sit beautifully atop our petals.
Step 1: Create the Magic Ring
Just as before, create a magic ring with Color B yarn. Chain 1 to secure.
Step 2: Round 1 – Foundation Circle
Work 6 single crochet into the magic ring. Pull the tail to close the ring tightly. Join with a slip stitch to the first single crochet. (6 stitches)
Step 3: Round 2 – Increase Round
Chain 1. Work 2 single crochet into each stitch around. Join with a slip stitch. (12 stitches)
Step 4: Round 3 – Final Increase Round
Chain 1. *Work 2 single crochet in the next stitch, then 1 single crochet in the following stitch.* Repeat from * to * around. Join with a slip stitch. (18 stitches)
Step 5: Finish the Center
Fasten off, but leave a long tail (approximately 12 inches) for sewing the center to the petal layer.
Assembly
Now comes the satisfying part—bringing your flower together!
Step 1: Position the Center
Place the golden center on top of the petal layer, making sure the centers are aligned. The petal layer should be facing up with the petals radiating outward, and the center should sit neatly on top.
Step 2: Sew the Center in Place
Thread the long tail from the center onto your yarn needle. Working carefully, sew through both layers around the edge of the center circle. Use a simple whip stitch or running stitch, going through the center’s edge stitches and catching the petal layer beneath. Continue around the entire circumference until the center is securely attached.
Step 3: Secure and Finish
Once you’ve sewn all the way around, weave the needle through a few stitches on the back of the flower to secure the thread. Weave in all remaining ends with your yarn needle to ensure a clean, professional finish.
Step 4: Optional Embellishment
For an extra touch of charm, sew a small button or bead to the very center of the flower. This adds a lovely focal point and a bit of sparkle or texture.
Creative Ways to Use Your Meadow Blossom
Now that you’ve mastered this delightful pattern, the possibilities are endless! Here are a few ideas to inspire you:
- Accessorize: Sew the flower onto a headband, hair clip, or brooch pin for a handmade accessory that brightens any outfit.
- Home Decor: Attach several blossoms to a wreath, create a garland, or use them as charming gift toppers.
- Bag Embellishment: Add a pop of color to a plain tote bag or purse.
- Scarf or Hat Accent: Give a store-bought or handmade hat a personal touch.
- Jewelry: With a smaller hook and finer yarn, you could create miniature versions for earrings or pendants.
Tips for Perfect Results
- Yarn Choice: DK weight yarn works beautifully for this project, but you can easily adapt the pattern using worsted weight yarn and a larger hook for a bigger flower, or fingering weight yarn for a smaller version.
- Color Combinations: Don’t be afraid to experiment! Try a classic white petal with a sunny yellow center, or go bold with contrasting colors like purple and lime green.
- Blocking: If your petals seem a bit curled, you can gently block the flower by pinning it flat and lightly steaming it (being careful not to touch synthetic yarns with a hot iron).
- Practice Makes Perfect: If this is your first time working with a magic ring or creating petals, don’t worry—the more you practice, the more natural it will feel.
This Whimsical Meadow Blossom pattern is a wonderful way to practice basic crochet stitches while creating something truly beautiful. Whether you’re a beginner looking to build your skills or an experienced crocheter seeking a quick, satisfying project, this flower delivers on all fronts. The textured petals and contrasting center create a realistic, garden-fresh appearance that will bring a smile to anyone who sees it.
So grab your yarn and hook, and let your creativity bloom! Happy crocheting!


