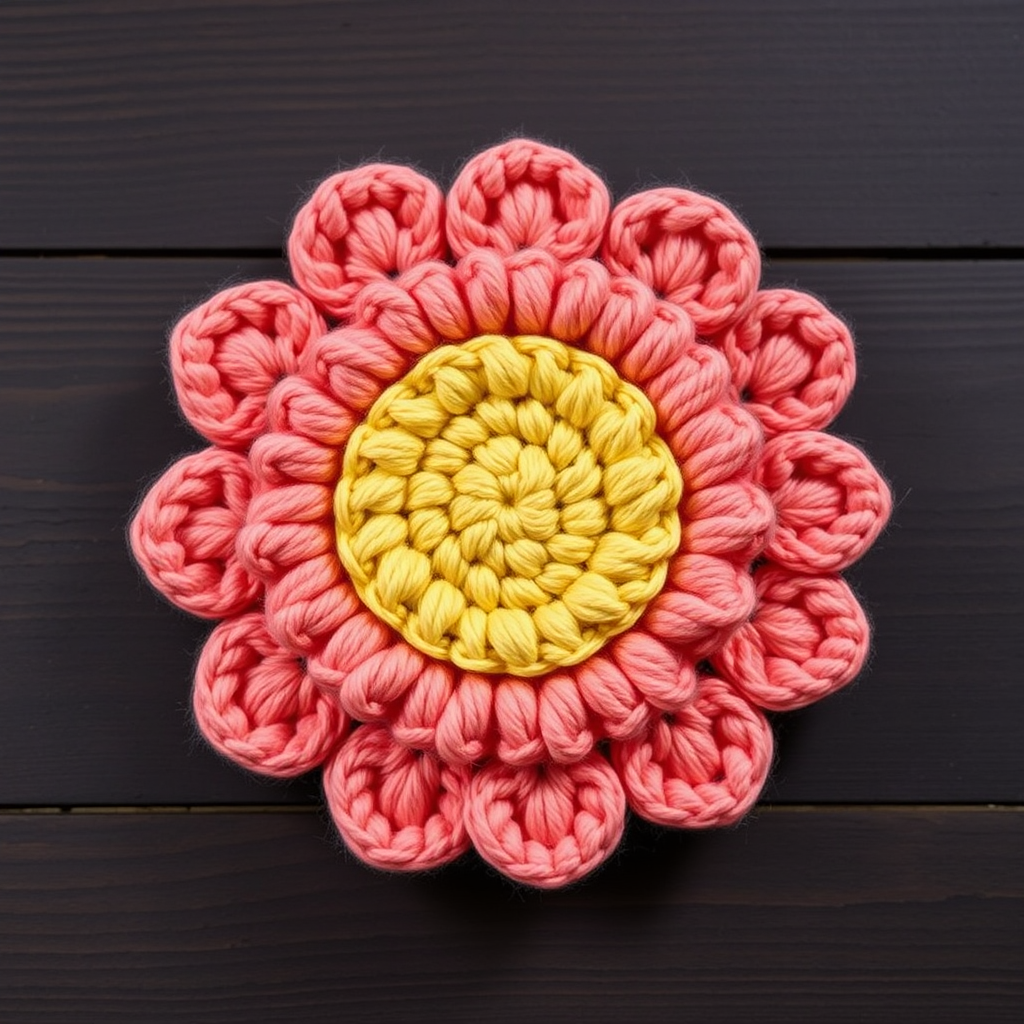
Enchanted Meadow Blossoms Free Pattern

Enchanted Meadow Blossoms: A Free Crochet Flower Pattern for Beginners
Imagine adding a whimsical, handcrafted touch to your favorite hat, scarf, or tote bag with a beautiful, textured flower that looks like it was plucked from a storybook meadow. The Enchanted Meadow Blossoms pattern is the perfect way to bring a little nature-inspired elegance to any project. This layered crochet flower features a plush, dimensional design with a warm butter-yellow center, soft blush inner petals, and creamy white outer petals. Best of all, this free pattern is beginner-friendly, using only basic stitches and simple rounds to create a stunning result. Whether you're embellishing a gift or adding a finishing touch to your own handmade wardrobe, these blossoms are sure to enchant.
In this comprehensive guide, we'll walk you through every step, from gathering your materials to assembling the final flower. By the end, you'll have a beautiful 2.5-inch applique ready to adorn anything you desire. Let's dive into this delightful crochet flower pattern!
Materials Needed for Your Crochet Flower
Before you begin, gather the following supplies. This pattern is designed to be accessible, so you likely already have most of these items in your crafting kit.
Yarn
- Worsted weight cotton or acrylic yarn in assorted colors. For one flower, you'll need 2-3 colors:
- Center color: Warm butter yellow or gold
- Inner petal color: Soft blush pink or rose
- Outer petal color: Creamy white or sage green (or any contrasting shade)
- Note: Cotton yarn gives a lovely matte finish and great stitch definition, but acrylic works beautifully too and is often more affordable.
Hook and Notions
- 3.5 mm (E/4) crochet hook – This size is perfect for worsted weight yarn to create a dense, structured petal.
- Yarn needle – For weaving in ends and sewing the layers together.
- Scissors – For cutting yarn.
- Optional: A small button, bead, or pearl to embellish the center.
Gauge and Finished Size
- Gauge: 5 dc x 2.5 rows = 1 inch (not critical for this project, but useful for consistency).
- Finished Size: Approximately 2.5 inches in diameter for a small flower.
Step-by-Step Instructions: Crocheting the Enchanted Meadow Blossom
This pattern is worked in three separate pieces (center, inner petals, outer petals) and then assembled. We'll go through each part carefully. Let's review the abbreviations first:
- ch = chain
- sl st = slip stitch
- sc = single crochet
- hdc = half double crochet
- dc = double crochet
- tr = treble crochet (not used in this pattern, but good to know)
- rnd = round
Part 1: Flower Center (Make 1)
The center is a small, solid circle that sits on top of the petals, giving the flower its charming focal point.
Rnd 1: With your center color (butter yellow), make a magic ring. If you're not familiar with a magic ring, you can alternatively ch 2 and work into the first chain, but the magic ring gives a tighter, cleaner finish. Ch 1 (does not count as a stitch), then work 6 single crochet (sc) into the ring. Pull the ring tight to close the circle. Join with a slip stitch (sl st) to the first sc. (You should have 6 sc).
Rnd 2: Ch 1 (not a stitch). Work 2 sc in each sc around the circle. This is an increase round. You'll have 12 sc total. Join with a sl st to the first sc of this round.
Fasten off and weave in the yarn end with your yarn needle. Set this piece aside. It should be a small, flat circle about 0.75 inches in diameter.
Part 2: Inner Petal Layer (Make 1)
This layer creates the five smaller, rounded petals in your chosen inner color (blush pink).
Rnd 1: With your inner petal color, make a magic ring. Ch 1, then work 10 sc into the ring. Pull the ring tight and join with a sl st to the first sc. (10 sc)
Rnd 2 (Creating the petal bases): This round forms the loops that will become your petals. *Ch 4, skip the next sc, sl st into the following sc.* Repeat from * to * around the circle. You will create a total of 5 ch-4 loops. To finish, make your last sl st into the base of the very first ch-4 loop to secure the round. (5 loops)
Rnd 3 (Forming the petals): Now we'll work into each ch-4 loop. In each loop, work the following sequence: (sc, hdc, 3 dc, hdc, sc). This creates a rounded, teardrop-shaped petal. After completing the sequence in one loop, move directly to the next loop and repeat. Once you've worked into all 5 loops, join with a sl st to the first sc of the round.
Fasten off, but leave a long tail (about 12-15 inches) for sewing the layers together later. Set this piece aside.
Part 3: Outer Petal Layer (Make 1)
This layer forms the six larger, slightly more pointed petals in your outer color (creamy white).
Rnd 1: With your outer petal color, make a magic ring. Ch 1, then work 12 sc into the ring. Pull the ring tight and join with a sl st to the first sc. (12 sc)
Rnd 2 (Creating the petal bases): This round is similar to the inner layer but with longer chains. *Ch 5, skip the next sc, sl st into the following sc.* Repeat from * to * around. You will create a total of 6 ch-5 loops. End by making your last sl st into the base of the first ch-5 loop. (6 loops)
Rnd 3 (Forming the petals): Work into each ch-5 loop with the following sequence: (sc, hdc, 5 dc, hdc, sc). The extra double crochet stitches make these petals larger and slightly more elongated than the inner ones. Work into all 6 loops, then join with a sl st to the first sc of the round.
Fasten off, leaving a long tail for sewing if you prefer to use this tail for assembly (though we'll primarily use the inner petal tail). Weave in the end if you don't need it.
Assembling Your Enchanted Meadow Blossom
Now for the magical part—bringing all the layers together to create your dimensional flower.
Step 1: Layer the Pieces
Place the outer petal layer flat on your work surface with the right side facing up. Place the inner petal layer on top of it, ensuring the petals alternate—meaning the inner petals should sit in the spaces between the outer petals, not directly on top of them. This creates a beautiful, full look. Finally, place the flower center on top of the inner petal layer, covering the hole in the middle.
Step 2: Sew the Layers Together
Thread your yarn needle with the long tail from the inner petal layer. Starting from the back of the outer layer, push the needle up through the center of all three layers. Then, push the needle back down through the layers, making a small stitch. Repeat this 3-4 times, pulling gently to secure the layers tightly together. Make sure your stitches are hidden under the flower center.
Step 3: Add a Finishing Touch (Optional)
For extra charm, sew a small button, bead, or pearl to the very center of the flower using a matching thread or yarn. This adds a lovely sparkle and covers any remaining stitches.
Step 4: Weave in Ends
Turn the flower over and weave in all remaining loose ends using your yarn needle. Trim any excess yarn with scissors.
Finishing and Styling Your Flower
Your Enchanted Meadow Blossom is now complete! To give it a professional, polished look, you can block the flower lightly. To do this, spray it with a little water and gently press it flat with your fingers, shaping the petals. Allow it to dry completely. This helps the petals lay flat and defines the stitches beautifully.
Once dry, your flower is ready to be attached to your project. Use a yarn needle and matching thread to sew it onto a hat, scarf, bag, headband, or even a pillow. You can also attach a brooch pin to the back to make it a wearable accessory. Make several in different color combinations to create a whole garden of blossoms!
We hope you enjoyed this crochet flower pattern. Happy crafting, and may your world be filled with enchanted meadow blossoms!