Varsity Stripe Tissue Cozy Free Crochet Pattern
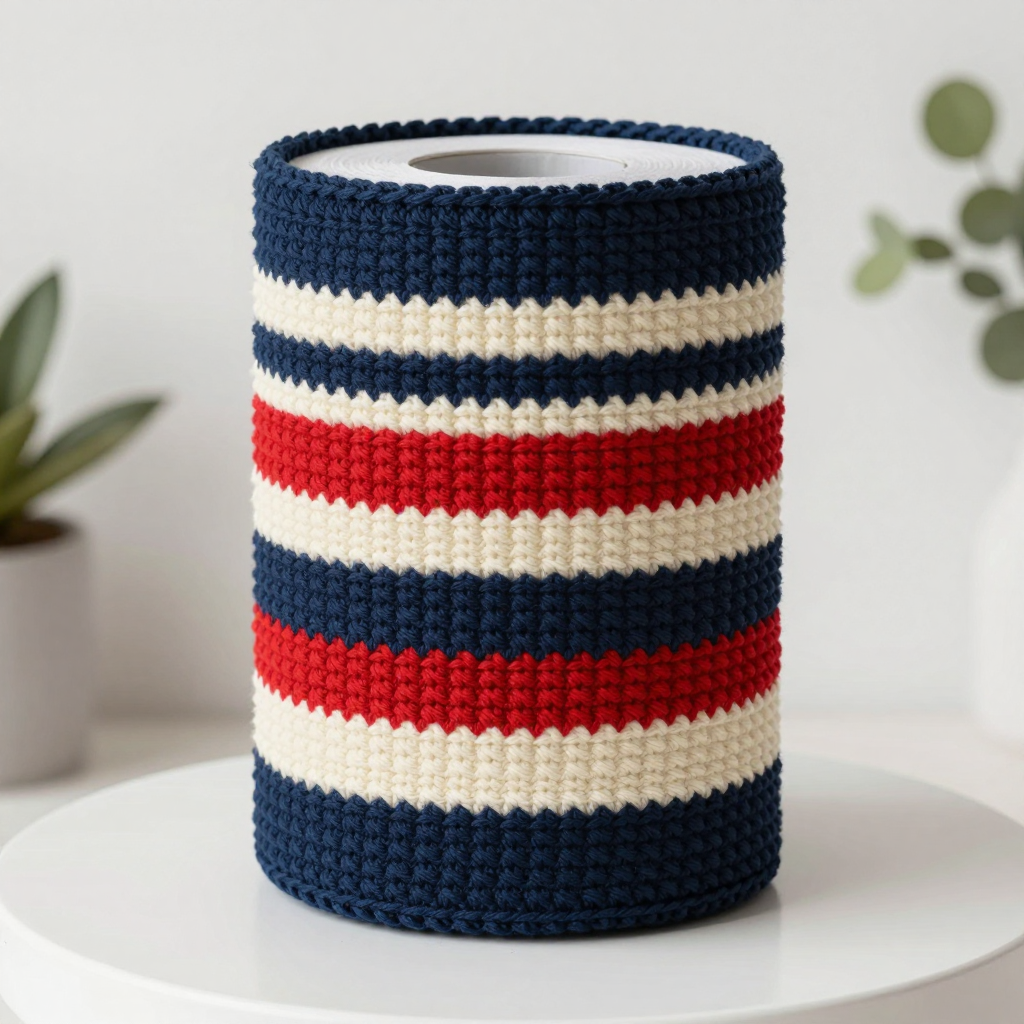
Varsity Stripe Tissue Cozy: A Beginner-Friendly Free Crochet Pattern
If you have ever wanted to make something that looks store-bought but is secretly your very first project, this Varsity Stripe Tissue Cozy is exactly the place to start. It is a simple tube with a closed bottom, worked entirely in single crochet, so you only need to learn one stitch to finish the whole thing. The bold navy, cream, and red stripes give it a preppy, collegiate look that instantly polishes a bathroom shelf or guest bath. The finished cozy is dense, soft, and slightly ridged, standing about 5.5 inches tall and slipping neatly over a standard roll of toilet tissue. Best of all, it works up in an evening or two, which means you get that wonderful "I made this" feeling fast.
Materials Needed
- Yarn: Worsted weight (Category 4) acrylic yarn. You will need approximately 60 yards navy, 30 yards cream, and 25 yards red. One standard skein of each color is far more than enough.
- Crochet hook: Size J/10 (6.0 mm).
- Stitch marker: At least one, to mark the first stitch of each round.
- Tapestry needle: A blunt-tipped needle with a large eye, for weaving in ends and sewing the optional hanging loop.
- Scissors: Any sharp pair for cutting yarn.
- Finished size: Approximately 5 inches (12.7 cm) in diameter across the base and 5.5 inches (14 cm) tall, sized to fit a standard roll of toilet tissue.
Abbreviations and Beginner Glossary
Every term below is explained as if you have never held a hook. Read through this list once before you begin and it will all make sense.
- ch – chain. Make a loop of yarn on your hook, then pull the yarn through that loop. Each one you make is a "chain."
- sc – single crochet. Insert your hook into the next stitch, wrap the yarn over the hook, pull it back through the stitch (you now have 2 loops on the hook), wrap the yarn over again, and pull it through both loops. One single crochet made.
- sl st – slip stitch. Insert your hook into the next stitch, wrap the yarn over, and pull it straight through both the stitch and the loop on your hook in one motion. It makes a nearly invisible joining stitch.
- sc2tog – single crochet 2 together (a decrease). Insert your hook into the first stitch, pull up a loop, insert your hook into the next stitch, pull up a loop (3 loops on hook), wrap yarn over and pull through all 3 loops. This turns two stitches into one. (Not used in this pattern, but listed so you recognize it in other patterns.)
- st(s) – stitch or stitches. The little "V" shapes you work into.
- rnd – round. One complete trip around the circle or tube.
- magic ring – an adjustable loop of yarn you crochet into, then pull closed so there is no hole in the center. If you prefer, you can chain 2 and work your first stitches into the first chain instead.
- 2 sc in next st – work two single crochets into the same stitch. This is an increase, and it makes the circle grow.
- [ ] – brackets. Everything inside the brackets is repeated the number of times stated after the bracket.
- fasten off – cut the yarn a few inches from your work and pull the tail all the way through the last loop to lock it.
Gauge
Gauge: 12 single crochet stitches x 14 rounds = 4 inches (10 cm) in single crochet worked in the round.
Gauge means how big your stitches come out. It matters because it controls the finished size: if your stitches are bigger than the gauge, the cozy will be loose and baggy on the roll; if they are smaller, it may be too snug to slip on. To check, crochet a small flat swatch of about 15 single crochets for 15 rows, lay it flat, and measure 4 inches across the middle. Count how many stitches fit in those 4 inches. If you have more than 12, your stitches are tight—try a larger hook. If you have fewer than 12, your stitches are loose—try a smaller hook. Gauge is not critical for fit here, but it does affect the finished size, so a quick check is worth it.
Beginner Tips Before You Start
- Use your stitch marker every single round. Because this cozy is worked in a spiral (continuous rounds), there is no seam to tell you where a round begins. Place the marker in the first stitch of each round and move it up as you go.
- Do not pull your yarn too tight. Tension is the number one beginner struggle. Keep your yarn relaxed so your hook slides easily; tight stitches make the fabric stiff and hard to work into.
- Change colors on the last yarn-over of the round. When the instructions say "change to cream on the last stitch of Rnd 12," finish that final single crochet using the new color for the last pull-through. This hides the color change neatly.
- Carry your unused colors loosely up the inside. Do not cut the yarn between stripes. Just let the other colors rest against the inside of the tube and pick them up again when needed.
- Count your stitches at the end of every round. The count should be 48 from Round 8 onward. If you are off, fix it now rather than later.
- Relax and enjoy it. This is a small, forgiving project. Mistakes are easy to undo and no one will ever see the inside.
Step-by-Step Instructions
Notes: Work in continuous rounds (a spiral) unless otherwise stated. Do not join or turn unless instructed. Place a stitch marker in the first stitch of each round and move it up as you work. Change colors on the last yarn-over of the final stitch of the round before the new color round begins. Carry unused colors loosely up the inside of the tube; do not cut between stripes.
Base (Navy)
Rnd 1: With navy, make a magic ring. Ch 1 (does not count as a st). Work 6 sc into the ring. Pull the ring closed. (6 sc)
Rnd 2: 2 sc in each st around. (12 sc)
Rnd 3: [2 sc in next st, 1 sc in next st] around. (18 sc)
Rnd 4: [2 sc in next st, 1 sc in each of next 2 sts] around. (24 sc)
Rnd 5: [2 sc in next st, 1 sc in each of next 3 sts] around. (30 sc)
Rnd 6: [2 sc in next st, 1 sc in each of next 4 sts] around. (36 sc)
Rnd 7: [2 sc in next st, 1 sc in each of next 5 sts] around. (42 sc)
Rnd 8: [2 sc in next st, 1 sc in each of next 6 sts] around. (48 sc)
The base should now measure approximately 5 inches (12.7 cm) across.
Body (Worked Even in Stripes)
Rnds 9–12: Sc in each st around. (48 sc) — 4 rounds navy. Change to cream on the last stitch of Rnd 12.
Rnds 13–15: Sc in each st around. (48 sc) — 3 rounds cream. Change to red on the last stitch of Rnd 15.
Rnds 16–18: Sc in each st around. (48 sc) — 3 rounds red. Change to navy on the last stitch of Rnd 18.
Rnds 19–22: Sc in each st around. (48 sc) — 4 rounds navy. Change to cream on the last stitch of Rnd 22.
Rnds 23–25: Sc in each st around. (48 sc) — 3 rounds cream. Change to red on the last stitch of Rnd 25.
Rnds 26–28: Sc in each st around. (48 sc) — 3 rounds red. Change to navy on the last stitch of Rnd 28.
Rnds 29–32: Sc in each st around. (48 sc) — 4 rounds navy.
Top Edge (Navy)
Rnd 33: Sc in each st around. (48 sc)
Rnd 34: Sc in each st around. Sl st in next st to join. Fasten off, leaving a 6-inch tail. (48 sc)
Optional Hanging Loop
Loop: With navy, ch 12, then sl st in each ch across. Fold the loop in half and sew it to the inside top edge of the cozy using the tapestry needle.
Assembly and Finishing
Weave in the ends. Thread each yarn tail onto the tapestry needle. Working on the inside of the tube, poke the needle through the backs of several stitches, then reverse direction and weave back through a few more. This locks the tail so it will not work loose. Trim the yarn close to the fabric.
Steam-block the cozy. Fill a kettle or iron with water and let it produce steam. Hold the cozy a few inches from the steam (do not touch the iron to the acrylic, as it can melt) and let the fibers relax for a minute or two. Gently shape the tube with your hands so it is round and the stripes sit straight, then let it dry completely. This smooths the stripes and settles the stitches so the fabric looks even.
Use it. Slip the cozy over a standard toilet tissue roll from the top, allowing the roll to sit flat on the closed base. The tissue pulls from the center as usual.
Pro Tips and Variations
- Change the color story. Swap navy, cream, and red for any three colors you love—team colors, bathroom colors, or a soft neutral palette. Keep the same stripe order and round counts so the finished size stays the same.
- Adjust the size. To make the cozy taller or shorter, simply add or remove even rounds (sc in each st around) in the navy sections before the top edge. Each added round adds about 0.3 inches of height.
- Try a different yarn. Cotton yarn gives a crisper, more matte look and is machine washable; a wool blend gives a softer, warmer feel. Just check your gauge again, since different fibers behave differently.
- Add texture. Work the body rounds in the back loop only for a subtle ribbed look, or add a contrasting slip-stitch round between stripes for extra definition.


