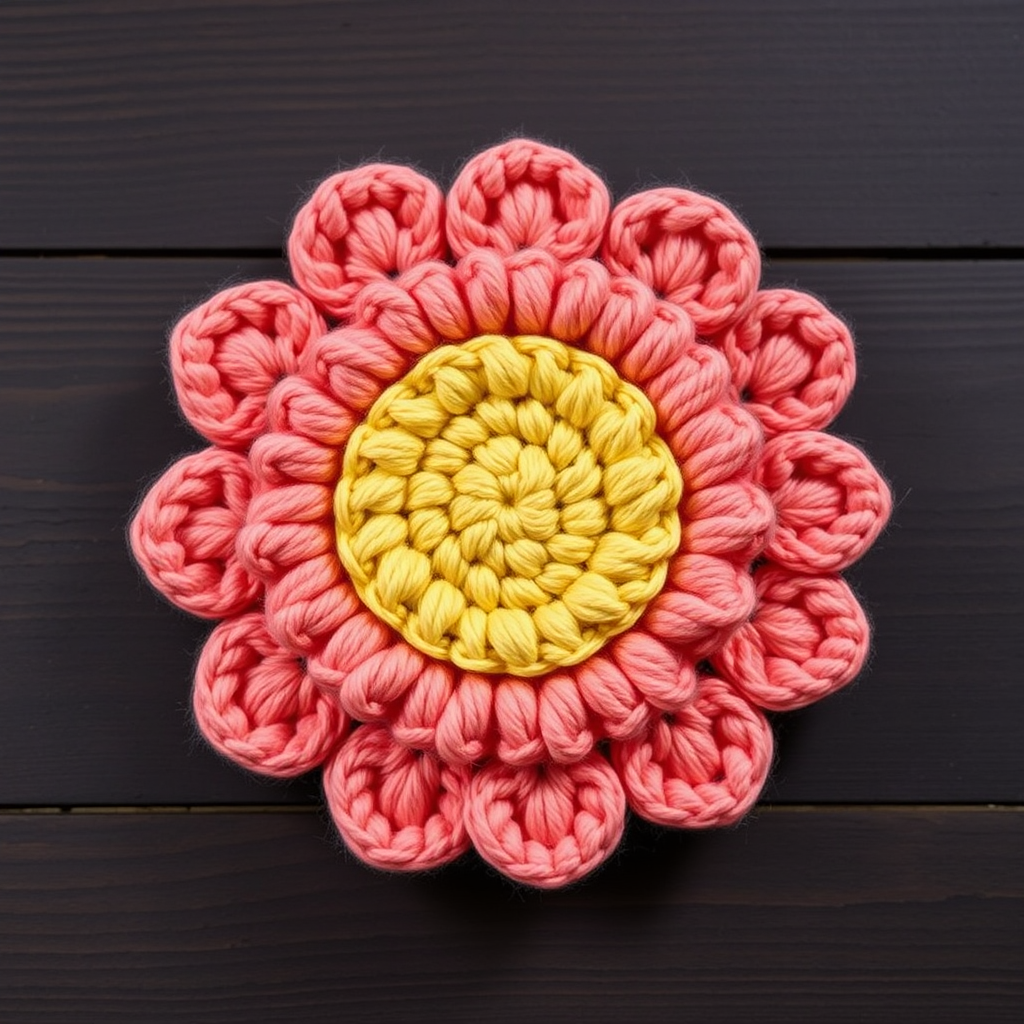
Sunburst Dahlia Bloom Free Crochet Pattern

Sunburst Dahlia Bloom: A Free Crochet Flower Pattern for Boho Home Decor
Are you ready to bring a touch of bohemian elegance into your home? This free crochet pattern will guide you through creating a stunning, oversized dahlia-inspired flower that's rich in texture and full of dimension. Whether you're looking to craft a statement piece for wall art, a unique brooch, or a charming home decor accent, this Sunburst Dahlia Bloom is the perfect project. With its layered petals in warm terracotta, deep burgundy, and golden yellow, this flower captures the essence of a lush, garden-fresh dahlia—no green thumb required!
This pattern is designed with beginners in mind, but it's also a delightful challenge for more experienced crocheters who love working with texture and color. The continuous spiral technique and simple stitch combinations create a professional-looking result that's surprisingly easy to achieve. Let's dive in and start crafting your very own botanical masterpiece!
Materials Needed
Before you begin, gather the following supplies to ensure a smooth and enjoyable crochet experience:
- Yarn: Worsted weight yarn in three shades:
- Deep burgundy (approx. 50g)
- Warm terracotta (approx. 50g)
- Golden yellow (approx. 50g)
- Crochet Hook: 5.5 mm (I/9) crochet hook
- Stitch Markers: To track your rounds (especially helpful when working in spirals)
- Yarn Needle: For weaving in ends and finishing
- Scissors: For cutting yarn
- Optional: Brooch pin or hanging loop for finishing touches
Gauge: The first 3 rounds should measure 2 inches in diameter. While gauge isn't critical for this project, maintaining consistent tension will help your flower lay flat and look polished.
Step-by-Step Instructions
This pattern is worked in continuous spirals unless otherwise noted. Use a stitch marker to track your rounds—this is essential for keeping your work even and avoiding mistakes.
Center (Golden Yellow)
Let's start with the heart of your dahlia—the dense, textured center that anchors the entire flower.
- Round 1: Make a magic ring, work 6 single crochet (sc) into the ring. (6 stitches)
- Round 2: Work 2 sc in each stitch around. (12 stitches)
- Round 3: (Sc in next stitch, 2 sc in next stitch) repeat around. (18 stitches)
- Round 4: (Sc in next 2 stitches, 2 sc in next stitch) repeat around. (24 stitches)
- Fasten off and weave in the end securely.
Inner Petal Layer (Terracotta)
Now we'll add the first layer of petals, creating small, cupped shapes that hug the center.
- Attach Yarn: Attach terracotta yarn to any single crochet of Round 4.
- Round 5: Chain 3 (counts as a double crochet), double crochet (dc) in the same stitch, then 2 dc in each stitch around. Join with a slip stitch to the top of the chain-3. (48 dc)
- Round 6: Chain 1, sc in the same stitch, *chain 4, skip next 3 dc, sc in next dc* repeat from * to * around, ending with chain 4 and a slip stitch to the first sc. (12 chain-4 loops)
- Round 7: Slip stitch into the first chain-4 loop, (chain 3, 4 dc, chain 3, slip stitch) in the same loop, *slip stitch in next loop, (chain 3, 4 dc, chain 3, slip stitch) in next loop* repeat from * to * around, join with a slip stitch to the first slip stitch. (12 small petals)
- Fasten off and weave in the end.
Middle Petal Layer (Terracotta)
This layer adds medium-sized petals that sit behind the inner ones, giving your flower depth and fullness.
- Attach Yarn: Attach terracotta yarn to the back loop of any double crochet from Round 5 (the base of the inner petals).
- Round 8: Chain 1, sc in the same stitch, *chain 5, skip next 3 dc, sc in next dc* repeat from * to * around, ending with chain 5 and a slip stitch to the first sc. (12 chain-5 loops)
- Round 9: Slip stitch into the first chain-5 loop, (chain 3, 6 dc, chain 3, slip stitch) in the same loop, *slip stitch in next loop, (chain 3, 6 dc, chain 3, slip stitch) in next loop* repeat from * to * around, join with a slip stitch to the first slip stitch. (12 medium petals)
- Fasten off and weave in the end.
Outer Petal Layer (Burgundy)
Finally, we'll create the large, dramatic outer petals that give this dahlia its stunning, oversized look.
- Attach Yarn: Attach burgundy yarn to the back loop of any double crochet from Round 5 (the same round as before, but on the back loop of the same stitches).
- Round 10: Chain 1, sc in the same stitch, *chain 6, skip next 3 dc, sc in next dc* repeat from * to * around, ending with chain 6 and a slip stitch to the first sc. (12 chain-6 loops)
- Round 11: Slip stitch into the first chain-6 loop, (chain 3, 8 dc, chain 3, slip stitch) in the same loop, *slip stitch in next loop, (chain 3, 8 dc, chain 3, slip stitch) in next loop* repeat from * to * around, join with a slip stitch to the first slip stitch. (12 large petals)
- Fasten off and weave in the end.
Finishing Touches
Your Sunburst Dahlia Bloom is almost complete! Here's how to finish it beautifully:
- Block the Flower: Gently block your flower to shape the petals. This helps the petals lay flat and gives your dahlia a polished, professional look. You can use a spray bottle to lightly mist the flower and pin it to a blocking mat, or simply press it with a cool iron (avoiding the yarn's melting point).
- Add a Backing (Optional): If you'd like to wear your flower as a brooch, sew a brooch pin onto the back. For wall art or a hanging decoration, attach a loop of yarn or ribbon to the back.
- Display Your Creation: Place your finished dahlia on a shelf, attach it to a wreath, or pin it to a bag—the possibilities are endless!
Tips for Success
To ensure your crochet flower turns out perfectly, keep these tips in mind:
- Use a Stitch Marker: Since this pattern is worked in continuous spirals, a stitch marker is your best friend. It prevents you from losing your place and ensures your rounds are even.
- Maintain Consistent Tension: While gauge isn't critical, consistent tension will make your petals uniform and your flower more symmetrical.
- Count Your Stitches: After each round, take a moment to count your stitches. This simple habit prevents mistakes from compounding.
- Weave in Ends Securely: Since this is a decorative piece, make sure to weave in your ends thoroughly so they don't come loose over time.
Creative Ways to Use Your Sunburst Dahlia
This versatile flower can be used in countless ways. Here are a few ideas to inspire you:
- Wall Art: Create a cluster of dahlias in different sizes and colors to make a stunning boho wall display.
- Home Decor: Attach your flower to a throw pillow, a lampshade, or a curtain tieback for a touch of whimsy.
- Wearable Art: Add a brooch pin to the back and wear it on a cardigan, scarf, or hat.
- Gift Topper: Use it as a unique, handmade addition to a wrapped gift.
We hope you enjoy creating your Sunburst Dahlia Bloom! This pattern is a wonderful way to practice your crochet skills while producing something truly beautiful. Whether you're a beginner or a seasoned pro, this flower is sure to bring a smile to your face and a touch of boho charm to your home. Happy crocheting!