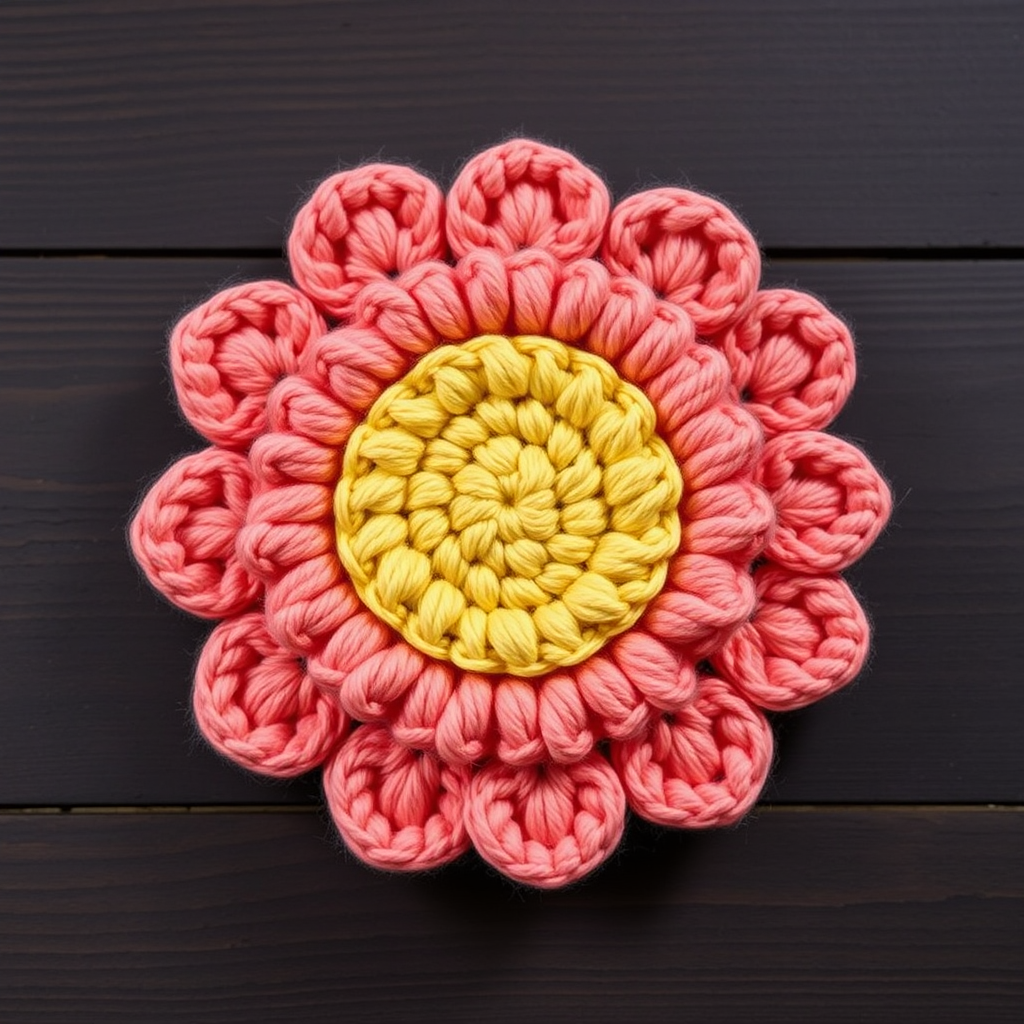
Sun-Kissed Meadow Bloom Free Pattern – Layered Crochet Flower Brooch

Sun-Kissed Meadow Bloom Free Pattern – Layered Crochet Flower Brooch
Bring a touch of everlasting spring to your wardrobe with this charming layered crochet flower, designed for absolute beginners. Its soft, textured petals and warm sunset hues make it a delightful accessory for hats, bags, or scarves. This pattern is perfect for using up small scraps of worsted weight cotton yarn and creates a beautiful, dimensional flower that looks far more complex than it actually is. Whether you're new to crochet or looking for a quick weekend project, this flower brooch is sure to become a favorite.
Materials Needed
Before you begin, gather the following materials. All items are readily available at craft stores or online.
- Yarn: Worsted weight cotton yarn in three colors:
- Petal A: Warm yellow (for the largest, bottom layer)
- Petal B: Soft peach (for the middle layer)
- Petal C: Cream (for the smallest, top layer)
- A small amount of green yarn for the leaves
- Crochet Hook: 5.0 mm (H-8) crochet hook
- Notions: Stitch marker, yarn needle for weaving in ends and sewing, scissors, and a brooch pin or safety pin for the backing (optional: a small felt circle to cover the pin).
Gauge: Gauge is not critical for this project; aim for a tight, neat stitch to keep petals firm. A tighter tension will help the flower hold its shape and prevent the layers from looking floppy.
Step-by-Step Instructions
This pattern is worked in continuous rounds unless otherwise stated. Use a stitch marker to keep track of your rounds. The entire project is made from simple single crochet (sc) stitches and basic increases, making it perfect for beginners.
Petal Layer 1 (Yellow) – The Largest Layer
This layer forms the base of your flower and is the largest of the three circles.
- Round 1: Make a magic ring. Work 6 single crochet (sc) into the ring. Pull the tail tight to close the ring. (6 stitches)
- Round 2: Work 2 sc in each stitch around. (12 stitches)
- Round 3: *Sc in the next stitch, 2 sc in the next stitch* repeat from * to * around. (18 stitches)
- Round 4: *Sc in the next 2 stitches, 2 sc in the next stitch* repeat from * to * around. (24 stitches)
- Round 5: *Sc in the next 3 stitches, 2 sc in the next stitch* repeat from * to * around. (30 stitches)
- Finish: Fasten off and weave in the ends. This is your center disc. Set it aside.
Petal Layer 2 (Peach) – The Middle Layer
This layer is slightly smaller than the yellow layer, creating a beautiful tiered effect.
- Round 1: Make a magic ring. Work 6 sc into the ring. Pull tight to close. (6 stitches)
- Round 2: Work 2 sc in each stitch around. (12 stitches)
- Round 3: *Sc in the next stitch, 2 sc in the next stitch* repeat from * to * around. (18 stitches)
- Round 4: *Sc in the next 2 stitches, 2 sc in the next stitch* repeat from * to * around. (24 stitches)
- Finish: Fasten off, leaving a long tail (about 12 inches) for sewing the layers together. This layer will be slightly smaller than the yellow layer.
Petal Layer 3 (Cream) – The Top Layer
This is the smallest layer, sitting at the very top of the flower.
- Round 1: Make a magic ring. Work 6 sc into the ring. Pull tight to close. (6 stitches)
- Round 2: Work 2 sc in each stitch around. (12 stitches)
- Round 3: *Sc in the next stitch, 2 sc in the next stitch* repeat from * to * around. (18 stitches)
- Finish: Fasten off, leaving a long tail (about 12 inches) for sewing. This is your smallest layer.
Leaves (Make 2)
These simple leaves add a natural touch to your flower. They are worked in rows, not rounds.
- Foundation: Chain 8.
- Row 1 (First side): Sc in the 2nd chain from the hook, half double crochet (hdc) in the next chain, double crochet (dc) in the next 2 chains, hdc in the next chain, sc in the last chain.
- Row 1 (Second side): Now, working along the other side of the foundation chain, sc in the same last chain (the one you just worked into), hdc in the next chain, dc in the next 2 chains, hdc in the next chain, sc in the last chain.
- Finish: Slip stitch to join the round. Fasten off, leaving a long tail (about 8 inches) for sewing the leaf to the flower.
Assembly – Bringing It All Together
Now for the fun part – assembling your beautiful flower!
- Stack the Layers: Place the layers on top of each other from largest to smallest: yellow on the bottom, peach in the middle, and cream on top. Make sure they are centered neatly on top of each other.
- Sew the Layers: Thread your yarn needle with the long tail from the peach (middle) layer. Insert the needle through the center of all three layers, from the top (cream layer) down to the bottom (yellow layer). Pull the yarn tight, then bring the needle back up through the center. Repeat this a few times, pulling firmly each time. This will create a slight dome shape in the center of your flower, giving it a dimensional, puffy look. Secure with a few tight stitches and weave in the end.
- Attach the Leaves: Using the green tails from the leaves, sew one leaf to the back of the flower on the left side and the other on the right side, positioning them at the base of the flower. Make sure the points of the leaves face outward. Secure the tails by weaving them into the back of the flower.
- Attach the Brooch Pin: Sew a brooch pin or safety pin to the back of the flower. Position it horizontally across the center of the back. Use strong thread or the remaining yarn tails to securely stitch the pin in place. For a neat finish, you can cover the stitches with a small felt circle, gluing or sewing it over the pin's base.
- Final Touches: Weave in all remaining ends securely. Give your flower a gentle shape adjustment, fluffing the petals and ensuring the dome is centered.
Your Sun-Kissed Meadow Bloom is complete! This lovely brooch is perfect for embellishing a hat, bag, scarf, or even a hairband. Because it's made with cotton yarn, it's durable and holds its shape beautifully. Enjoy your handmade accessory, and don't be surprised if you find yourself making a whole garden of these flowers!