Mojave Mesh Water Bottle Sling Free Crochet Pattern
Mojave Mesh Water Bottle Sling — Free Beginner Crochet Pattern
Introduction
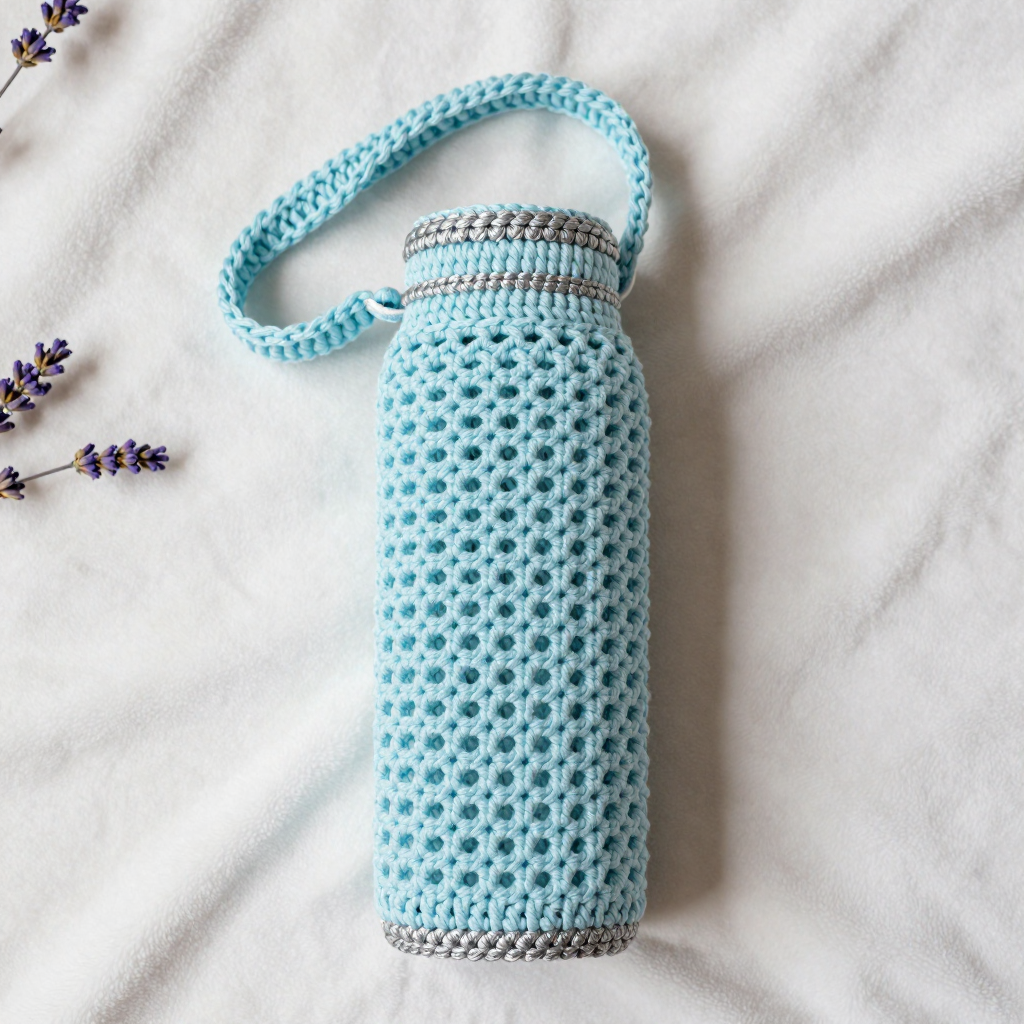
If you have never held a crochet hook before, this is the perfect very first project to make with your own two hands. The Mojave Mesh Water Bottle Sling is a soft, airy little net tube that cradles a standard water bottle and hangs from a short strap over your wrist or a gym bag hook. It is worked flat as one simple rectangle of chain-and-single-crochet netting, then sewn into a tube — no shaping, no complicated stitch counting, and no working in the round required. The finished sling looks desert-boho and effortless: pale ice-blue mesh with one narrow silver stripe near the top and solid silver single-crochet edging at both openings, light as a feather and breathable so your bottle never sweats through your bag. It feels stretchy and grippy in the hand, and because the mesh opens up as it stretches, it hugs bottles from about 3.5 to 4 inches across.
Materials Needed
- Yarn: Worsted weight acrylic yarn (Category 4), approximately 90–110 yards total: 70–85 yards ice blue (Color A) and 20–25 yards silver (Color B).
- Crochet hook: Size H-8 (5.0 mm), or the size needed to obtain gauge.
- Stitch marker (optional, but helpful for beginners).
- Tapestry needle (a large blunt needle with an eye big enough for yarn) for seaming and weaving in ends.
- Scissors for cutting yarn.
- Measuring tape or ruler for checking gauge and size.
Finished size: Body circumference approximately 10 inches (25.5 cm) flat / 20 inches (51 cm) around, fitting a standard 3.5–4 inch (9–10 cm) diameter water bottle with ease. Body height approximately 7 inches (18 cm). Strap approximately 8 inches (20 cm) long and 0.5 inch (1.25 cm) wide.
Abbreviations and Beginner Glossary
- ch — chain. Make a loop with the yarn, then pull a new loop through it. Each loop you pull through is one chain. Chains form your foundation and the open "holes" of the mesh.
- sc — single crochet. Insert your hook into the stitch, yarn over (wrap yarn around the hook), pull up a loop (you now have 2 loops on the hook), yarn over again, and pull through both loops. That is one single crochet.
- sl st — slip stitch. Insert your hook into the stitch, yarn over, and pull the yarn straight through both the stitch and the loop on your hook in one motion. It makes an almost invisible joining stitch.
- sp — space. The little gap or hole created by a chain. When a pattern says "ch-1 sp," it means the hole made by one chain stitch.
- st(s) — stitch(es). One completed unit of crochet work.
- RS — right side. The "public" side of your work that will face outward on the finished sling.
- WS — wrong side. The back side of your work.
- turn — flip your work over so you can crochet back along the row you just finished.
- yarn over — wrap the working yarn around your hook from back to front.
- fasten off — cut the yarn a few inches from your work, then pull the tail all the way through the last loop to lock it.
- join — attach a new strand of yarn to your work, usually with a slip stitch.
- whipstitch — a simple sewing stitch: pass the needle over the edge and back through, over and back, in small even stitches, like lacing.
- weave in ends — thread a yarn tail onto a tapestry needle and run it back and forth through the back of your stitches so it disappears.
Gauge
Gauge: In the mesh pattern, 4 mesh squares = 4 inches (10 cm) wide and 4 mesh rows = 3 inches (7.5 cm) tall. Each mesh square measures approximately 1 inch (2.5 cm) wide by 0.75 inch (2 cm) tall.
Why gauge matters: Gauge is simply how big your stitches turn out. If your stitches are bigger than the pattern's, your sling will be baggy and slide off the bottle; if smaller, it will be too tight to stretch over the bottle. Checking first saves you from re-making the whole thing.
How to make a gauge swatch: With Color A, ch 21. Work Row 1 as written below (20 sc), then repeat Row 3 until your piece is about 4 inches tall. Lay it flat without stretching and measure across 4 mesh squares (about 4 inches) and up 4 mesh rows (about 3 inches). If your squares are larger, try a smaller hook; if smaller, try a larger hook. The swatch is also great practice!
Beginner Tips Before You Start
- Count your chains twice. The foundation chain of 41 is the width of your whole sling. If you lose count, the rectangle will be lopsided. Count in groups of 10 and place a stitch marker every 10 chains.
- Do not pull the yarn too tight. Beginners tend to choke the hook. The mesh needs loose, relaxed chains so the holes stay open and the netting can stretch around the bottle.
- Keep your turning chain consistent. Every row begins with "ch 1, turn." That single chain keeps your edges straight — it does not count as a stitch, so your first sc goes into the very first stitch.
- Use a stitch marker to clip onto the first stitch of each row so you always know where a row begins and ends.
- Trust the mesh. The fabric will look holey and a bit floppy while you work — that is exactly right. It only looks like a proper net once it is seamed into a tube and stretched over a bottle.
- Work in good light and keep your tension even; the pattern is repetitive, so it is easy to relax into a rhythm.
Step-by-Step Instructions
Special Stitch: Mesh Net
The mesh is worked over a multiple of 2 stitches plus 1. Each ch-1 space forms one open mesh square. The pattern row is: ch 1, turn, sc in first sc, *ch 1, skip next sc, sc in next ch-1 sp; repeat from * across, ending sc in last sc. You will repeat this row for the whole body.
Body (worked flat as a rectangle)
With Color A, ch 41.
Row 1 (RS): Sc in 2nd ch from hook and in each ch across. (40 sc)
Row 2 (WS): Ch 1, turn. Sc in first sc, *ch 1, skip next sc, sc in next sc; repeat from * across. (20 sc, 19 ch-1 sps)
Row 3 (RS): Ch 1, turn. Sc in first sc, *ch 1, skip next sc, sc in next ch-1 sp; repeat from * across, ending sc in last sc. (20 sc, 19 ch-1 sps)
Rows 4–24: Repeat Row 3. (20 sc, 19 ch-1 sps) On the final row (Row 24), change to Color B by pulling Color B through the last sc. Do not fasten off Color A yet.
Row 25 (RS, Color B): Ch 1, turn. Sc in first sc, *ch 1, skip next sc, sc in next ch-1 sp; repeat from * across, ending sc in last sc. Fasten off Color B. (20 sc, 19 ch-1 sps)
Row 26 (WS, Color A): Join Color A with sl st in first sc, ch 1, sc in same st, *ch 1, skip next sc, sc in next ch-1 sp; repeat from * across, ending sc in last sc. Fasten off Color A, leaving a 24-inch (60 cm) tail for seaming. (20 sc, 19 ch-1 sps)
Piece measures approximately 10 inches (25.5 cm) wide by 7 inches (18 cm) tall.
Seaming Into a Tube
Fold the rectangle in half with right sides together, matching the foundation chain edge to the final row. Thread the long tail onto your tapestry needle. Whipstitch the two short side edges together, passing the needle over the edge and back through in small, even stitches all the way from bottom to top, to form a cylinder. Fasten off and weave in the end. Turn the tube right side out.
Top Edging (Color B)
Join Color B with a sl st at the top edge seam. Ch 1, work 1 sc in each sc and 1 sc in each ch-1 sp around the top edge — approximately 40 sc. Join with sl st to first sc. Fasten off and weave in ends.
Bottom Edging (Color B)
Join Color B with a sl st at the bottom edge seam. Ch 1, work 1 sc in each foundation ch around the bottom edge. (40 sc) Join with sl st to first sc. Fasten off and weave in ends.
Strap
With Color A, ch 61.
Row 1: Sc in 2nd ch from hook and in each ch across. (60 sc)
Row 2: Ch 1, turn. Sc in each sc across. Fasten off, leaving a 12-inch (30 cm) tail. (60 sc)
Strap measures approximately 8 inches (20 cm) long by 0.5 inch (1.25 cm) wide.
Attaching the Strap
Fold the strap in half to find its center. Position the two strap ends on opposite sides of the top edge of the body, approximately 2 inches (5 cm) apart on either side of the center front. Using the tail and tapestry needle, sew each strap end securely to the top edging with several passes back and forth. Weave in ends.
Assembly and Finishing
Seaming: Your only seam is the short side seam of the body, already whipstitched in the steps above. Work with the right sides facing each other so the seam hides inside the tube, and keep your stitches small and close together so the netting does not gap at the join.
Weaving in ends: Thread each remaining tail onto the tapestry needle. Run it back and forth through the back of several stitches in one direction, then turn and run it through a few more in another direction. Trim the yarn close to the fabric — the change of direction locks it in place so it will not work loose in the wash.
Blocking: Gently steam the sling with an iron held an inch or two above the fabric (never press the iron directly onto acrylic, which can melt), or wet block it: mist lightly with cool water, reshape the tube and strap with your hands, and lay it flat to dry. Blocking settles the mesh into even, open squares and straightens the edging.
Finishing touch: Slip a water bottle into the tube. The mesh stretches to grip the bottle while the strap hangs over your wrist or a gym bag hook.
Care: Hand wash cold, reshape, and lay flat to dry.
Pro Tips and Variations
- Change the stripe: Add two or three silver stripes instead of one by working Row 25 in Color B, then alternating colors every few rows. Carry the unused color loosely up the side edge, or fasten off and rejoin each time for a cleaner edge.
- Adjust the size: For a wider bottle, add chains to the foundation in multiples of 2 (for example, ch 45 or ch 49) and work the same mesh rows; each extra 2 chains adds about 1 inch of circumference. For a taller sling, simply work more repeat rows before the silver stripe — each mesh row adds about 0.75 inch (2 cm).
- Substitute yarn: Cotton or cotton-blend worsted weight yarn gives a sturdier, less stretchy sling that holds its shape well; a wool blend adds softness. Always swatch again, since different fibers change your gauge.
- Make the strap longer: For a crossbody or shoulder carry, chain more for the strap (each 7–8 chains adds about 1 inch) and check the length against your body before sewing it on.