Toadstool Trim Water Bottle Cozy Free Pattern: Irish-Style Mushroom Lace Crochet
Toadstool Trim Water Bottle Cozy: A Beginner-Friendly Irish-Style Mushroom Lace Crochet Pattern
Introduction
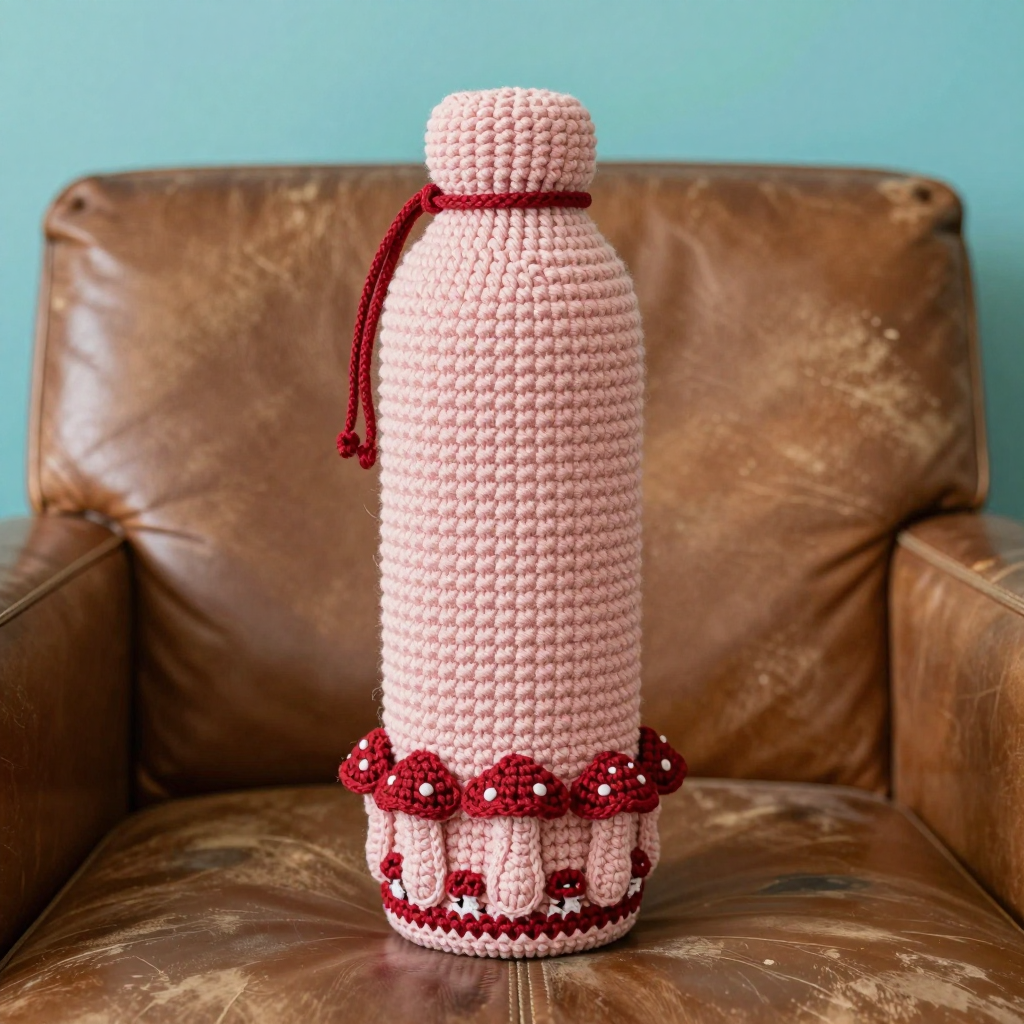
If you have never held a crochet hook before, this is the perfect first project to fall in love with. The Toadstool Trim Water Bottle Cozy is a simple blush pink tube worked in easy single crochet rounds, then dressed up with a row of eight tiny cherry red mushroom motifs around the base and a sweet drawstring top. It is made for absolute beginners who want something charming and useful, not a practice swatch that ends up in a drawer. The finished cozy is a soft, matte, slightly nubby cylinder about 10 inches around and 7 inches tall, with picot-edged mushroom caps peeking around the bottom like a little fairy ring. Slip it over your bottle and it feels like a coastal grandmother's kitchen: warm, handmade, and quietly lovely.
Materials Needed
- Yarn (main color): Sport weight (CYC 2) linen blend, approximately 55% linen / 45% cotton, about 250 yd (229 m) per 100 g skein. Blush pink, 1 skein (you will use about 110 yd / 100 m).
- Yarn (contrast): Same yarn type in cherry red, small amount (about 25 yd / 23 m).
- Crochet hook: 3.5 mm (US E/4) for the tube and motifs.
- Crochet hook: 3.0 mm (US D/3) for the drawstring cord.
- Stitch markers: At least 1 (a scrap of contrasting yarn works too).
- Tapestry needle: A blunt-tipped needle with a large eye for weaving in ends and seaming.
- Scissors for trimming yarn.
- Finished size: Fits a standard 3 in (7.5 cm) diameter water bottle. Circumference approx. 10 in (25.5 cm); height approx. 7 in (18 cm) including the mushroom border. Drawstring opening approx. 3 1/4 in (8.3 cm) across, flat.
Abbreviations and Beginner Glossary
- ch – chain: wrap yarn over hook, pull it through the loop on your hook. Makes one chain.
- sl st – slip stitch: insert hook into stitch, yarn over, pull through the stitch and the loop on your hook at the same time. Makes a nearly invisible joining stitch.
- sc – single crochet: insert hook into stitch, yarn over, pull up a loop (2 loops on hook), yarn over, pull through both loops. One sc made.
- hdc – half double crochet: yarn over, insert hook, pull up a loop (3 loops), yarn over, pull through all 3 loops. (Listed for reference; not used in this pattern.)
- dc – double crochet: yarn over, insert hook, pull up a loop (3 loops), yarn over, pull through 2 loops, yarn over, pull through last 2 loops. (Reference only.)
- tr – treble crochet: yarn over twice, insert hook, pull up a loop, then pull through 2 loops three times. (Reference only.)
- sc2tog – single crochet 2 together (a decrease): insert hook into first stitch, pull up a loop, insert hook into next stitch, pull up a loop (3 loops on hook), yarn over, pull through all 3 loops. Turns 2 stitches into 1.
- ch-3 picot – chain 3, then slip stitch into the third chain from your hook. Makes a tiny bump.
- FLO – front loop only: work into just the loop of the stitch closest to you, leaving the back loop unused.
- BLO – back loop only: work into just the loop farthest from you. (Reference only.)
- st(s) – stitch(es).
- rnd – round: one complete circle of stitches.
- magic ring – an adjustable loop of yarn you crochet into, then pull tight to close the center hole.
- join with sl st – finish a round by making a slip stitch into the first stitch of that round so the circle closes.
Gauge
20 sc x 24 rounds = 4 in (10 cm) in single crochet worked in the round with the 3.5 mm hook, after gentle blocking. One mushroom motif measures approx. 1 1/4 in (3.2 cm) wide x 1 1/2 in (3.8 cm) tall.
Why gauge matters: gauge is how many stitches and rounds fit into one inch. If your stitches are bigger than the pattern's, the cozy will be baggy and slide off the bottle; if smaller, it will not fit over the bottle at all. How to check: chain 22, work 24 rows of sc, block lightly, then lay a ruler across the middle. Count the stitches in 4 inches and the rows in 4 inches. If you have more than 20 stitches, try a larger hook; if fewer, try a smaller hook.
Beginner Tips Before You Start
- Use a stitch marker. The tube is worked in a continuous spiral with no joins, so place a marker in the first stitch of each round and move it up as you go. Without it, you will lose your place.
- Do not pull the yarn too tight. Linen blend has almost no stretch. Keep your stitches relaxed so the cozy slips over the bottle easily.
- Count every round. You should always have 50 stitches. Counting takes ten seconds and saves hours of ripping out.
- Keep the starting chain untwisted. Before joining the ring, lay the chain flat on the table and check that no part spirals.
- Make one mushroom motif first as a test before making all eight. It is small, so any tension problem shows up fast.
- Work the mushroom caps with the right side facing out so the picot bumps sit on the outside of the finished cozy.
Step-by-Step Instructions
Tube (make 1, blush pink, 3.5 mm hook)
Setup: Ch 50, taking care not to twist, sl st in first ch to form a ring.
Rnd 1: Ch 1, sc in each ch around, join with sl st to first sc. (50 sc)
Rnds 2–4: Ch 1, sc in each st around, join with sl st. (50 sc) These three rounds form the turned hem.
Rnd 5: Working in FLO of Rnd 4, sc in each st around, join with sl st. (50 sc)
Rnds 6–40: Sc in each st around in continuous spiral rounds, working into both loops. Do not join; use a marker. (50 sc per round)
After Rnd 40: Sl st in next st, fasten off, weave in ends. Tube measures approx. 5 1/2 in (14 cm) from hem to top edge.
Drawstring Casing (blush pink)
With right side facing, join yarn with sl st to any st of Rnd 40.
Rnd 41: Ch 1, sc in each st around, join with sl st. (50 sc)
Rnd 42: Ch 1, *sc in next 3 sts, ch 1, skip next st; rep from * around, join with sl st. (12 ch-1 spaces)
Rnd 43: Ch 1, sc in each st and in each ch-1 space around, join with sl st. (50 sc)
Rnd 44: Ch 1, sc in each st around, join with sl st. Fasten off, weave in ends.
Mushroom Motif (make 8; caps cherry red, stems blush pink; 3.5 mm hook)
Cap (cherry red):
Rnd 1: Magic ring, ch 1, 6 sc into ring, join with sl st to first sc. (6 sc)
Rnd 2: Ch 1, 2 sc in each st around, join with sl st. (12 sc)
Rnd 3: Ch 1, *sc in next st, 2 sc in next st; rep from * around, join with sl st. (18 sc)
Rnd 4: Ch 1, sc in each st around, join with sl st. (18 sc)
Rnd 5 (picot edge): Ch 1, *sc in next 2 sts, ch-3 picot; rep from * around, join with sl st. Fasten off cherry red. (6 picots)
Stem (blush pink):
Row 1: With right side of cap facing, join blush pink with sl st to the 6th sc of Rnd 4 (center front of cap). Ch 1, sc in same st, sc in next 3 sts. (4 sc)
Row 2: Ch 1, turn, sc2tog, sc2tog. (2 sc)
Row 3: Ch 1, turn, sc2tog. Fasten off, leaving a 6 in (15 cm) tail for joining. (1 sc)
Weave in the cherry red end only; keep the blush tail free.
Joining the Motif Strip
Arrange the 8 motifs in a row, caps pointing up, stems down, all facing the same way.
Join Motif 1 to Motif 2: With cherry red and right side facing, sl st through the outer edge sts of the caps (approx. 5 sl sts per join), working from the bottom edge of the cap to the top. Repeat to join all 8 motifs into a strip. Do not join the first and last motif yet.
Join the strip into a ring: Sl st the first and last motifs together in the same way. Fasten off, weave in ends.
Attaching the Border
Pin the motif ring around the base of the tube, aligning the bottom of the caps with Rnd 5 (the FLO round) and the stems pointing down over the hem.
With blush pink and the 3.5 mm hook, working from the wrong side so stitches are hidden, sl st the top edge of each cap to Rnd 5 of the tube, catching one loop of the motif edge and one loop of the tube per sl st. Work evenly around all 8 motifs. Fasten off, weave in ends.
Tip: Keep the sl sts loose so the border lies flat.
Drawstring Cord (cherry red, 3.0 mm hook)
Cord: Ch 60. Sl st in second ch from hook and in each ch across. Fasten off. (59 sl sts) Cord measures approx. 12 in (30 cm).
Thread the cord through the ch-1 spaces of Rnd 42, beginning and ending at the same space. Tie the ends in a small overhand knot and trim to 1/2 in (1.3 cm).
Assembly and Finishing
Weave in ends: Thread each yarn tail onto the tapestry needle and run it back and forth through the wrong side of the fabric for about 1 inch, then snip close. Never knot your ends; knots work loose in the wash.
Seam check: Turn the cozy inside out and look at the slip-stitched border join. If any gap shows, take a few tiny whipstitches with the tapestry needle and matching yarn to close it.
Blocking: Mist the cozy lightly with water, slide it over a water bottle or a rolled towel, and pin the mushroom caps flat on a towel. Let it dry completely, away from direct sun. Blocking opens up the picots and evens out the single crochet texture.
Final step: Slip the cozy onto the bottle; the drawstring cinches the top. Care: hand wash cool, reshape, and dry flat.
Pro Tips and Variations
- Change the colors: Try cream caps with sage stems, or a mustard tube with rust mushrooms. Keep the contrast between cap and stem strong so the motif reads clearly.
- Adjust the size: The tube works in multiples of 5 stitches. For a wider bottle, add 5 chains to the setup (55 sc) and add 5 more motifs to the border; for a narrower bottle, subtract 5 chains and 1 motif.
- Substitute yarn: Cotton or a cotton-acrylic blend works beautifully and has a bit more stretch, which makes the cozy easier to pull on. Match the sport weight and always swatch your gauge first.
- Make it a gift set: Crochet a second cozy in a matching color and tie the drawstrings together with a small tag. The mushroom border takes only about 25 yards of contrast yarn, so one skein goes a long way.