Lavender Wheel of Segments Crochet Baby Mobile Free Pattern
Lavender Wheel of Segments Crochet Baby Mobile
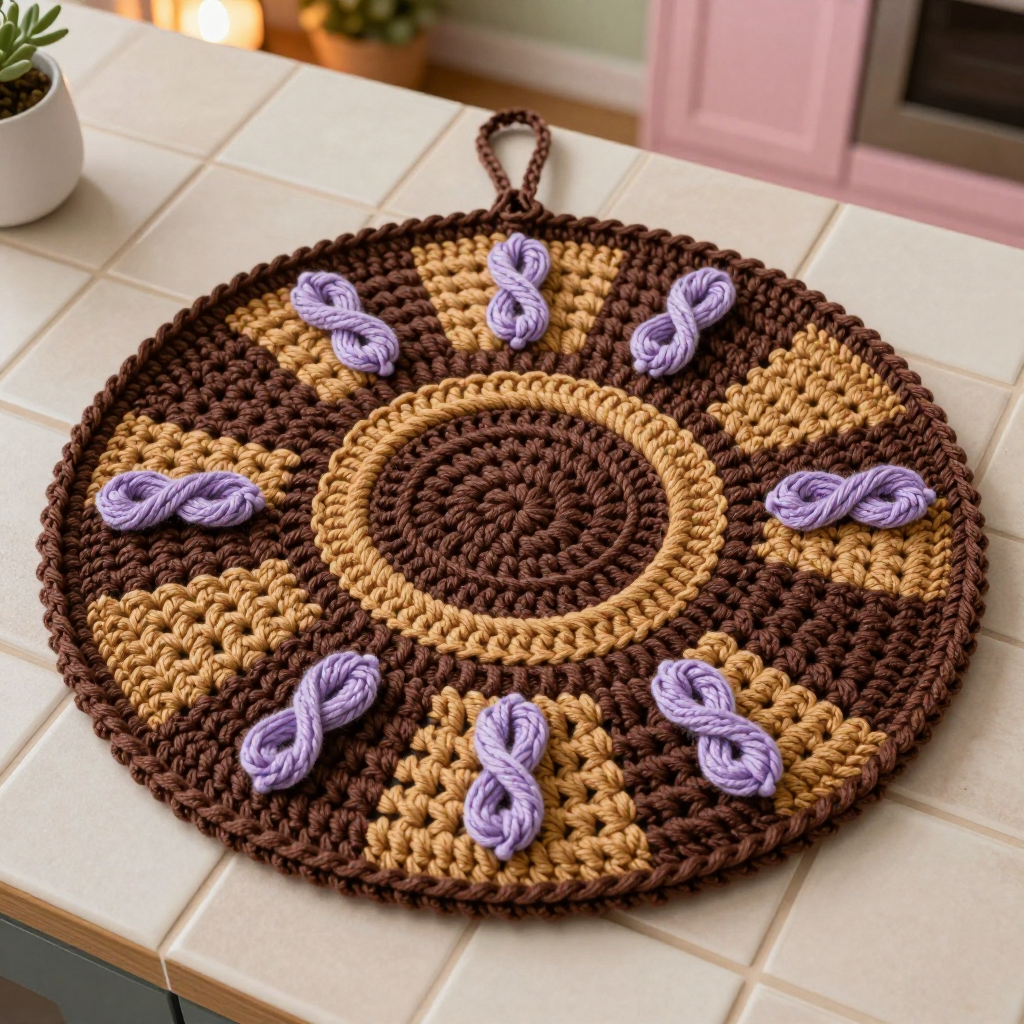
A free, beginner-friendly farmhouse pattern for a flat crocheted circle with eight chocolate-and-caramel alpine stitch segments, each topped with a little lavender yarn knot.
Introduction
If you have never held a crochet hook before, this is the perfect first project to fall in love with. The Lavender Wheel of Segments is a flat, round mobile made from soft baby acrylic in warm chocolate and caramel, with a raised, braided texture called alpine stitch that looks far more complicated than it actually is. It works up as one simple circle, so there is no seaming, no shaping, and no fiddly pieces to assemble — just one continuous, meditative round after round. The finished piece is about 8 inches across, dense and squishy in the hand, with a gentle ridged surface and eight tiny lavender knots that give it a rustic farmhouse charm. Hang it above a crib or changing table (always out of a toddler's reach) and you have a handmade heirloom that took an afternoon and a few beginner stitches.
Materials Needed
- Yarn: Baby-soft acrylic worsted weight yarn (Category 4, approx. 180 yds / 165 m per 3.5 oz / 100 g skein). You will need 1 skein chocolate brown (Color A), 1 skein caramel (Color B), and a small amount of lavender (Color C) — about 2 yards is plenty.
- Crochet hook: Size H-8 / 5.0 mm.
- Stitch marker (one is enough; a scrap of contrasting yarn works too).
- Tapestry needle (a blunt, large-eyed needle for weaving in ends).
- Scissors.
- Optional: a small amount of polyester fiberfill for slight padding.
- Hanging loop: a 12 in / 30 cm length of 1/8 in ribbon or twine.
- Finished size: the circle measures approx. 8 in / 20 cm in diameter. Each of the eight color bands forms one visual segment of the wheel.
Abbreviations and Beginner Glossary
- ch – chain. Make a loop of yarn on your hook, wrap yarn over the hook, and pull it through the loop. That is one chain.
- sc – single crochet. Insert hook into the stitch, yarn over, pull up a loop (2 loops on hook), yarn over, pull through both loops. One loop remains.
- dc – double crochet. Yarn over, insert hook into stitch, yarn over, pull up a loop (3 loops on hook), yarn over, pull through 2 loops, yarn over, pull through last 2 loops.
- fpdc – front post double crochet. Work a double crochet, but instead of going into the top of the stitch, insert your hook from front to back to front around the post (the vertical body) of the stitch below. This pushes the stitch forward and creates the raised braid.
- sl st – slip stitch. Insert hook into stitch, yarn over, pull the loop straight through the stitch and through the loop on your hook. Used here to join rounds.
- st(s) – stitch(es).
- beg – beginning.
- rep – repeat.
- magic ring – an adjustable loop of yarn you crochet into, then pull tight so there is no hole in the center. If it feels tricky, you can instead ch 4 and join with a sl st into a ring, then work into that ring.
- join with sl st – after working all the stitches of a round, slip stitch into the first stitch of that round to close the circle.
- fasten off – cut the yarn leaving a 6 in tail, pull the tail all the way through the last loop, and tug to secure.
- weave in ends – thread a yarn tail onto the tapestry needle and run it back and forth through the back of the fabric so it disappears.
Gauge
14 sts x 8 rows = 4 in / 10 cm in alpine stitch (the post stitches create a dense, textured fabric).
Why gauge matters: gauge is simply how big your stitches turn out. If your stitches are bigger than the pattern's, your circle will be larger than 8 inches; if smaller, it will shrink. Because this mobile is a single flat circle, gauge mostly affects the final diameter — but it is still worth checking so your project looks like the photo.
How to make a gauge swatch: with your H-8 hook and Color A, ch 22. Work 1 row of dc, then 1 row of alternating fpdc and dc, repeating these two rows until your swatch is about 4 in tall. Lay it flat, place a ruler across the middle, and count the stitches in 4 inches and the rows in 4 inches. If you have more stitches than 14, your tension is tight — try a larger hook. If you have fewer, try a smaller hook. (For a decorative mobile, a small difference is fine — just aim to be close.)
Beginner Tips Before You Start
- Use a stitch marker. Place it in the first stitch of each round so you always know where the round begins and ends. Move it up as you go.
- Do not pull your yarn too tight. New crocheters tend to choke the hook. Keep a relaxed, even tension — the fabric should feel soft, not stiff.
- Count every round. The stitch counts in parentheses are your safety net. If a round comes out wrong, undo it right away rather than discovering it ten rounds later.
- Change colors on the last stitch of the round. Pull the new color through the final loop of the last stitch, then join — this hides the change neatly.
- Carry the unused color loosely. When you switch between A and B, let the resting yarn lie along the back without pulling; too-tight floats will make the circle pucker.
- Keep your front post stitches loose. Fpdc is easier if you gently push the post toward you with your finger as you insert the hook.
Step-by-Step Instructions
Part 1: Base Circle (Color A – chocolate)
Rnd 1: Make a magic ring. Ch 1 (does not count as a st). Work 8 sc into the ring. Join with sl st to first sc. (8 sc)
Rnd 2: Ch 1. Work 2 sc in each st around. Join with sl st to first sc. (16 sc)
Rnd 3: Ch 1. *2 sc in next st, sc in next st; rep from * around. Join with sl st to first sc. (24 sc)
Rnd 4: Ch 1. *2 sc in next st, sc in next 2 sts; rep from * around. Join with sl st to first sc. (32 sc)
Rnd 5: Ch 1. *2 sc in next st, sc in next 3 sts; rep from * around. Join with sl st to first sc. (40 sc)
Rnd 6: Ch 1. *2 sc in next st, sc in next 4 sts; rep from * around. Join with sl st to first sc. (48 sc)
Rnd 7: Ch 1. *2 sc in next st, sc in next 5 sts; rep from * around. Join with sl st to first sc. (56 sc)
Rnd 8: Ch 1. *2 sc in next st, sc in next 6 sts; rep from * around. Join with sl st to first sc. (64 sc)
Rnd 9: Ch 1. *2 sc in next st, sc in next 7 sts; rep from * around. Join with sl st to first sc. (72 sc)
Rnd 10: Ch 1. *2 sc in next st, sc in next 8 sts; rep from * around. Join with sl st to first sc. (80 sc)
Rnd 11: Ch 1. *2 sc in next st, sc in next 9 sts; rep from * around. Join with sl st to first sc. (88 sc)
Rnd 12: Ch 1. *2 sc in next st, sc in next 10 sts; rep from * around. Join with sl st to first sc. (96 sc)
Rnd 13: Ch 1. *2 sc in next st, sc in next 11 sts; rep from * around. Join with sl st to first sc. (104 sc)
Rnd 14: Ch 1. *2 sc in next st, sc in next 12 sts; rep from * around. Join with sl st to first sc. (112 sc)
Part 2: Alpine Stitch Segments (color changes begin)
Color sequence: change color every 2 rounds in this order: A, A, B, B, A, A, B, B — eight color bands of 2 rounds each. Carry the unused yarn loosely up the wrong side, or fasten off and rejoin.
Rnd 15 (Color A): Ch 2 (counts as first dc). Dc in each st around. Join with sl st to top of beg ch-2. (112 dc)
Rnd 16 (Color A): Ch 2. *Fpdc around next st, dc in next st; rep from * around, ending with fpdc around last st. Join with sl st to top of beg ch-2. (112 sts)
Rnd 17 (Color B): Ch 1. Sc in each st around. Join with sl st to first sc. (112 sc)
Rnd 18 (Color B): Ch 2. *Fpdc around next st, dc in next st; rep from * around, ending with fpdc around last st. Join with sl st to top of beg ch-2. (112 sts)
Rnd 19 (Color A): Ch 1. Sc in each st around. Join with sl st to first sc. (112 sc)
Rnd 20 (Color A): Ch 2. *Fpdc around next st, dc in next st; rep from * around, ending with fpdc around last st. Join with sl st to top of beg ch-2. (112 sts)
Rnd 21 (Color B): Ch 1. Sc in each st around. Join with sl st to first sc. (112 sc)
Rnd 22 (Color B): Ch 2. *Fpdc around next st, dc in next st; rep from * around, ending with fpdc around last st. Join with sl st to top of beg ch-2. (112 sts)
Part 3: Edging
Rnd 23 (Color A): Ch 1. Sc in each st around. Join with sl st to first sc. (112 sc)
Rnd 24: Ch 1. Sc in each st around. Join with sl st to first sc. (112 sc)
Fasten off. Weave in all ends.
Part 4: Lavender Yarn Knots (make 8)
With lavender (Color C), cut 8 lengths of yarn, each approx. 6 in / 15 cm long. Tie a small knot at the center of each length, leaving two tails. Trim the tails to approx. 1 in / 2.5 cm. These are your lavender knots.
Assembly and Finishing
1. Attach the knots. Using the tapestry needle, attach one lavender knot to the center of each of the eight color segments, spacing them evenly around the circle. Secure each one with a small stitch through the knot so it cannot come loose.
2. Make the hanging loop. Fold the ribbon or twine in half to form a loop. Using the tapestry needle, sew the two ends securely to the center of the back of the circle, stitching back and forth a few times for strength.
3. Optional padding. If you would like a slightly padded center, lightly stuff a small amount of fiberfill between the layers at the center before the final securing stitches — this is entirely optional.
4. Weave in ends. Thread each remaining yarn tail onto the tapestry needle and run it back and forth through the back of the fabric for about 1 inch, then trim close to the fabric.
5. Block. Lightly mist the circle with water, lay it flat on a towel, and gently pat it into a perfect round shape. Let it dry completely — this flattens any curl and evens out the texture.
Safety note: ensure all knots are secure and tails are woven in. Hang the mobile out of reach of the toddler — this is a decorative item, not a toy. Check it periodically for loose parts.
Pro Tips and Variations
- Change the palette. Swap chocolate and caramel for sage and cream, or dusty blue and grey, for a different nursery theme. Keep the lavender knots as the accent color for a cohesive look.
- Make it bigger or smaller. To enlarge the circle, continue the base circle increase pattern (each round adds 8 stitches) until you reach your desired size, then work the alpine segments at that stitch count. To shrink it, stop the base circle earlier — just keep the stitch count a multiple of 8 so the segments divide evenly.
- Substitute yarn. Any worsted weight (Category 4) yarn works; a cotton blend gives a crisper, more defined stitch, while acrylic stays soft and baby-friendly. Always check your gauge with the new yarn.
- Add a tassel or bead. Hang a small wooden bead or a short yarn tassel from the bottom of the hanging loop for extra farmhouse charm — just make sure it is securely fastened and out of reach.
Your Lavender Wheel of Segments mobile is complete — congratulations on your first crochet project!