Jingle Bell Berry Wreath Free Crochet Pattern – Festive Textured Holiday Hoop
Jingle Bell Berry Wreath Free Crochet Pattern – Festive Textured Holiday Hoop
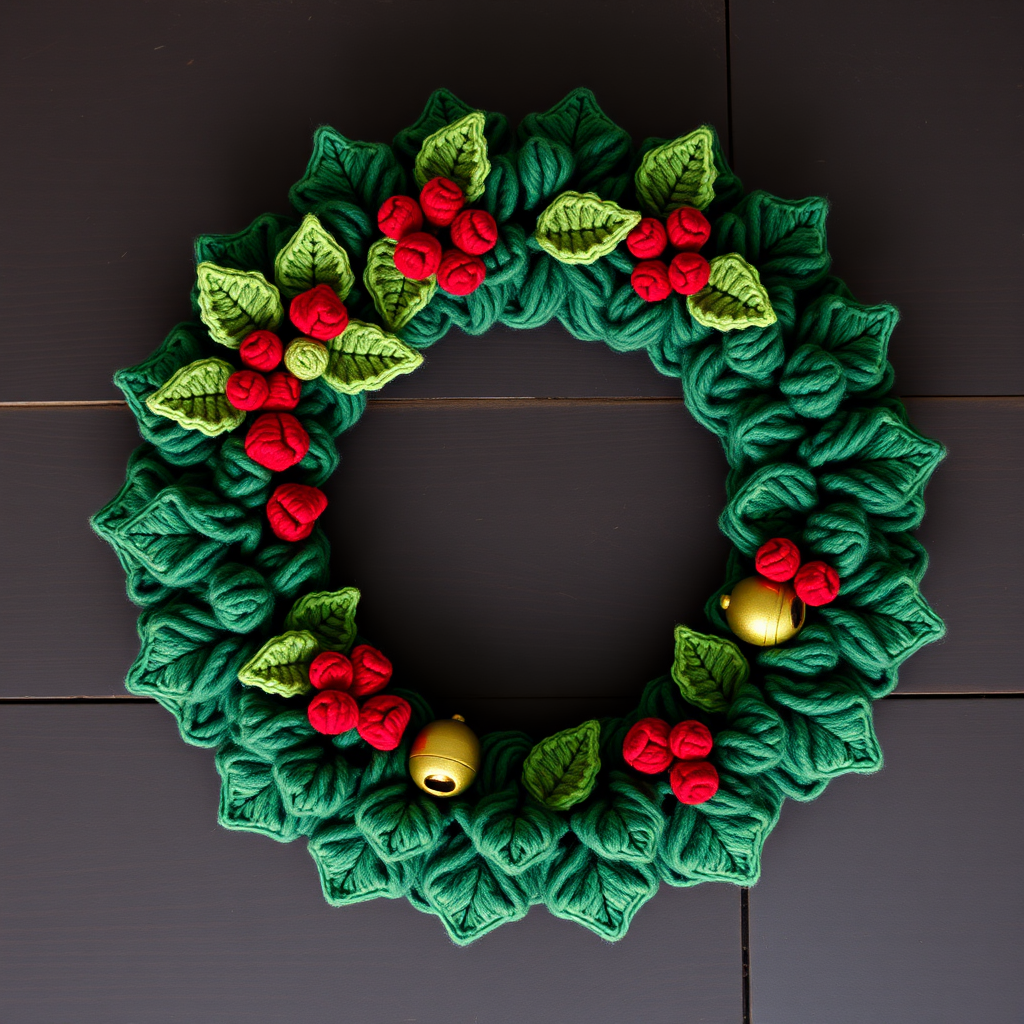
Wrap your door in cozy cheer with this lush, berry-studded crochet wreath that combines classic Christmas colors with a modern, tactile twist. Each jingling bell is hand-crocheted and nestled among textured leaves for a warm, handmade welcome. This pattern is perfect for intermediate beginners looking to create a stunning holiday decoration that will be treasured for years to come.
The Jingle Bell Berry Wreath features a beautifully ruffled base ring in deep forest green, adorned with 12 pointed leaves, 15 plump cranberry-red berries, and 8 golden bells that actually jingle! The three-dimensional texture and rich color palette make this wreath a standout piece for your front door, mantel, or wall. Best of all, this free crochet pattern breaks down into simple, manageable pieces that you can work on while watching your favorite holiday movies.
Materials Needed
Before you begin, gather the following supplies to ensure a smooth crochet experience:
Yarn Requirements
- Forest Green – Worsted weight yarn, approximately 200g (for the base ring and leaves)
- Cranberry Red – Worsted weight yarn, approximately 100g (for the berries)
- Cream – Worsted weight yarn, approximately 50g (for accent details)
- Gold – Worsted weight yarn, approximately 20g (for the bells)
Tools and Notions
- 5.0 mm (H-8) crochet hook
- Yarn needle for weaving in ends and assembly
- Stitch markers to keep track of rounds
- Small jingle bells (8 pieces) – purchased from craft store
- Scissors
- Small amount of yarn scrap for stuffing berries
Gauge Information
4" x 4" = 16 sc x 18 rows. Gauge is not critical for this project, but consistent tension helps the wreath lie flat and maintain its beautiful shape.
Step-by-Step Instructions
This wreath is worked in two main parts: the base ring and the decorative elements (leaves, berries, and bells). All pieces are crocheted separately and then assembled. Follow each section carefully, and you'll have a gorgeous wreath in no time!
Part 1: The Base Ring
The base ring creates a ruffled, textured circle that serves as the foundation for all your decorative elements. Take your time with this section – the shells create the beautiful dimensional look.
Foundation: Make a chain of 60 stitches. Join with a slip stitch to form a ring, being careful not to twist your chain.
Round 1: Chain 1, single crochet in each chain around, join with a slip stitch to the first single crochet. (60 single crochet stitches)
Round 2: Chain 1, single crochet in the same stitch, *chain 3, skip 2 stitches, single crochet in the next stitch* – repeat from * to * around, join with a slip stitch to the first single crochet. (20 chain-3 spaces)
Round 3: Slip stitch into the first chain-3 space, chain 1, work (single crochet, half double crochet, double crochet, half double crochet, single crochet) in each chain-3 space around, join with a slip stitch to the first single crochet. (20 shell clusters)
Round 4: Chain 1, single crochet in the same stitch, *chain 5, skip the next shell, single crochet in the next single crochet* – repeat from * to * around, join with a slip stitch to the first single crochet. (20 chain-5 spaces)
Round 5: Slip stitch into the first chain-5 space, chain 1, work (single crochet, half double crochet, 3 double crochet, half double crochet, single crochet) in each chain-5 space around, join with a slip stitch to the first single crochet. (20 larger shells)
Round 6: Chain 1, single crochet in the same stitch, *chain 7, skip the next shell, single crochet in the next single crochet* – repeat from * to * around, join with a slip stitch to the first single crochet. (20 chain-7 spaces)
Round 7: Slip stitch into the first chain-7 space, chain 1, work (single crochet, half double crochet, 5 double crochet, half double crochet, single crochet) in each chain-7 space around, join with a slip stitch to the first single crochet. (20 extra-large shells)
Fasten off and weave in your ends securely. Your ruffled base ring is complete! Set it aside while you create the decorative elements.
Part 2: Leaves (Make 12)
These pointed, textured leaves add organic charm to your wreath. The shaping creates a realistic leaf silhouette.
Foundation: Chain 10.
Row 1: Single crochet in the 2nd chain from hook, half double crochet in the next chain, double crochet in the next 5 chains, half double crochet in the next chain, single crochet in the last chain. (9 stitches)
Row 2: Chain 1, turn, single crochet in each stitch across. (9 single crochet stitches)
Row 3: Chain 1, turn, single crochet in the first 2 stitches, half double crochet in the next stitch, double crochet in the next 3 stitches, half double crochet in the next stitch, single crochet in the last 2 stitches. (9 stitches)
Fasten off, leaving a long tail for sewing. To shape the leaf, fold it slightly lengthwise and sew the base together to create a pointed leaf form. This gives the leaf dimension and makes it easier to attach to the wreath.
Part 3: Berries (Make 15)
These plump red berries add pops of festive color throughout your wreath. They're quick to make and adorable!
Foundation: Using Cranberry Red yarn, make a magic ring.
Round 1: Work 6 single crochet into the ring. (6 single crochet stitches)
Round 2: Work 2 single crochet in each stitch around. (12 single crochet stitches)
Round 3: Single crochet in each stitch around. (12 single crochet stitches)
Round 4: Single crochet 2 together (sc2tog) around. (6 single crochet stitches)
Fasten off, leaving a long tail. Stuff lightly with a small amount of yarn scrap to give the berry its plump shape. Pull the tail to close the opening and secure with a few stitches. Weave in the end or leave it for assembly.
Part 4: Bells (Make 8)
These charming golden bells hide a real jingle bell inside for an authentic festive sound. They're sure to delight visitors of all ages!
Foundation: Using Gold yarn, make a magic ring.
Round 1: Work 6 single crochet into the ring. (6 single crochet stitches)
Round 2: Work 2 single crochet in each stitch around. (12 single crochet stitches)
Round 3: Single crochet in each stitch around. (12 single crochet stitches)
Round 4: (Single crochet in the next 2 stitches, single crochet 2 together) – repeat around. (9 single crochet stitches)
Round 5: Single crochet in each stitch around. (9 single crochet stitches)
Round 6: (Single crochet in the next stitch, single crochet 2 together) – repeat around. (6 single crochet stitches)
Fasten off, leaving a long tail. Do not stuff. Instead, insert a small purchased jingle bell into the crocheted bell, then pull the tail to close the top and secure. Sew a small loop of gold yarn at the top for hanging – this will be used to attach the bell to the wreath.
Part 5: Assembly
Now comes the fun part – bringing all your pieces together to create your beautiful wreath!
Step 1 – Attach the Leaves: Arrange the 12 leaves evenly around the base ring. Using the green yarn tails, sew each leaf onto the ring. Overlap them slightly for a full, lush look. Make sure they're distributed evenly – roughly every 3rd shell cluster should have a leaf.
Step 2 – Add the Berries: Sew the berries in clusters of 2-3 between the leaves, using the red tails. Position them so they peek out from between the leaves, creating natural-looking berry clusters. Distribute all 15 berries evenly around the wreath.
Step 3 – Attach the Bells: Attach the 8 bells at various points around the wreath, letting them dangle slightly below the ring. Use the gold loops you created to sew them securely. Vary the attachment points slightly so the bells hang at different lengths for visual interest.
Step 4 – Create the Hanging Loop: With green yarn, chain 20 stitches. Sew the ends to the top back of the wreath, creating a sturdy hanging loop. Make sure it's centered and secure.
Step 5 – Final Touches: Weave in all ends securely. Give your wreath a gentle shake to make sure everything is attached firmly. Fluff the shells and arrange the leaves and berries to your liking.
Tips for Success
- Keep consistent tension throughout your work to ensure the wreath lies flat and maintains its shape.
- Use stitch markers to keep track of your rounds, especially when working the base ring.
- Block your base ring if needed – lightly steam or wet block to help it lie perfectly flat.
- Customize your colors – try white and silver for a winter wonderland theme, or burgundy and gold for a more traditional look.
- Make extra berries – they're quick to make and can fill any sparse areas.
Your Jingle Bell Berry Wreath is now complete! Hang it proudly on your door, above your mantel, or anywhere that needs a touch of handmade holiday cheer. The jingling bells and rich textures will bring smiles to everyone who sees it. This wreath also makes a wonderful handmade gift for friends and family – just wrap it carefully and watch their faces light up!
Happy crocheting, and have a wonderfully crafty holiday season!


