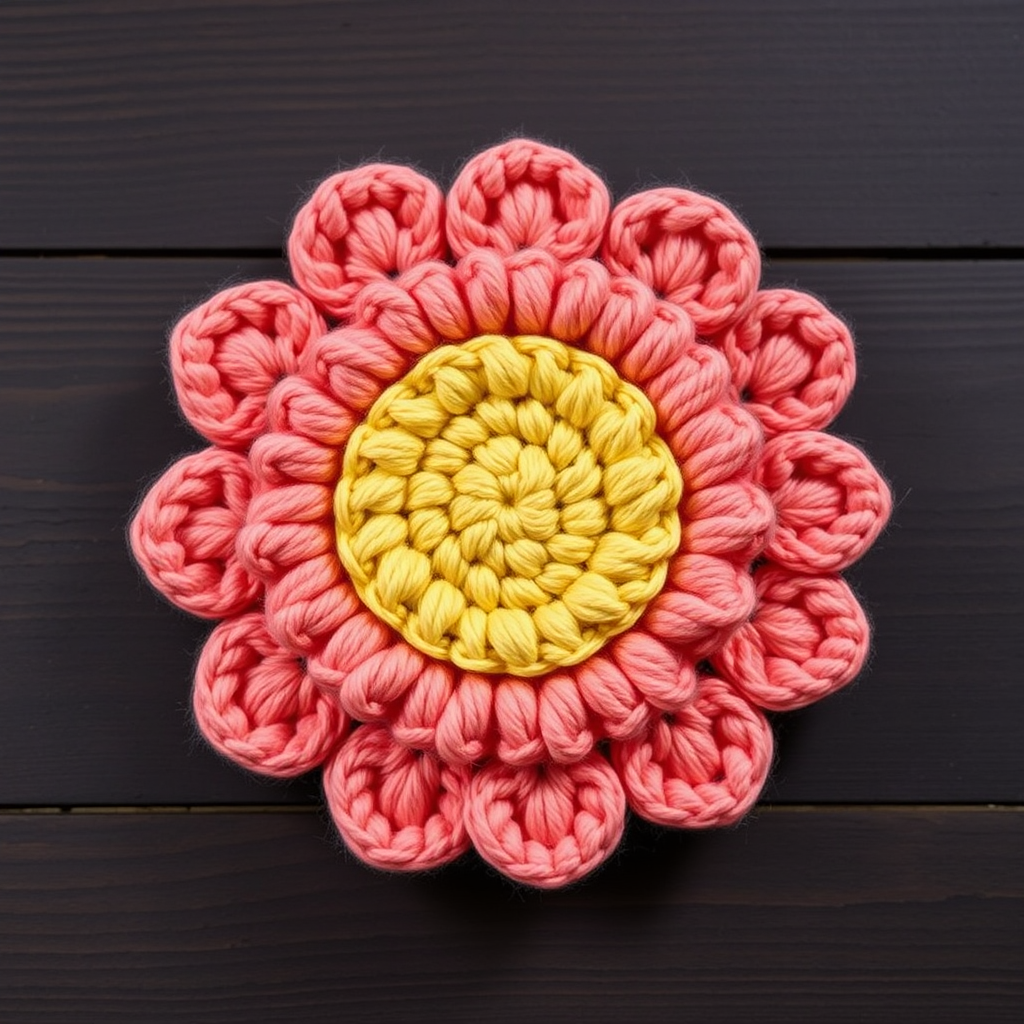
Enchanted Meadow Bloom Brooch Free Crochet Pattern – Layered Petal Garden Pin

Enchanted Meadow Bloom Brooch: A Free Crochet Pattern for a Layered Petal Garden Pin
Imagine capturing the whimsical charm of a wildflower meadow in full bloom and pinning it to your favorite jacket. That's exactly what you'll achieve with this Enchanted Meadow Bloom Brooch crochet pattern. This layered, three-dimensional flower pin features textured petals and a delicate, ruffled center, making it a perfect piece of wearable art. Whether you're adorning a cozy scarf, a handbag, or a simple cardigan, this handmade brooch adds a touch of garden-inspired elegance to any outfit. Best of all, this free pattern is beginner-friendly, using basic crochet stitches to create a stunning, professional-looking result.
This project is a joy to make, working up quickly with worsted weight cotton yarn. The design cleverly uses back-loop-only stitches to create cupped, dimensional petals that overlap beautifully. The result is a lush, layered bloom approximately 4 inches in diameter that's sure to become a treasured accessory. Let's dive into this delightful crochet flower pattern and create your own little piece of meadow magic.
Materials Needed
Before you begin, gather these simple supplies. The beauty of this pattern is that it requires minimal materials, making it a perfect stash-busting project.
- Yarn: Worsted weight cotton yarn in three shades:
- Soft blush pink (for the largest petal layer)
- Warm cream (for the middle petal layer)
- Golden yellow (for the center)
- Crochet Hook: 3.5mm (E) crochet hook
- Yarn Needle: For weaving in ends and sewing layers together
- Optional: Pin back or brooch clasp, strong thread or fabric glue for attaching it
Gauge: Gauge is not critical for this project. The key is to aim for a tight, firm fabric to help the petals hold their shape. If your stitches are loose, consider using a slightly smaller hook.
Step-by-Step Instructions
Follow these detailed instructions to create your Enchanted Meadow Bloom. We'll start with the largest petal layer and work our way to the center. Take your time, and you'll have a gorgeous flower in no time.
Petal Layer 1 (Large, 5 Petals) - Soft Blush Pink
This is the largest layer, forming the base of your flower. The increases in the back loops only create the cupped petal shape.
- Round 1: Make a magic ring. Chain 1 (does not count as a stitch). Work 10 single crochet (sc) into the ring. Slip stitch (sl st) to join with the first sc. (10 stitches)
- Round 2: Chain 1. Work 2 sc in each stitch around. Slip stitch to join. (20 stitches)
- Round 3: Chain 1. *Sc in the next stitch, 2 sc in the next stitch.* Repeat from * to * around. Slip stitch to join. (30 stitches)
- Round 4: Chain 1. *Sc in the next 2 stitches, 2 sc in the next stitch.* Repeat from * to * around. Slip stitch to join. (40 stitches)
- Round 5: Chain 1. Working in back loops only, *sc in the next 7 stitches, 2 sc in the next stitch.* Repeat from * to * around. Slip stitch to join. (45 stitches)
- Round 6: Chain 1. Working in back loops only, *sc in the next 8 stitches, 2 sc in the next stitch.* Repeat from * to * around. Slip stitch to join. (50 stitches)
- Fasten off and weave in the yarn end.
Petal Layer 2 (Medium, 4 Petals) - Warm Cream
This middle layer sits on top of the pink layer, adding depth and contrast. The technique is identical to the first layer, just with fewer starting stitches.
- Round 1: Make a magic ring. Chain 1. Work 8 sc into the ring. Slip stitch to join. (8 stitches)
- Round 2: Chain 1. Work 2 sc in each stitch around. Slip stitch to join. (16 stitches)
- Round 3: Chain 1. *Sc in the next stitch, 2 sc in the next stitch.* Repeat from * to * around. Slip stitch to join. (24 stitches)
- Round 4: Chain 1. *Sc in the next 2 stitches, 2 sc in the next stitch.* Repeat from * to * around. Slip stitch to join. (32 stitches)
- Round 5: Chain 1. Working in back loops only, *sc in the next 6 stitches, 2 sc in the next stitch.* Repeat from * to * around. Slip stitch to join. (36 stitches)
- Round 6: Chain 1. Working in back loops only, *sc in the next 7 stitches, 2 sc in the next stitch.* Repeat from * to * around. Slip stitch to join. (40 stitches)
- Fasten off and weave in the yarn end.
Petal Layer 3 (Small, 3 Petals) - Deeper Rose Shade
This is the topmost petal layer, adding a final pop of color and texture. If you don't have a deeper rose shade, you can use another color from your stash that complements the pink and cream.
- Round 1: Make a magic ring. Chain 1. Work 6 sc into the ring. Slip stitch to join. (6 stitches)
- Round 2: Chain 1. Work 2 sc in each stitch around. Slip stitch to join. (12 stitches)
- Round 3: Chain 1. *Sc in the next stitch, 2 sc in the next stitch.* Repeat from * to * around. Slip stitch to join. (18 stitches)
- Round 4: Chain 1. *Sc in the next 2 stitches, 2 sc in the next stitch.* Repeat from * to * around. Slip stitch to join. (24 stitches)
- Round 5: Chain 1. Working in back loops only, *sc in the next 5 stitches, 2 sc in the next stitch.* Repeat from * to * around. Slip stitch to join. (28 stitches)
- Fasten off and weave in the yarn end.
Center (Golden Yellow)
The ruffled center mimics a sunflower's heart and is the perfect finishing touch for your bloom.
- Round 1: Make a magic ring. Chain 1. Work 6 sc into the ring. Slip stitch to join. (6 stitches)
- Round 2: Chain 1. Work 2 sc in each stitch around. Slip stitch to join. (12 stitches)
- Round 3: Chain 1. *Sc in the next stitch, 2 sc in the next stitch.* Repeat from * to * around. Slip stitch to join. (18 stitches)
- Round 4: Chain 1. Working in front loops only, *sc in the next stitch, chain 2, slip stitch in the same stitch.* Repeat from * to * around to create a ruffled, scalloped edge.
- Fasten off, leaving a long tail (about 12 inches) for sewing the center onto the flower.
Assembly
Now for the fun part—bringing all your beautiful pieces together to create the final brooch.
- Layer the Petals: Place the largest pink layer down first. On top of it, place the medium cream layer, rotating it so its petals sit between the petals of the pink layer for a fuller, more natural look. Finally, place the smallest rose layer on top, again rotating it to alternate with the cream layer.
- Sew the Layers Together: Thread your yarn needle with a length of yarn (you can use any of the colors, or a matching thread). Sew through the center of all three layers, going back and forth several times to secure them firmly together. Make sure your stitches are hidden in the center where the flower's middle will cover them.
- Attach the Center: Place the golden yellow center piece on top of the assembled petals. Using the long tail you left, sew the center securely to the flower, stitching through all layers. Again, go back and forth a few times to ensure it's well-attached.
- Add the Pin Back (Optional): Turn the flower over. If you're adding a pin back or brooch clasp, position it in the center of the back. Sew it on securely using strong thread, or attach it with a strong fabric glue. Allow the glue to dry completely before wearing.
- Final Shaping: Weave in any remaining yarn ends. Gently shape the petals by curling them slightly outward with your fingers. This will give your flower a lively, natural look.
And there you have it—a stunning, handcrafted Enchanted Meadow Bloom Brooch! This project is a wonderful way to practice your crochet skills and create a beautiful, functional piece of art. Wear it with pride, or gift it to a fellow flower lover. Happy crocheting!