Aurora Cloud Slippers Free Crochet Pattern – Dreamy Gradient House Slippers
Aurora Cloud Slippers Free Crochet Pattern – Dreamy Gradient House Slippers
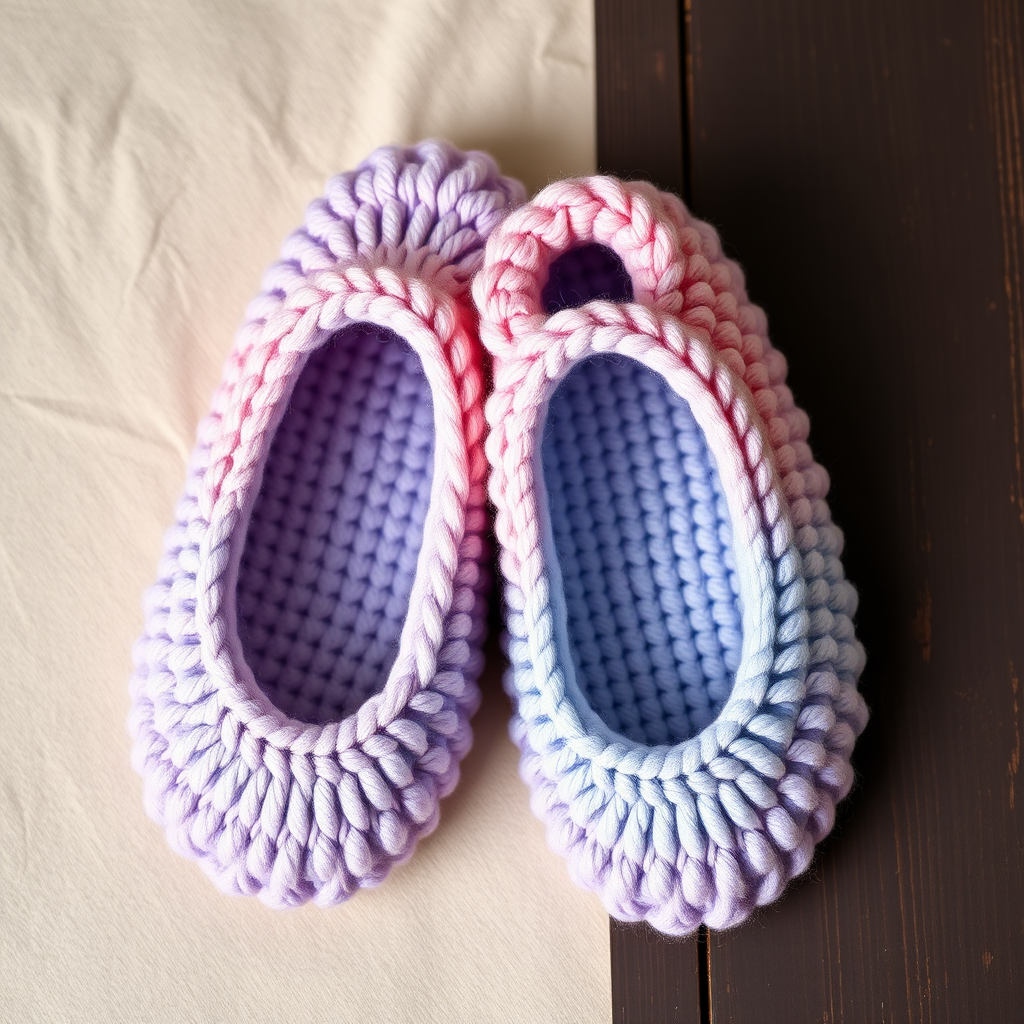
Wrap your feet in the softest, dreamiest clouds with these gradient house slippers that transition from blush pink to lavender to sky blue. This quick one-hour project uses a simple half-double crochet stitch to create a plush, cozy fit that feels like walking on marshmallows. Perfect for beginners and experienced crocheters alike, these slippers are the ultimate handmade comfort accessory for lounging at home, gifting, or treating yourself to a little luxury.
With a dense, ribbed texture and a seamless, moccasin-like silhouette, the Aurora Cloud Slippers are as beautiful as they are functional. The gradient yarn does all the colorwork for you, so you can relax and enjoy the rhythmic flow of stitching while watching your slippers come to life. Whether you're curling up with a book, sipping hot cocoa, or simply padding around the house, these slippers will keep your toes toasty and your style on point.
Materials Needed
Before you begin, gather the following supplies to ensure a smooth and enjoyable crochet session:
- Yarn: Worsted weight (#4) in gradient colors: blush pink, lavender, sky blue (or any self-striping gradient yarn), approximately 150g total. A self-striping yarn will automatically create the beautiful color transition, but you can also use three separate colors and change them as you go.
- Crochet Hook: 5.5mm (I-9) crochet hook. This size creates the perfect dense, squishy fabric for slippers.
- Other Tools: Yarn needle for weaving in ends, scissors, and a stitch marker (optional but helpful for keeping track of rounds).
Gauge: 14 hdc x 11 rows = 4x4 inches (10x10 cm). Gauge is important for achieving the correct size, so take a moment to make a small swatch before starting.
Sizes: This pattern is written for Women's US 6-8. To adjust for other sizes, simply change the starting chain length (see instructions below).
Step-by-Step Instructions
Follow these detailed instructions carefully, and you'll have a pair of dreamy slippers in no time. The pattern is broken into three main parts: the sole, the upper, and the finishing touches.
Abbreviations
- ch = chain
- hdc = half double crochet
- sl st = slip stitch
- st(s) = stitch(es)
- sc = single crochet
- hdc2tog = half double crochet 2 together (decrease)
Sole (Make 2)
The sole forms the foundation of your slipper. It's worked flat in rows, creating a sturdy, comfortable base.
- Foundation Chain: Ch 22 (or your desired length: approximately 1 inch less than your actual foot length. For example, if your foot is 9 inches long, chain to measure 8 inches).
- Row 1: Hdc in the 3rd ch from the hook (the first 2 chs count as your first hdc) and in each ch across. You should have 20 hdc stitches. Ch 2, turn.
- Row 2: Hdc in each st across. (20 hdc) Ch 2, turn.
- Rows 3+: Repeat Row 2 until the sole measures 1 inch shorter than your foot length. For a US women's size 6-8, this will be approximately 8-9 inches total. The fabric should be dense and slightly stiff to provide good support.
- Finish: Fasten off and weave in the yarn tail. Repeat to make a second sole.
Pro Tip: To ensure your slippers fit perfectly, trace your foot on a piece of paper and measure the length. Use this measurement to adjust your starting chain and row count.
Upper (Make 2)
The upper is worked in the round, starting from the sole and building upward to create the cozy, moccasin-like shape.
- Attach Yarn: Attach your yarn to the center back edge of the sole with a sl st. This will be the heel area of your slipper.
- Round 1: Ch 1, then sc evenly around the entire sole. To round the edges nicely, work 2 sc in each corner stitch. Join with a sl st to the first sc. You should have approximately 60 sc stitches around the perimeter. (The exact number may vary slightly depending on your sole size, which is fine.)
- Round 2: Ch 2 (this counts as your first hdc), then hdc in each st around. Join with a sl st to the top of the ch-2. (60 hdc)
- Rounds 3-5: Repeat Round 2 for three more rounds. This builds the height of the slipper around your foot. (60 hdc each round)
- Round 6 (Toe Shaping Begins): Ch 2, hdc in the next 20 sts, then hdc2tog (decrease) 5 times, hdc in the next 20 sts, hdc2tog 5 times, join with sl st. (50 hdc) This begins to shape the toe area, making it narrower.
- Round 7: Ch 2, hdc in the next 18 sts, hdc2tog 4 times, hdc in the next 18 sts, hdc2tog 4 times, join. (42 hdc)
- Round 8: Ch 2, hdc in the next 16 sts, hdc2tog 3 times, hdc in the next 16 sts, hdc2tog 3 times, join. (36 hdc)
- Round 9: Ch 1, sc in each st around, join. This final round creates a neat, finished edge. Fasten off and weave in all ends.
Understanding the Decreases: The hdc2tog decreases are placed at the front of the slipper (the toe area). By working them in pairs (5, then 4, then 3), you create a gentle, rounded curve that fits the shape of your foot perfectly.
Finishing Touches
- Fold the Cuff: Gently fold the top edge of the upper down slightly at the ankle to create a soft, rolled cuff. This not only looks adorable but also helps keep the slipper securely on your foot.
- Optional Embellishment: For extra charm, add a small pom-pom at the center front toe of each slipper. You can make a pom-pom with leftover yarn or use a store-bought one. Attach it securely with a yarn needle.
- Weave in Ends: Double-check that all yarn tails are securely woven in to prevent unraveling.
And there you have it—your very own pair of Aurora Cloud Slippers! These dreamy, gradient house shoes are perfect for keeping your feet warm and cozy all year round. The soft pastel colors and plush texture make them a joy to wear and a beautiful handmade gift for friends and family.
Happy crocheting, and may your feet always feel like they're walking on clouds!


