Whispering Willow Dragon Free Pattern – Crocheted Forest Guardian Amigurumi
Whispering Willow Dragon Free Pattern – Crocheted Forest Guardian Amigurumi
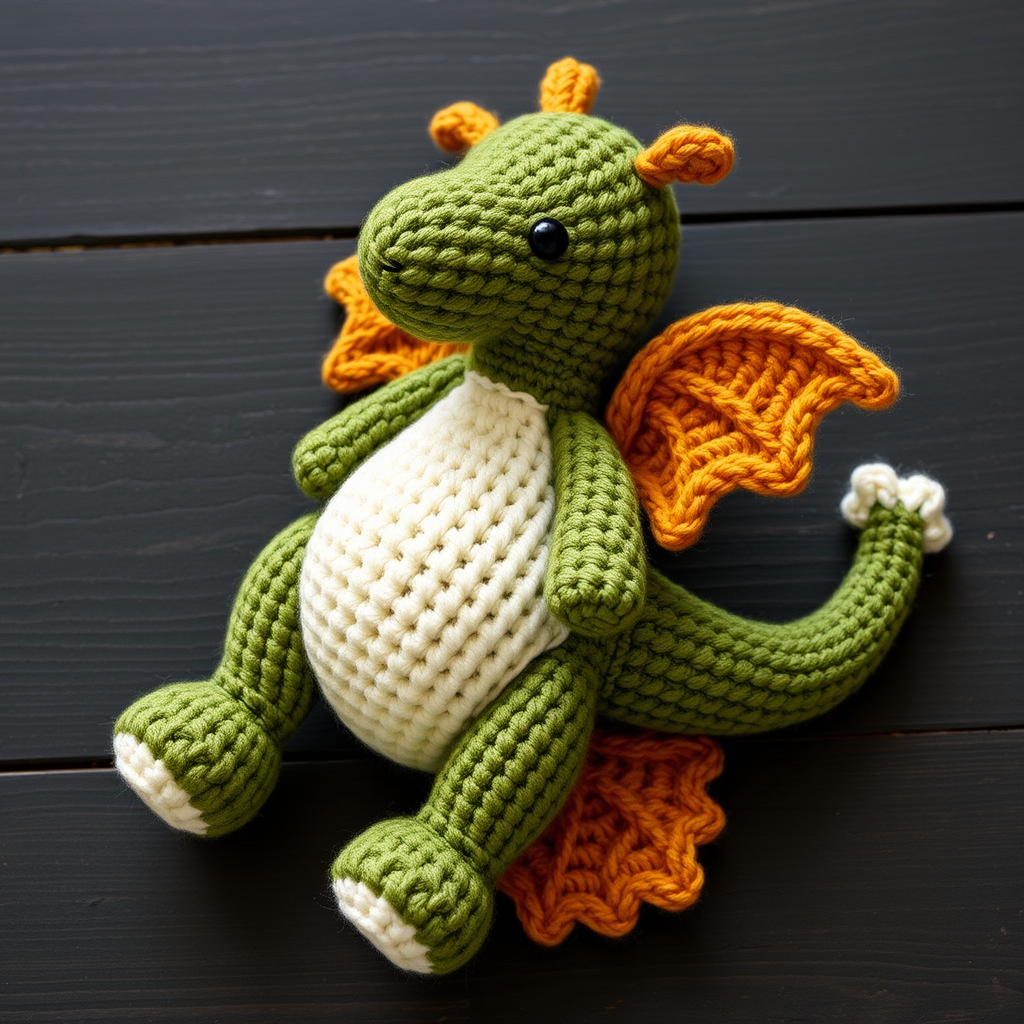
Welcome to the enchanting world of amigurumi! Today, I'm thrilled to share a truly special pattern with you: the Whispering Willow Dragon. This gentle, mossy-green dragon is a forest guardian at heart, designed with leaf-shaped wings and a curling tail that makes it perfect for nature-loving crafters. Using textured single-crochet stitches, this pattern creates a soft, heirloom-quality companion that feels both cozy and magical. Whether you're a seasoned crocheter or a brave beginner ready for a rewarding project, this dragon will steal your heart. Let's gather our supplies and bring this little guardian to life!
Materials Needed
Before we dive into the magic, let's ensure you have everything you need. This project is wonderfully portable and uses simple, accessible materials:
- Yarn: Worsted weight cotton or acrylic blend in four colors: moss green (head, arms), sage green (body, tail), cream (legs), and gold (wings). Approximately 200g total (roughly 2 skeins of main color, 1 of each accent).
- Hook: 3.5mm crochet hook (or size needed to meet gauge).
- Gauge: 4 sc x 4 rows = 1 inch in single crochet. (Don't stress about perfect gauge for amigurumi—just use a tight tension to prevent stuffing from showing!)
- Other: Yarn needle for sewing, polyester fiberfill stuffing, stitch markers, scissors, and black yarn or safety eyes for the face.
Step-by-Step Instructions
This pattern is worked in continuous spirals unless otherwise noted. Use a stitch marker to keep track of your rounds. Let's begin with the head, the heart of our dragon.
Head (make 1, in moss green)
We'll start with a magic ring to create a seamless, rounded head.
- Round 1: Magic ring, 6 sc in ring. (6)
- Round 2: Inc in each st around. (12) (2 sc in each stitch)
- Round 3: (Sc in next st, inc) around. (18)
- Round 4: (Sc in next 2 sts, inc) around. (24)
- Round 5: (Sc in next 3 sts, inc) around. (30)
- Rounds 6-10: Sc in each st around. (30) (5 rounds of straight sc—this builds the height of the head)
- Round 11: (Sc in next 3 sts, dec) around. (24) (Decrease by working 2 sts together)
- Round 12: (Sc in next 2 sts, dec) around. (18)
- Round 13: (Sc in next st, dec) around. (12)
Stuff firmly with fiberfill, shaping the head into a smooth sphere. Fasten off, leaving a long tail (about 12 inches) for sewing to the body.
Body (make 1, in sage green)
The body is slightly wider than the head to give our dragon a plump, huggable belly.
- Round 1: Magic ring, 6 sc in ring. (6)
- Round 2: Inc in each st around. (12)
- Round 3: (Sc in next st, inc) around. (18)
- Round 4: (Sc in next 2 sts, inc) around. (24)
- Round 5: (Sc in next 3 sts, inc) around. (30)
- Rounds 6-12: Sc in each st around. (30) (7 straight rounds for the body height)
- Round 13: (Sc in next 3 sts, dec) around. (24)
- Round 14: (Sc in next 2 sts, dec) around. (18)
- Round 15: (Sc in next st, dec) around. (12)
Stuff firmly, ensuring the body is evenly filled. Fasten off, leaving a long tail for sewing.
Legs (make 2, in cream)
These little stubs give the dragon its adorable, grounded stance.
- Round 1: Magic ring, 6 sc in ring. (6)
- Round 2: Inc in each st around. (12)
- Rounds 3-5: Sc in each st around. (12) (3 straight rounds)
Stuff lightly—you want them soft but not bulging. Fasten off, leaving a long tail for sewing.
Arms (make 2, in moss green)
These are smaller than the legs, perfect for a gentle dragon.
- Round 1: Magic ring, 6 sc in ring. (6)
- Round 2: (Sc in next st, inc) around. (9)
- Rounds 3-6: Sc in each st around. (9) (4 straight rounds)
Stuff lightly. Fasten off, leaving a long tail for sewing.
Wings (make 2, in gold)
These are worked in rows, not rounds, to create a flat, leaf-like shape. The slight increases give them a natural curve.
- Row 1: Ch 6, sc in 2nd ch from hook and in each ch across. (5)
- Row 2: Ch 1, turn, sc in each st across. (5)
- Row 3: Ch 1, turn, sc in next 2 sts, inc in next st, sc in next 2 sts. (6)
- Row 4: Ch 1, turn, sc in each st across. (6)
- Row 5: Ch 1, turn, sc in next 2 sts, inc in next st, sc in next 3 sts. (7)
- Row 6: Ch 1, turn, sc in each st across. (7)
- Row 7: Ch 1, turn, sc in next 3 sts, inc in next st, sc in next 3 sts. (8)
- Row 8: Ch 1, turn, sc in each st across. (8)
- Row 9: Ch 1, turn, sc in next 3 sts, inc in next st, sc in next 4 sts. (9)
- Row 10: Ch 1, turn, sc in each st across. (9)
Fasten off, leaving a long tail. Fold the wing slightly at the bottom (the starting chain edge) to create a leaf-like curve. This will give the wings a beautiful, organic shape when attached.
Tail (make 1, in sage green)
The tail is long and tapering, curling to one side for that whimsical dragon look.
- Round 1: Magic ring, 6 sc in ring. (6)
- Round 2: Inc in each st around. (12)
- Rounds 3-8: Sc in each st around. (12) (6 straight rounds)
- Round 9: (Sc in next 2 sts, dec) around. (9)
- Rounds 10-14: Sc in each st around. (9) (5 straight rounds)
- Round 15: (Sc in next st, dec) around. (6)
- Rounds 16-20: Sc in each st around. (6) (5 straight rounds for the thin tip)
Stuff lightly—the tail should be flexible enough to curl. Fasten off, leaving a long tail for sewing.
Assembly
Now for the magical part—bringing all the pieces together! Use the long tails you left on each piece and a yarn needle.
- Head to Body: Align the head over the body, matching the opening edges. Whipstitch around the seam securely, weaving in the end.
- Legs: Position the legs on the bottom front of the body, spaced evenly apart (about 1 inch from the center). Sew each leg on with its tail, stitching through both the leg and body firmly.
- Arms: Attach the arms to the sides of the body, just below the neck seam. Sew securely, angling them slightly forward.
- Wings: Sew the wings to the back of the body, angled slightly upward and outward. The folded bottom edge should face down, creating a leaf-like silhouette.
- Tail: Attach the tail to the back bottom of the body, curling it to one side. Sew securely, making sure the curl faces outward.
- Face: Embroider two simple eyes with black yarn (or attach safety eyes before stuffing the head) and a small smile with gold yarn. Place the eyes about 4-5 stitches apart on the head, centered.
- Optional Ear Tufts: For extra charm, create small leaf-shaped tufts: Ch 3, sc in 2nd ch from hook, sc in last ch. Sew these to the top of the head, angled slightly outward.
And there you have it—your very own Whispering Willow Dragon! This pattern is a joy to make, and the result is a soft, textured companion that looks like it just stepped out of an enchanted forest. The combination of moss green, sage, cream, and gold creates a harmonious, earthy palette that will look beautiful on any shelf or in a child's arms.
I'd love to see your creations! Tag me in your photos and share your dragon's personality. Happy crocheting, and may your forest guardian watch over your craft room with gentle wisdom.


