Jolly Holly Penguin Free Pattern – A Cozy Holiday Amigurumi
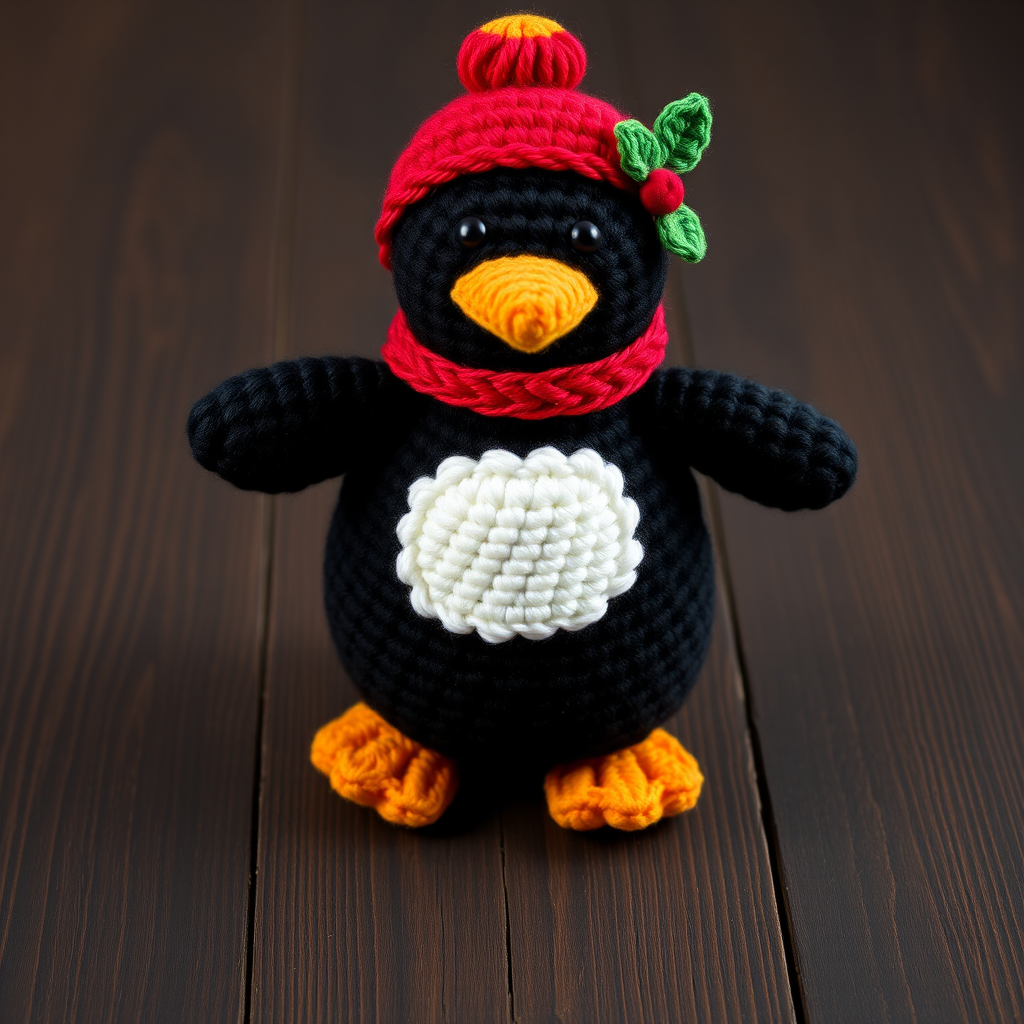
Jolly Holly Penguin Free Pattern – A Cozy Holiday Amigurumi
There’s something truly magical about handcrafting a holiday companion that will be cherished for years to come. The Jolly Holly Penguin is the perfect project to welcome the festive season—a charming, huggable penguin dressed in cheerful red and green holly accents. Whether you’re looking to add a handmade touch to your holiday decor or searching for a heartfelt gift for someone special, this detailed amigurumi pattern will guide you through every round to create a soft, adorable friend.
This pattern is designed with beginners in mind, using basic crochet techniques like single crochet, increases, and decreases. The result is a plump, rounded penguin with a smooth, dense texture that stands upright and radiates holiday cheer. Let’s gather your supplies and start crafting this delightful companion!
Materials Needed
Before you begin, make sure you have all the necessary supplies on hand. Here’s everything you’ll need to create your Jolly Holly Penguin:
Yarn (Worsted Weight, Category 4)
- Black – for the main body and wings
- White – for the belly patch and face patch
- Red – for the hat and scarf
- Green – for the holly leaves
- Orange – for the beak and feet
- Yellow – for the hat pompom
Tools & Notions
- G/6 (4.0 mm) crochet hook
- Yarn needle for sewing and weaving in ends
- Polyester fiberfill stuffing
- Stitch marker to track your rounds
- Scissors
- Optional: Safety eyes (8-9 mm) or black yarn for embroidered eyes
Gauge
3 stitches and 4 rows = 1 inch in single crochet. Gauge is not critical for this project, but maintaining consistent tension will help your penguin look neat and uniform.
Abbreviations
- ch = chain
- sc = single crochet
- inc = increase (2 sc in same stitch)
- dec = decrease (sc 2 together)
- rnd = round
- st(s) = stitch(es)
- sl st = slip stitch
- hdc = half double crochet
- dc = double crochet
Step-by-Step Instructions
Follow these detailed instructions carefully, and you’ll have a beautiful Jolly Holly Penguin in no time. Work each piece in the order given, and remember to stuff firmly for a plump, huggable result.
Head and Body (Worked as One Piece)
Start with black yarn. This section creates the main structure of your penguin, worked from the top of the head down to the bottom of the body.
Rnd 1: Magic ring, 6 sc in ring. (6 sts)
Rnd 2: Inc in each st around. (12 sts)
Rnd 3: (Sc in next st, inc) around. (18 sts)
Rnd 4: (Sc in next 2 sts, inc) around. (24 sts)
Rnd 5: (Sc in next 3 sts, inc) around. (30 sts)
Rnd 6: (Sc in next 4 sts, inc) around. (36 sts)
Rnd 7-12: Sc in each st around. (36 sts) – Work these 6 rounds without any increases to form the head shape.
Rnd 13: (Sc in next 5 sts, inc) around. (42 sts)
Rnd 14-18: Sc in each st around. (42 sts) – These rounds shape the body, which is slightly wider than the head.
Rnd 19: (Sc in next 5 sts, dec) around. (36 sts)
Rnd 20: (Sc in next 4 sts, dec) around. (30 sts)
Rnd 21: (Sc in next 3 sts, dec) around. (24 sts)
Rnd 22: (Sc in next 2 sts, dec) around. (18 sts)
Stuff firmly with polyester fiberfill. Make sure the stuffing reaches all the way into the head area and shapes the body nicely.
Rnd 23: (Sc in next st, dec) around. (12 sts)
Rnd 24: Dec around. (6 sts)
Fasten off, leaving a tail. Weave the yarn through the remaining 6 stitches and pull tight to close the opening. Weave in the end securely.
Belly Patch (White)
This oval patch will be sewn onto the front of the body to create the penguin’s white belly.
Rnd 1: Magic ring, 6 sc in ring. (6 sts)
Rnd 2: Inc in each st around. (12 sts)
Rnd 3: (Sc in next st, inc) around. (18 sts)
Rnd 4: (Sc in next 2 sts, inc) around. (24 sts)
Rnd 5: (Sc in next 3 sts, inc) around. (30 sts)
Rnd 6-8: Sc in each st around. (30 sts)
Fasten off, leaving a long tail for sewing. Position the belly patch on the front of the body, centered between the sides. Sew it in place using a whip stitch or mattress stitch, making sure it lies flat and smooth.
Face Patch (White)
This smaller circular patch will become the penguin’s face area, where the eyes and beak will be attached.
Rnd 1: Magic ring, 6 sc in ring. (6 sts)
Rnd 2: Inc in each st around. (12 sts)
Rnd 3: (Sc in next st, inc) around. (18 sts)
Fasten off, leaving a long tail. Sew this patch onto the head area, just above the belly patch. Position it so there’s enough space for the eyes and beak. The face patch should sit slightly higher than the belly patch, creating a natural separation between face and body.
Beak (Orange)
The beak is a small, flat triangle shape that adds character to your penguin’s face.
Ch 4. Sc in 2nd ch from hook, sc in next ch, 3 sc in last ch. Working on the other side of the chain, sc in next ch, sc in last ch.
Fasten off, leaving a tail. Sew the beak onto the center of the face patch, positioning it between where the eyes will go. Make sure it’s centered and secure.
Eyes
You have two options for the eyes:
Option 1 – Safety Eyes: If using safety eyes (8-9 mm), attach them before sewing the face patch onto the head. Position them symmetrically on the face patch, about 3-4 stitches apart, and secure the backs firmly.
Option 2 – Embroidered Eyes: Using black yarn and a yarn needle, embroider two small French knots or satin stitches onto the face patch. Position them symmetrically, centered above the beak. Make small, tight stitches for a clean look.
Wings (Make 2, Black)
These flattened oval shapes will be attached to the sides of the body.
Rnd 1: Magic ring, 6 sc in ring. (6 sts)
Rnd 2: (Sc in next st, inc) around. (9 sts)
Rnd 3-6: Sc in each st around. (9 sts)
Rnd 7: Dec, sc in next 7 sts. (8 sts)
Rnd 8: Sc in each st around. (8 sts)
Fasten off, leaving a tail. Flatten each wing and sew to the sides of the body, positioning them about 2-3 rounds below the head/body junction. Make sure they’re symmetrical on both sides.
Feet (Make 2, Orange)
These small, flat circles will help your penguin stand upright.
Rnd 1: Magic ring, 6 sc in ring. (6 sts)
Rnd 2: Inc in each st around. (12 sts)
Rnd 3: Sc in each st around. (12 sts)
Fasten off, leaving a tail. Stuff lightly with fiberfill—just enough to give them a bit of shape without making them bulky. Sew to the bottom of the body, positioning them side by side so the penguin can stand balanced.
Hat (Red)
This classic Christmas hat adds the perfect festive touch.
Rnd 1: Magic ring, 6 sc in ring. (6 sts)
Rnd 2: Inc in each st around. (12 sts)
Rnd 3: (Sc in next st, inc) around. (18 sts)
Rnd 4: (Sc in next 2 sts, inc) around. (24 sts)
Rnd 5-8: Sc in each st around. (24 sts)
Rnd 9: (Sc in next 2 sts, dec) around. (18 sts)
Rnd 10-12: Sc in each st around. (18 sts)
Rnd 13: (Sc in next st, dec) around. (12 sts)
Rnd 14-16: Sc in each st around. (12 sts)
Rnd 17: Dec around. (6 sts)
Fasten off, leaving a tail. Weave the yarn through the remaining stitches and pull tight to close the top of the hat.
Pompom (Yellow)
Create a small pompom by wrapping yellow yarn around two fingers about 20-25 times. Carefully slide the loops off, tie tightly in the middle with a separate piece of yarn, and cut the loops open. Trim into a neat, round ball. Sew the pompom securely to the top of the hat.
Place the hat on the penguin’s head, positioning it at a jaunty angle if desired. Sew it in place around the base of the hat to keep it secure.
Scarf (Red)
This simple strip will wrap around the penguin’s neck for extra coziness.
Ch 40. Sc in 2nd ch from hook and in each ch across. (39 sts)
Fasten off, leaving a tail. Wrap the scarf around the penguin’s neck, crossing the ends in the front. Tie in a knot or sew in place for a permanent look. You can also add small fringe by cutting short pieces of red yarn and attaching them to the ends of the scarf.
Holly Leaves (Make 2, Green)
These decorative leaves will adorn the side of the hat.
Ch 6. Sc in 2nd ch from hook, hdc in next ch, dc in next ch, hdc in next ch, sc in last ch.
Fasten off, leaving a tail. Sew the holly leaves to the side of the hat, overlapping slightly for a natural look.
Berry Pompoms (Red)
Make 2-3 tiny red pompoms using the same technique as the yellow pompom, but wrap the yarn only 10-12 times around one finger. Trim into small, tight balls. Sew these berries onto the holly leaves, clustering them at the base of the leaves for a festive accent.
Finishing Touches
Weave in all ends securely using your yarn needle. Double-check that all parts are firmly attached—give the wings, feet, hat, and scarf a gentle tug to ensure they won’t come loose. Trim any stray yarn fibers for a clean, polished look.
Your Jolly Holly Penguin is now complete and ready to spread holiday cheer! Whether perched on a mantel, nestled under the Christmas tree, or gifted to someone special, this adorable companion is sure to bring smiles and warmth to any setting.
Happy crocheting, and have a wonderful holiday season!


