Whispering Meadow Crochet Lace Top (Free Pattern)
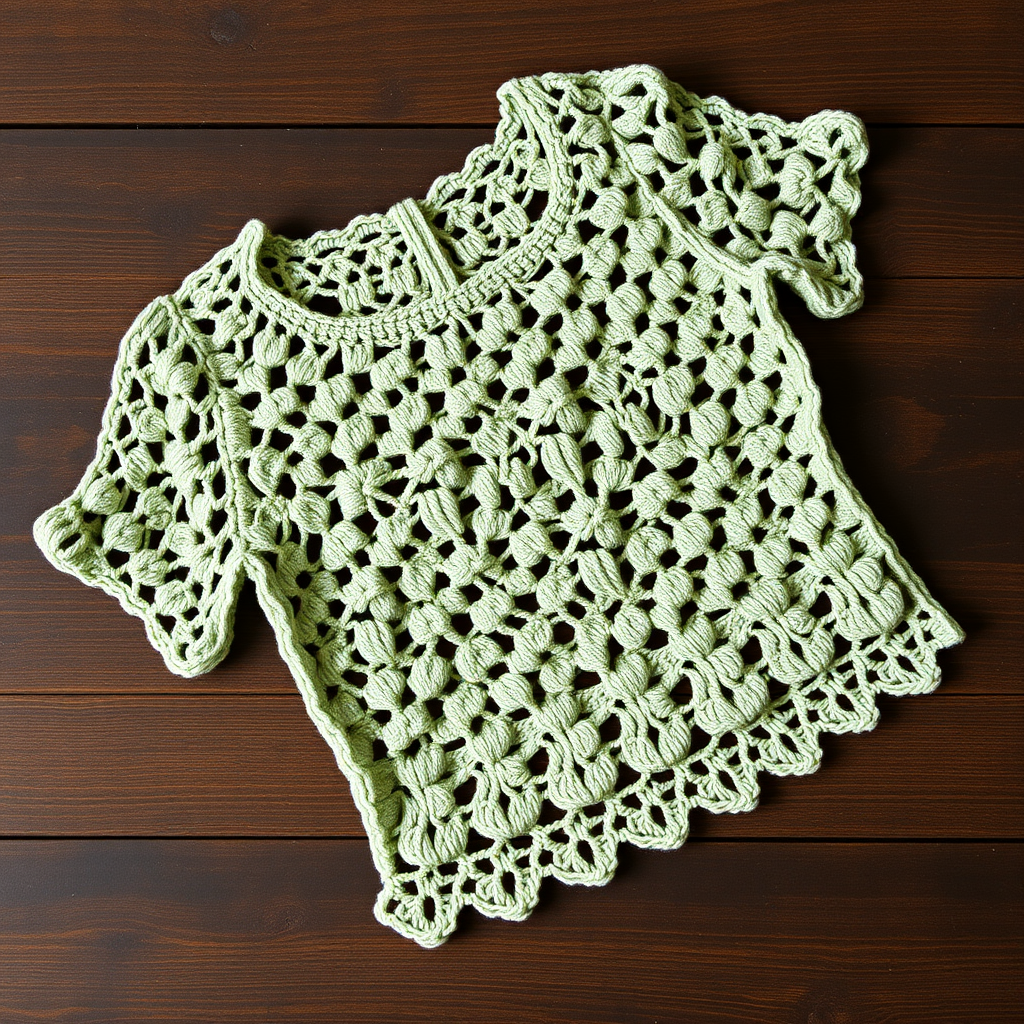
Whispering Meadow Crochet Lace Top: A Free Beginner-Friendly Pattern
Imagine a garment that captures the essence of a sun-drenched meadow, where delicate petals dance on a gentle breeze. That's the magic of the Whispering Meadow Crochet Lace Top. This free pattern offers a modern, airy twist on classic openwork, creating a breezy, floral-inspired design that drapes beautifully. Whether you're layering it over a swimsuit for a beach day or pairing it with high-waisted jeans for a summer brunch, this top is your new warm-weather essential. Best of all, it's crafted with simple stitches and clear instructions, making it a perfect project for confident beginners ready to create their first piece of wearable art.
This pattern is designed to be worked in one piece from the bottom up, which simplifies the construction and ensures a seamless, flattering fit. With a soft sage green color and a delicate V-stitch lace pattern, this top is more than just clothing—it's a statement of handmade elegance. Let's dive into the materials and steps to bring this meadow-inspired beauty to life.
Materials Needed
Before you begin, gather the following supplies. Using the correct materials ensures your gauge matches and your finished top has the perfect drape and size.
- Yarn: Worsted weight cotton or cotton-blend yarn (approx. 400-500 yards for size small). A soft sage green or any pastel shade will enhance the floral aesthetic.
- Crochet Hook: D/3 (3.25 mm) hook. This smaller hook size creates a tighter, more defined lace stitch.
- Other Tools: Yarn needle for weaving in ends, scissors, and a tape measure to check your gauge.
- Gauge: 5 dc x 2.5 rows = 1 inch (worked in pattern stitch). Always make a gauge swatch first to ensure your top fits correctly.
Step-by-Step Instructions
This pattern is broken down into manageable sections. Follow each step carefully, and you'll have a beautiful lace top in no time. The pattern is written for a Size Small (fits chest 32-34 inches).
Stitches and Abbreviations
Familiarize yourself with these standard crochet abbreviations before starting:
- ch = chain
- sc = single crochet
- dc = double crochet
- tr = treble crochet
- sk = skip
- sl st = slip stitch
- fpdc = front post double crochet
- bpdc = back post double crochet
Special Stitches
These two stitches create the unique texture of the Whispering Meadow top:
- V-stitch (V-st): (dc, ch 1, dc) all worked in the same stitch. This forms a "V" shape that creates the open, airy lace.
- Picot: ch 3, sl st in the top of the last dc made. This creates a small decorative loop for the edging.
Pattern Notes
- The body is worked in one piece from the bottom up, then split for the armholes.
- The ch 3 at the beginning of a row counts as the first dc.
- Turn your work at the end of each row unless otherwise stated.
Body (Worked in One Piece)
We'll start by creating the foundation and working the lace pattern up the body.
Row 1: Ch 92 (multiple of 6 + 2). Dc in the 4th ch from the hook and in each ch across. (90 dc)
Row 2: Ch 3, turn. *Sk 2 dc, V-st in next dc, sk 2 dc, dc in next dc; repeat from * across, ending with dc in the top of the turning ch. (15 V-sts)
Row 3: Ch 3, turn. *Sk 2 dc, V-st in the ch-1 space of the V-st, sk 2 dc, dc in next dc; repeat from * across. (15 V-sts)
Rows 4-20: Repeat Row 3. This creates the lace pattern. Tip: To adjust the length of the top, simply add or remove rows here. Each row adds approximately 0.4 inches in length.
Divide for Armholes
Now we'll separate the work to create the front panels and the back. This is where the shaping begins.
Left Front:
Row 21: Ch 3, turn. Work the pattern across the first 22 dc (including V-sts), stopping before the next V-st. Leave the remaining stitches unworked. (Approx. 3.5 V-sts)
Row 22: Ch 3, turn. Work the pattern across, decreasing 1 stitch at the armhole edge (work 2 dc together at the beginning). Continue in the pattern for 10 more rows, keeping the armhole edge straight. Adjust the number of rows for your desired armhole depth.
Right Front:
Row 21: Skip 23 dc for the back, join yarn in the next dc. Ch 3, work the pattern across the remaining 22 dc. (Mirror the left front)
Back:
Row 21: Join yarn in the first dc of the back section (the middle 46 dc). Ch 3, work the pattern across. Continue straight for 12 rows.
Join Shoulders
With the right sides of the fabric together, use a slip stitch or single crochet to join the shoulder seams. Each shoulder seam should be approximately 3 inches wide.
Sleeves (Worked in Rounds)
We'll now add the ribbed cuffs to the armholes, working in continuous rounds.
Round 1: Join yarn at the underarm, ch 3, work dc evenly around the armhole opening (approx. 40 dc). Join with a sl st to the top of the ch 3.
Round 2: Ch 3, *fpdc around the next dc, bpdc around the next dc; repeat from * around. Join with a sl st.
Rounds 3-8: Repeat Round 2, working the ribbing effect. Adjust the number of rounds for your desired sleeve length.
Finishing Touches
The picot edging adds the final, delicate flourish to the neckline and bottom hem.
Neckline Edging: Join yarn at the shoulder, sc evenly around the neckline, working a picot every 5th stitch. Fasten off.
Bottom Edging: Work sc around the bottom edge, then add the picot edging in the same manner.
Weave in all ends with your yarn needle to secure the yarn and give your top a clean, professional finish.
Care Instructions
To keep your Whispering Meadow top looking its best, hand wash it in cold water and lay it flat to dry. This will preserve the delicate lace stitches and the shape of the garment.
Congratulations! You've just completed a beautiful, handmade lace top that's perfect for the summer season. The intricate V-stitch pattern and the delicate picot edging create a piece that looks like it came straight from a boutique. Wear it with pride, knowing you crafted it with your own two hands. Happy crocheting!


