Orchard Wheel Crochet Capelet Free Pattern: Lemon-Slice Motifs with a Merino Roll Collar
Introduction
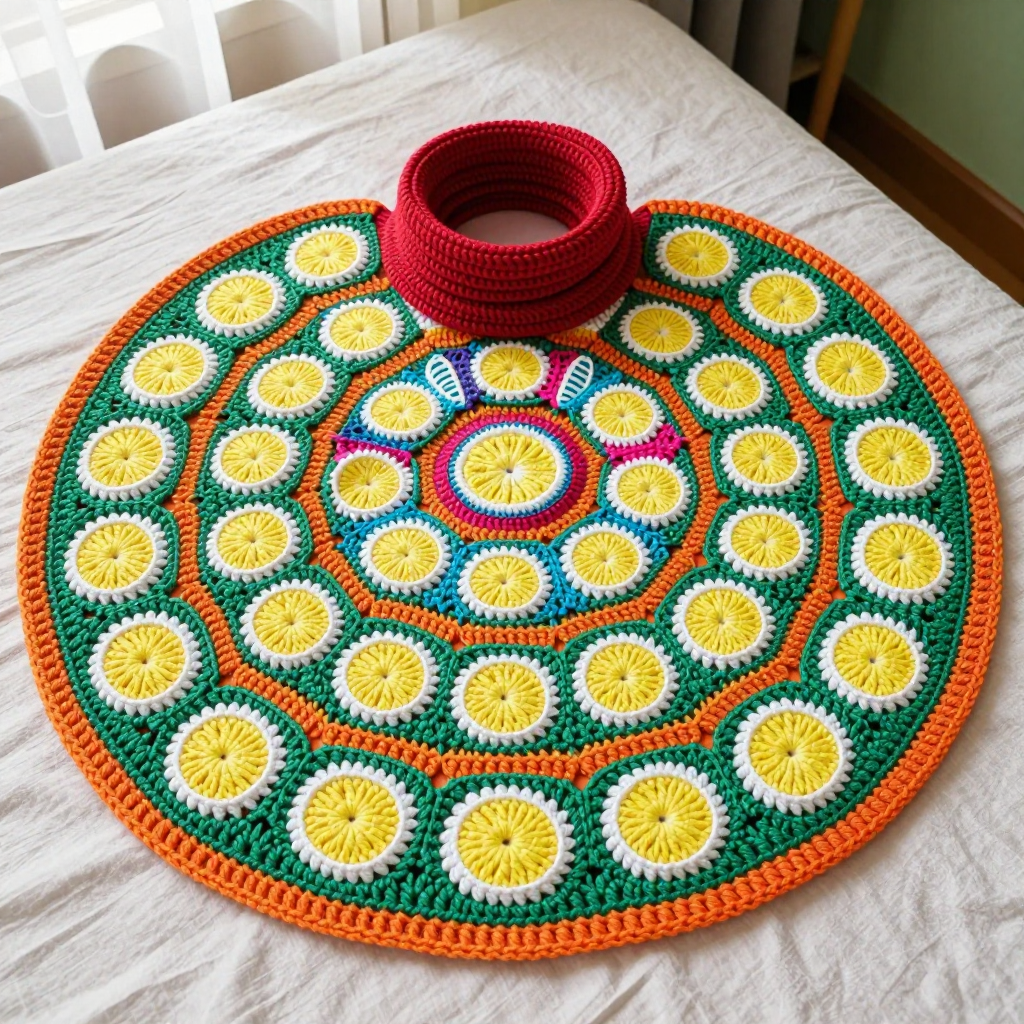
Welcome! If you have never held a crochet hook before, this is a wonderful place to start — and if you have made a few simple things, this capelet will stretch your skills in the gentlest possible way. The Orchard Wheel Capelet is a compact, circular shoulder layer built from 56 small "lemon-slice" motifs, each only about 2¾ inches (7 cm) across, joined as you go into four cheerful concentric rings. At the center sits a thick, soft roll collar in solid bright cherry red merino that curls toward your neck like a cozy scarf. The finished piece looks like a mid-century modern sunburst: a lemon-yellow center, a white ring, a grass-green rind, and tangerine-orange joins, all spreading over the shoulders in rainbow-bright merino. It feels light but warm, squishy and soft against the skin, and it slips on over the head in seconds. Every single stitch is explained below — you truly cannot get lost.
Materials Needed
- Yarn (DK weight / light worsted, approx. 246 yd / 225 m per 100 g skein): 1 skein each of bright lemon yellow, white, tangerine orange, hot coral pink, turquoise, grass green, and violet. Yellow and white are used most. Collar: 1 skein solid bright cherry red. Total approx. 480 yd (440 m).
- Crochet hook: 4.0 mm (US G-6) for the motifs.
- Crochet hook: 3.5 mm (US E-4) for the collar.
- Stitch marker (one is enough; a safety pin or scrap of yarn works too).
- Tapestry needle (a blunt, large-eyed needle for weaving in ends).
- Scissors.
- Finished size (one size, teen / small adult): neck opening 15 in (38 cm) circumference, stretching to approx. 19 in (48 cm); lower edge approx. 34 in (86 cm) circumference; depth from collar base to lower edge approx. 9 in (23 cm).
Abbreviations and Beginner Glossary
- ch – chain: yarn over the hook, pull the loop through the loop on your hook. Makes a small link.
- sl st – slip stitch: insert hook into the stitch, yarn over, pull the loop straight through both the stitch and the loop on your hook. Makes an almost invisible join.
- sc – single crochet: insert hook into stitch, yarn over, pull up a loop (2 loops on hook), yarn over, pull through both loops. (1 loop remains.)
- hdc – half double crochet: yarn over first, insert hook, yarn over, pull up a loop (3 loops on hook), yarn over, pull through all 3 loops.
- dc – double crochet: yarn over, insert hook, yarn over, pull up a loop (3 loops), yarn over, pull through 2 loops, yarn over, pull through last 2 loops.
- tr – treble crochet: yarn over twice, insert hook, pull up a loop, then pull through 2 loops three times. (Not used in this pattern, but listed so you recognize it.)
- st / sts – stitch / stitches.
- sp – space (the little gap made by a chain).
- beg – beginning.
- yo – yarn over: wrap the yarn from back to front over your hook.
- rnd – round: one complete circle of stitches worked in the round.
- magic ring – an adjustable loop: wrap yarn twice around your fingers, work stitches into the loop, then pull the tail to close the hole.
- standing sc – a single crochet started with a slip knot on the hook, worked straight into the stitch, so you don't need a beginning chain.
- JAYG (join-as-you-go) – joining motifs while you crochet the last round, instead of sewing later: you replace a chain with a slip stitch into the neighboring motif.
- picot-space – a small loop-space made by "sc, ch 2, sc" in the same spot.
Gauge
Motif gauge: one lemon-slice motif = 2.75 in (7 cm) across after blocking. Motif round gauge: 4 rounds = 1 in (2.5 cm) from the center.
Collar gauge: 18 sc x 20 rounds = 4 in (10 cm) in single crochet worked in the round with the 3.5 mm hook.
Why gauge matters: gauge is simply how big your stitches turn out. If your motifs come out larger than 2¾ inches, your rings won't sit flat and the capelet will be too big; if smaller, it will be too tight. How to swatch: make one complete motif exactly as written, block it (mist with water and let it dry flat), then measure straight across the widest point. If it's too big, try a hook one size smaller; if too small, one size larger. For the collar, work 20 sc into a magic ring and work 20 rounds of sc, then measure a 4-inch section — adjust your hook if needed.
Beginner Tips Before You Start
- Make one practice motif first. Work a single lemon slice without joining. Once it measures 2¾ inches and looks round, you're ready for the real thing.
- Use your stitch marker. Place it in the first stitch of each collar round so you always know where the round begins.
- Don't pull your yarn tight. Tension should be relaxed — tight stitches make the neck opening too small to fit over the head.
- Keep your joins loose. When you slip-stitch into a neighboring motif, keep that slip stitch relaxed so the seams lie flat.
- Lay the work flat after every ring. If a ring cups upward, your joins are too tight; if it ruffles, space the motifs slightly closer together.
- Weave in ends as you go. With 56 motifs there are many tails — tidy each one as you finish a ring.
Step-by-Step Instructions
Part 1: The Lemon-Slice Motif (make 56)
Work with the 4.0 mm (US G-6) hook. Each motif is worked in a spiral of joined rounds. Note: "join with sl st to first sc" means slip stitch into the very first single crochet you made in that round.
Rnd 1: With bright lemon yellow, make a magic ring. Ch 1 (does not count as a st). Work 8 sc into the ring. Join with sl st to first sc. (8 sc) Pull the tail tight to close the center.
Rnd 2: Ch 1. 2 sc in each sc around. Join with sl st to first sc. (16 sc) Fasten off yellow.
Rnd 3: Join white with a standing sc in any sc. Ch 1. *Sc in next sc, ch 1, skip next sc; repeat from * around, ending with sc in last sc, ch 1, join with sl st to first sc. (8 sc, 8 ch-1 sps) Do not fasten off white.
Rnd 4 (rind and join round): Ch 1. *Sc in next ch-1 sp, ch 2, sc in same sp (this makes a corner picot-space), sc in next sc; repeat from * around, ending with sl st to first sc. (8 picot-spaces, 16 sc) Fasten off white.
Rnd 5 (outer rind): Join grass green with a standing sc in any picot-space. *3 sc in picot-space, sc in each of next 2 sc; repeat from * around. Join with sl st to first sc. (40 sc) Fasten off grass green.
Rnd 6 (joining round): Join tangerine orange with a standing sc in any sc. Work 1 sc in each sc around, but at each of the 4 points where the motif meets a neighbor, work that joining sc as a sl st into the matching sc of the adjacent motif instead of into your own work, then continue. Join with sl st to first sc. (40 sc or sl sts) Fasten off tangerine orange. For the 8 motifs of Ring 1 only: work Rnd 6 as a plain sc round with no joins, then fasten off.
Part 2: Joining the Rings (Join-As-You-Go Spiral)
Ring 1 (neck ring): Work 8 motifs. Join motif 1 to motif 8 along one side using the JAYG method in Rnd 6, forming a closed ring of 8 motifs. The inner edges of these 8 motifs form the neck opening (approx. 15 in / 38 cm).
Ring 2: Work 12 motifs. Join each new motif to the ring above at 2 points (one sc join at each shared corner) and to the previously worked motif of Ring 2 at 1 point. Distribute evenly: alternate joining 1 and 2 motifs per Ring 1 motif.
Ring 3: Work 16 motifs, joining to Ring 2 at 2 points and to the previous Ring 3 motif at 1 point, evenly spaced.
Ring 4: Work 20 motifs, joining to Ring 3 at 2 points and to the previous Ring 4 motif at 1 point, evenly spaced. After the last motif, join its final side to the first motif of Ring 4 to close the ring. (56 motifs total: 8 + 12 + 16 + 20)
Part 3: The Merino Roll Collar
Switch to the 3.5 mm (US E-4) hook and cherry red. Work into the inner sc round of the Ring 1 motifs (not the outer rind).
Rnd 1: Join yarn with a standing sc at any inner sc of the neck opening. Sc evenly around the entire inner neck opening, working 1 sc in each inner sc and 1 sc in each join between motifs. Join with sl st to first sc. (approx. 120 sc) Place your marker.
Rnds 2–10: Ch 1, sc in each sc around, join with sl st to first sc. (120 sc) The fabric will naturally roll outward toward the right side — this is the roll collar.
Rnd 11 (roll turn): Ch 1, sc in each sc around, join with sl st to first sc. (120 sc) Do not fasten off yet.
Rnd 12 (rolled edge): Ch 1, sc in each sc around, join with sl st to first sc. (120 sc) Fasten off, leaving a 6 in (15 cm) tail.
Assembly and Finishing
Weaving in ends: Thread each tail onto the tapestry needle and run it through the back of about 1 inch of stitches, then snip close. Work on the wrong side so no tails show on the right side.
Closing the collar: Thread the 6 in (15 cm) tail from Rnd 12 onto the tapestry needle and run it through the last round of sc, then draw it up slightly so the collar rolls evenly and sits softly against the neck. Weave in the end.
Blocking the motifs: Pin the capelet flat on a towel or blocking mat, mist lightly with water, and let it dry completely. This opens the lemon-slice circles and evens the join-as-you-go seams.
Steam-blocking the collar: Hold a steam iron just above the collar (never press it flat) to preserve the roll. Check the fit: the neck opening should stretch comfortably over the head to approx. 19 in (48 cm). Trim any stray ends. Wear it with the collar rolled toward the neck and the lemon-slice rings spreading over the shoulders.
Pro Tips and Variations
- Change the palette: Swap the rainbow brights for a single color family — for example, all motifs in shades of one color with a cream collar — for a calmer, more grown-up look.
- Adjust the size: For a larger capelet, add a fifth ring of 24 motifs (joining to Ring 4 at 2 points and to the previous motif at 1 point). For a smaller child's version, stop after Ring 3 and pick up the collar as written.
- Substitute yarn: Any DK weight yarn works — acrylic for easy washing, cotton for a crisper motif, or alpaca for extra softness. Always re-check your motif gauge first.
- Make the collar taller or shorter: Add or remove rounds between Rnds 2–10 (each round adds about ¼ in / 6 mm of roll) to suit your taste.


