Whimsical Woodland Sprout Gnome Free Pattern – Crocheted Mossy Garden Guardian
Whimsical Woodland Sprout Gnome Free Pattern – Crocheted Mossy Garden Guardian
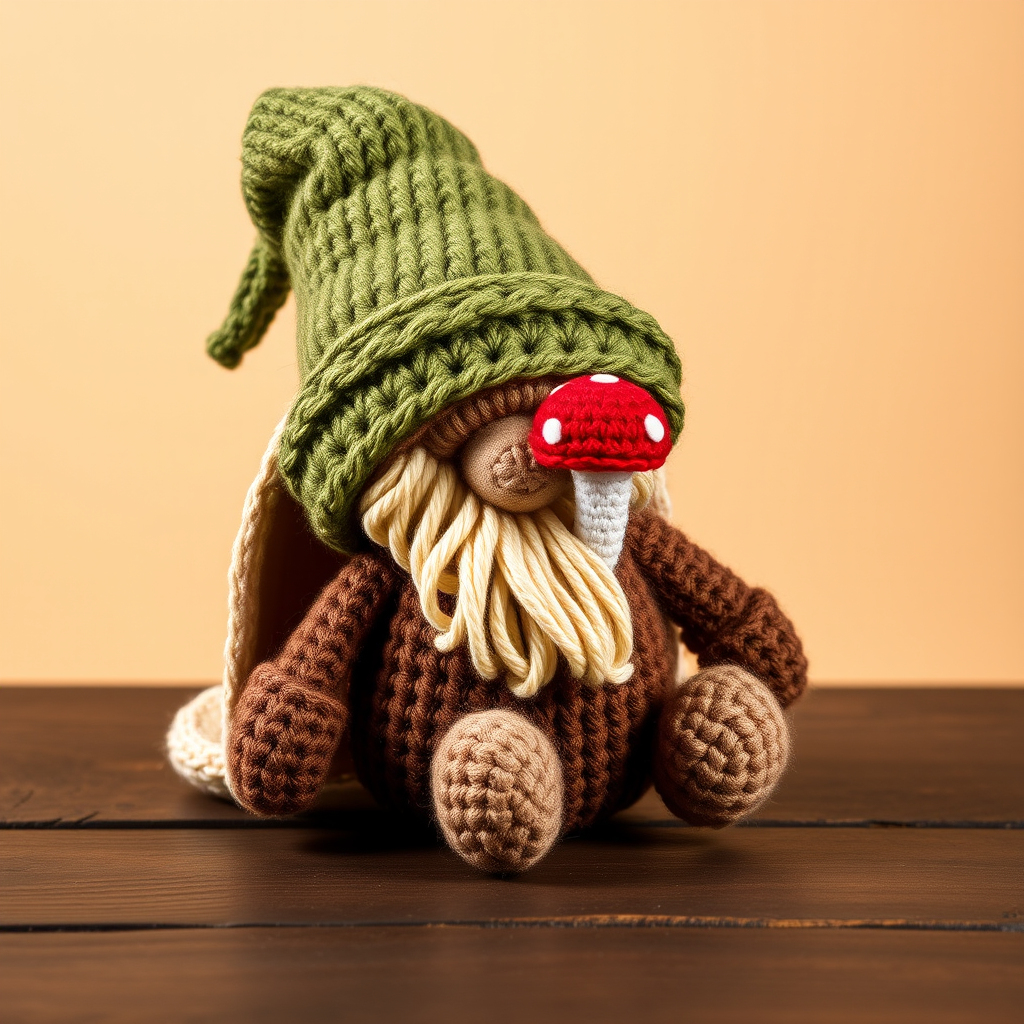
Bring a touch of enchanted forest charm to your shelf with this adorable crocheted gnome, complete with a mossy textured hat and a tiny mushroom friend. Perfect for nature lovers and whimsical decor enthusiasts, this beginner-friendly amigurumi project is a delightful way to add handmade magic to any room. Whether you're a seasoned crocheter or just starting your yarn journey, this pattern is designed to be approachable, rewarding, and utterly charming.
This little garden guardian stands about 6 inches tall and features a round, soft body in earthy brown, a fluffy cream beard, and a tall, pointed moss-green hat with a playful fold. The subtle ribbed texture of the hat, created by working in rows, adds depth and character. And of course, no woodland gnome is complete without a tiny red mushroom companion, complete with white spots, ready to join the adventure.
Let's gather our supplies and dive into this magical crochet project. By the end, you'll have a whimsical friend to brighten your shelf, desk, or garden windowsill.
Materials Needed
Before we begin, let's make sure you have everything you need. This project uses simple, readily available materials, making it perfect for a weekend crafting session.
- Yarn: Worsted weight yarn in the following colors:
- Moss green (for the hat)
- Earthy brown (for the body)
- Cream (for the beard and face)
- Soft red (for the mushroom cap)
- Crochet Hook: 3.5mm hook (E-4)
- Stuffing: Polyester fiberfill or your preferred amigurumi stuffing
- Yarn Needle: For sewing pieces together and weaving in ends
- Stitch Marker: To keep track of your rounds (optional but helpful)
- Black Embroidery Thread or Yarn: For the eyes
- White Embroidery Thread: For the mushroom spots
- Scissors
Gauge: Not critical for amigurumi; aim for tight stitches to prevent stuffing show-through. If your stitches are loose, consider using a smaller hook.
Step-by-Step Instructions
Let's bring our gnome to life! We'll work through each part systematically, starting with the head and body, then moving to the nose, hat, mushroom, and finally assembly. Take your time, and enjoy the process.
Head & Body (Worked in Continuous Rounds)
We'll start with the main body of the gnome, working in a spiral without joining rounds. Use a stitch marker to keep track of your starting point.
- Round 1: Magic ring, 6 sc in ring (6)
- Round 2: Inc in each st around (12)
- Round 3: (Sc in next st, inc) around (18)
- Round 4: (Sc in next 2 sts, inc) around (24)
- Rounds 5-7: Sc in each st around (24)
- Round 8: (Sc in next 2 sts, inc) around (32)
- Rounds 9-12: Sc in each st around (32)
- Round 13: (Sc in next 2 sts, dec) around (24)
- Round 14: (Sc in next st, dec) around (16)
- Round 15: (Dec) around (8)
Fasten off, leaving a long tail for sewing. Stuff firmly with fiberfill, shaping the body as you go. Make sure the stuffing is even and the body feels solid but soft.
Nose
The nose is a small, cute addition that gives the gnome his character. It's worked in continuous rounds.
- Round 1: Magic ring, 6 sc in ring (6)
- Round 2: Inc in each st around (12)
- Rounds 3-4: Sc in each st around (12)
Fasten off, leaving a tail. Stuff lightly and set aside. The nose should be a small, rounded bump.
Hat (Worked in Rows)
The hat is worked back and forth in rows, creating a lovely ribbed texture. This is a great way to practice your turning chains and single crochet stitches.
- Row 1: Ch 21, sc in 2nd ch from hook and across (20)
- Rows 2-4: Ch 1, turn, sc in each st (20)
- Row 5: Ch 1, turn, sc2tog, sc in next 16 sts, sc2tog (18)
- Row 6: Ch 1, turn, sc in each st (18)
- Row 7: Ch 1, turn, sc2tog, sc in next 14 sts, sc2tog (16)
- Row 8: Ch 1, turn, sc in each st (16)
- Row 9: Ch 1, turn, sc2tog, sc in next 12 sts, sc2tog (14)
- Row 10: Ch 1, turn, sc in each st (14)
- Row 11: Ch 1, turn, sc2tog, sc in next 10 sts, sc2tog (12)
- Row 12: Ch 1, turn, sc in each st (12)
- Row 13: Ch 1, turn, sc2tog, sc in next 8 sts, sc2tog (10)
- Row 14: Ch 1, turn, sc in each st (10)
- Row 15: Ch 1, turn, sc2tog, sc in next 6 sts, sc2tog (8)
- Row 16: Ch 1, turn, sc in each st (8)
- Row 17: Ch 1, turn, sc2tog, sc in next 4 sts, sc2tog (6)
- Row 18: Ch 1, turn, sc in each st (6)
- Row 19: Ch 1, turn, sc2tog, sc in next 2 sts, sc2tog (4)
- Row 20: Ch 1, turn, sc in each st (4)
Fasten off, leaving a long tail for sewing. The hat should now be a tapered triangle shape. When sewing it onto the head, fold the tip to one side for that whimsical, lived-in look.
Mushroom Friend
Every gnome needs a companion! This tiny mushroom is quick to make and adds the perfect finishing touch.
Stem:
- Round 1: Magic ring, 6 sc (6)
- Round 2: Inc in each st around (12)
- Rounds 3-6: Sc in each st around (12)
- Round 7: (Dec) around (6)
Stuff lightly and fasten off, leaving a tail for sewing.
Cap:
- Round 1: Magic ring, 6 sc (6)
- Round 2: Inc in each st around (12)
- Round 3: (Sc in next st, inc) around (18)
- Rounds 4-5: Sc in each st around (18)
Fasten off, leaving a tail. Sew the cap onto the stem. Add tiny white spots with embroidery thread to complete the mushroom look.
Assembly
Now for the fun part – bringing all the pieces together!
- Sew the Nose: Position the nose in the center of the face, about 2-3 rounds down from the top of the head. Sew it securely using the tail you left.
- Attach the Hat: Place the hat on top of the head, covering the top portion. Sew it in place along the bottom edge of the hat, folding the tip to one side for a jaunty look.
- Embroider the Eyes: Using black embroidery thread or yarn, create small French knots or simple stitches for the eyes, placing them just above the nose on either side.
- Add the Beard: Using cream yarn, create a loop stitch beard around the face, starting from just below the eyes and extending down to the bottom of the head. This adds wonderful texture and character.
- Attach the Mushroom: Sew the mushroom to the side of the gnome's body, near where a hand would be. This gives the impression that the gnome is holding or guarding his tiny friend.
And there you have it – your very own Whimsical Woodland Sprout Gnome! This charming little guardian is sure to bring a smile to anyone who sees it. Whether you keep it for yourself or gift it to a fellow nature lover, this handmade treasure is a testament to the magic of crochet.
Remember, amigurumi is all about practice and personal expression. Don't be afraid to experiment with different colors or add your own special touches. Happy crocheting, and may your garden always be guarded by whimsy!


