Whimsical Woodland Santa Gnome Free Pattern – Crocheted Festive Forest Figure
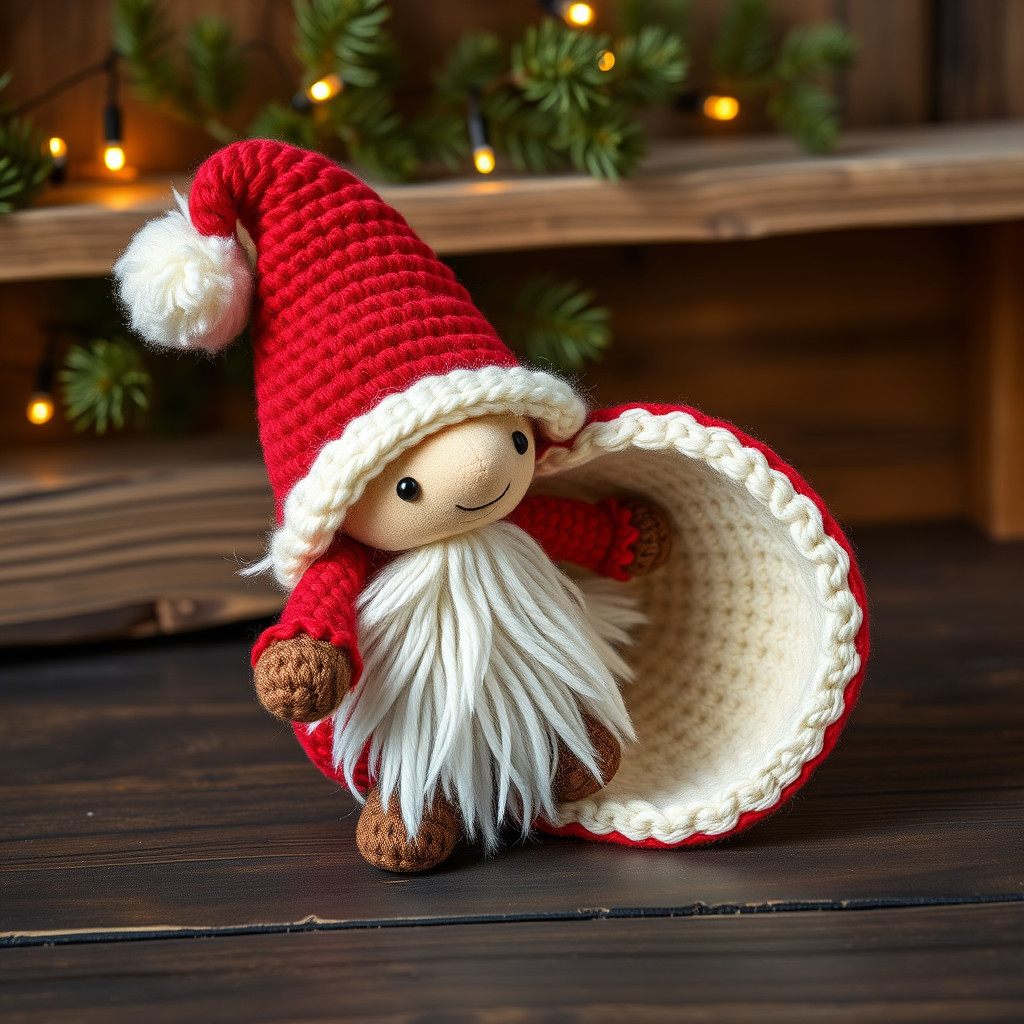
Whimsical Woodland Santa Gnome Free Crochet Pattern
Bring the magic of a snowy forest to your holiday decor with this adorable crocheted Santa gnome, complete with a fluffy beard and a star-tipped hat. This charming figure is perfect for gifting or adding a touch of whimsy to your mantelpiece. Whether you're a seasoned crocheter or a beginner looking for a fun project, this pattern is designed to be approachable and rewarding. Let's get started!
Materials Needed
Before you begin, gather the following materials. This project uses basic amigurumi techniques and is perfect for using up scrap yarn from your stash.
- Yarn: Worsted weight yarn in the following colors:
- Red (for body, hat, and arms)
- Cream or skin tone (for face and nose)
- Brown (for boots/legs)
- White fluffy yarn (for beard and hat trim – boucle or faux fur style works best)
- Crochet Hook: 3.5mm (E) crochet hook
- Other Notions:
- Stitch marker
- Yarn needle for sewing parts together
- Polyester fiberfill stuffing
- Black embroidery thread or small safety eyes (6mm)
- Scissors
Note on gauge: Gauge is not critical for this project, but aim for a tight tension to prevent the stuffing from showing through your stitches. If your stitches are loose, consider using a smaller hook.
Step-by-Step Instructions
This pattern is worked in continuous rounds (spiral) unless otherwise stated. Use a stitch marker to keep track of the start of each round. All stitches are single crochet (sc) unless specified.
Head & Body (Worked as One Piece)
We'll start from the top of the head and work down to the bottom of the body.
- Round 1: With skin tone yarn, make a magic ring, work 6 sc into the ring. (6 stitches)
- Round 2: Work 2 sc in each stitch around. (12 stitches)
- Round 3: *Sc in next stitch, 2 sc in next stitch*; repeat from * to * around. (18 stitches)
- Round 4: *Sc in next 2 stitches, 2 sc in next stitch*; repeat from * to * around. (24 stitches)
- Round 5: *Sc in next 3 stitches, 2 sc in next stitch*; repeat from * to * around. (30 stitches)
- Rounds 6-8: Sc in each stitch around. (30 stitches)
- Round 9 (Decrease): *Sc in next 3 stitches, sc2tog (single crochet two together)*; repeat from * to * around. (24 stitches)
- Round 10: *Sc in next 2 stitches, sc2tog*; repeat from * to * around. (18 stitches)
- Round 11: *Sc in next stitch, sc2tog*; repeat from * to * around. (12 stitches)
- Stuff the head firmly with fiberfill, shaping it into a round ball.
- Round 12: Change to red yarn. Sc in each stitch around. (12 stitches) – This marks the start of the body.
- Round 13 (Increase): *Sc in next stitch, 2 sc in next stitch*; repeat from * to * around. (18 stitches)
- Round 14: *Sc in next 2 stitches, 2 sc in next stitch*; repeat from * to * around. (24 stitches)
- Round 15: *Sc in next 3 stitches, 2 sc in next stitch*; repeat from * to * around. (30 stitches)
- Rounds 16-20: Sc in each stitch around. (30 stitches) – Work even for the body height.
- Round 21 (Decrease): *Sc in next 3 stitches, sc2tog*; repeat from * to * around. (24 stitches)
- Round 22: *Sc in next 2 stitches, sc2tog*; repeat from * to * around. (18 stitches)
- Stuff the body firmly, ensuring it's plump but not misshapen.
- Round 23: *Sc in next stitch, sc2tog*; repeat from * to * around. (12 stitches)
- Round 24: Sc2tog around. (6 stitches) – Fasten off, leaving a long tail. Weave the tail through the front loops of the remaining stitches and pull tight to close. Weave in the end securely.
Nose
- Round 1: With skin tone yarn, make a magic ring, work 6 sc into the ring. (6 stitches)
- Round 2: Work 2 sc in each stitch around. (12 stitches)
- Rounds 3-4: Sc in each stitch around. (12 stitches) – Fasten off, leaving a long tail for sewing.
- Stuff the nose lightly with a small amount of fiberfill. Sew the nose to the center of the face, positioning it just above where the beard will sit (roughly at the middle of the head section).
Beard
- With fluffy white yarn, chain 20.
- Starting in the 2nd chain from the hook, sc in each chain across. (19 stitches) – Fasten off, leaving a long tail for sewing.
- Position the beard around the lower half of the face, covering the area below the nose. The beard should wrap around the sides of the face slightly. Sew it in place securely, using the long tail. The fluffy yarn will hide the stitches nicely.
Hat
- Round 1: With red yarn, make a magic ring, work 6 sc into the ring. (6 stitches)
- Round 2: Work 2 sc in each stitch around. (12 stitches)
- Round 3: *Sc in next stitch, 2 sc in next stitch*; repeat from * to * around. (18 stitches)
- Rounds 4-6: Sc in each stitch around. (18 stitches)
- Round 7 (Decrease): *Sc in next 2 stitches, sc2tog*; repeat from * to * around. (15 stitches)
- Rounds 8-9: Sc in each stitch around. (15 stitches)
- Round 10: *Sc in next stitch, sc2tog*; repeat from * to * around. (10 stitches)
- Rounds 11-12: Sc in each stitch around. (10 stitches)
- Round 13: Sc2tog around. (5 stitches) – Fasten off, leaving a long tail.
- Sew the hat to the top of the head, tilting it slightly to one side for a whimsical look. Add a small pompom of fluffy white yarn to the tip of the hat if desired, or simply leave it as is.
Arms (Make 2)
- Round 1: With red yarn, make a magic ring, work 6 sc into the ring. (6 stitches)
- Rounds 2-5: Sc in each stitch around. (6 stitches) – Fasten off, leaving a long tail for sewing.
- Do not stuff the arms; they should be flat and flexible. Sew the arms to the sides of the body, positioning them just below the neck area (around Round 13 of the body).
Legs (Make 2)
- Round 1: With brown yarn, make a magic ring, work 6 sc into the ring. (6 stitches)
- Round 2: Work 2 sc in each stitch around. (12 stitches)
- Rounds 3-4: Sc in each stitch around. (12 stitches) – Fasten off, leaving a long tail for sewing.
- Stuff the legs lightly to give them shape. Sew the legs to the bottom of the body, spacing them evenly apart so the gnome can sit or stand.
Finishing Touches
- Eyes: Embroider two small eyes with black embroidery thread, or attach 6mm safety eyes. Position them on the face, just above the nose and beard. If using safety eyes, insert them before sewing the beard on.
- Smile: Embroider a small smile with black yarn or thread, curving downward or upward for a cheerful expression.
- Weave in all ends: Use a yarn needle to hide any remaining yarn tails inside the body or hat.
Your whimsical woodland Santa gnome is now complete! Display it on a shelf, mantel, or gift it to a fellow craft lover. The fluffy beard and pointed hat make it a standout piece of holiday decor. Happy crocheting!


