Whimsical Woodland Gnome Trio Free Crochet Pattern – Cozy Garden Guardians
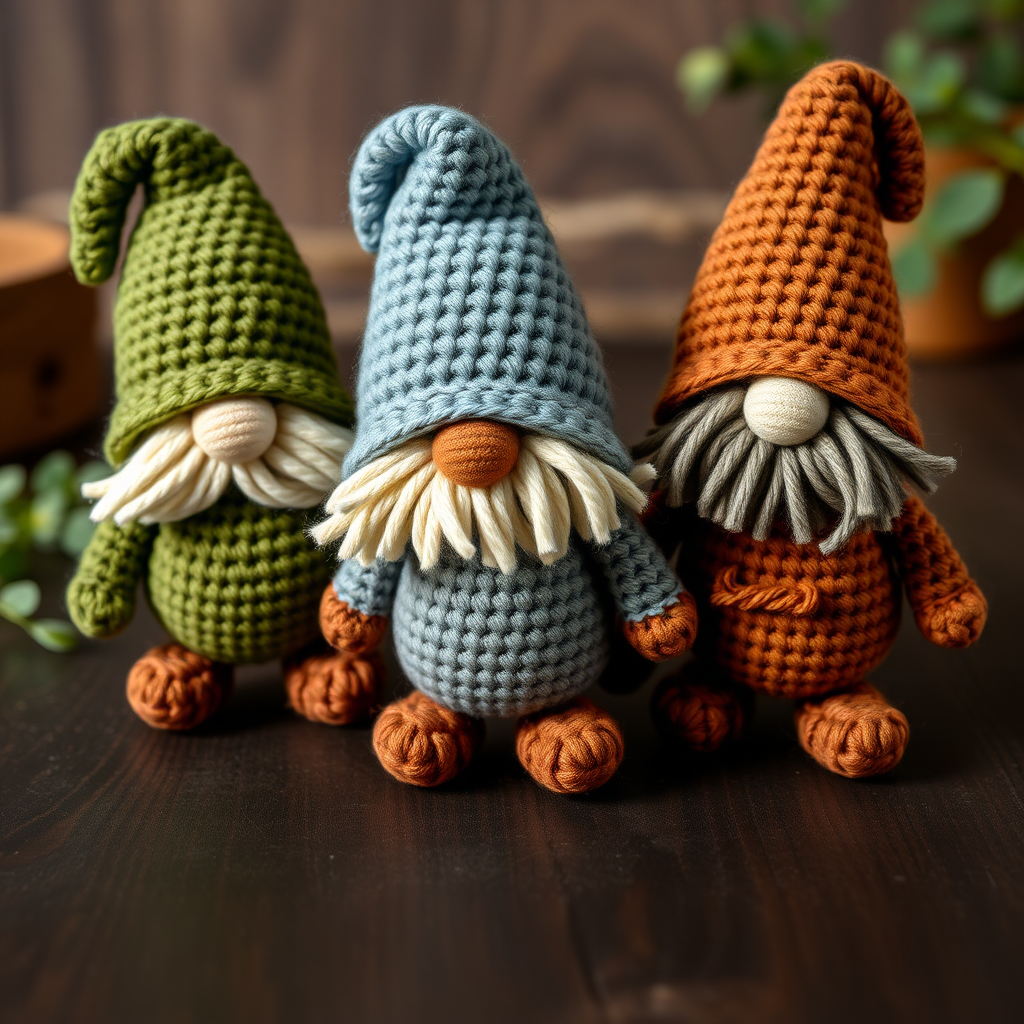
Whimsical Woodland Gnome Trio Free Crochet Pattern – Cozy Garden Guardians
Bring a touch of enchanted forest charm to your home with this adorable trio of crochet gnomes, each with a unique personality and cozy texture. Perfect for gifting or as whimsical shelf decor, these soft yarn companions are a joy to create. With their round, plump bodies, oversized pointed hats, and fluffy textured beards, these little garden guardians will add warmth and whimsy to any room. Whether you're a seasoned crocheter or just starting your amigurumi journey, this pattern is designed to be accessible, detailed, and thoroughly enjoyable.
Materials Needed
Before you begin, gather all your materials to ensure a smooth crafting experience. Here's everything you'll need to create your gnome trio:
- Yarn: Worsted weight cotton or acrylic yarn in earthy tones. You'll need multiple colors per gnome:
- Color A (body/hat base): moss green, dusty blue, or terracotta
- Color B (hat accent): optional contrasting shade
- Color C (beard): cream, warm brown, or soft gray
- Color D (nose): terracotta, cream, or moss green
- Color E (belt): warm brown or dark brown
- Color F (boots): warm brown or dark brown
- Crochet Hook: 3.5mm (E) crochet hook
- Polyester fiberfill stuffing for a soft, plump finish
- Yarn needle for sewing parts together
- Stitch marker to keep track of rounds
- Optional: Small bells or buttons for hat decoration, black yarn or safety eyes for the face, pink yarn or blush for rosy cheeks
Gauge: 4 sc x 4 rows = 1 inch. Gauge is not critical for amigurumi, but consistency is key to achieving evenly sized gnomes.
Abbreviations (US Terms)
- mr: magic ring
- sc: single crochet
- inc: increase (2 sc in same stitch)
- dec: decrease (sc 2 together)
- sl st: slip stitch
- ch: chain
- st(s): stitch(es)
- rnd: round
Step-by-Step Instructions
GNOME BODY (make 3, one in each color scheme)
Work in continuous rounds, using a stitch marker to track your progress.
- Rnd 1: With color A, mr, 6 sc in ring. (6 sts)
- Rnd 2: inc in each st around. (12 sts)
- Rnd 3: (sc in next st, inc) around. (18 sts)
- Rnd 4: (sc in next 2 sts, inc) around. (24 sts)
- Rnd 5: (sc in next 3 sts, inc) around. (30 sts)
- Rnd 6: (sc in next 4 sts, inc) around. (36 sts)
- Rnd 7-12: sc in each st around. (36 sts) — This creates the plump body shape.
- Rnd 13: (sc in next 4 sts, dec) around. (30 sts)
- Rnd 14: (sc in next 3 sts, dec) around. (24 sts)
- Rnd 15: (sc in next 2 sts, dec) around. (18 sts)
- Rnd 16: (sc in next st, dec) around. (12 sts)
Stuff firmly with polyester fiberfill. The body should be plump and hold its shape well.
- Rnd 17: dec around. (6 sts)
Fasten off, leaving a tail to weave in later.
GNOME HEAD (make 3)
- Rnd 1: With color A, mr, 6 sc in ring. (6 sts)
- Rnd 2: inc in each st around. (12 sts)
- Rnd 3: (sc in next st, inc) around. (18 sts)
- Rnd 4: (sc in next 2 sts, inc) around. (24 sts)
- Rnd 5-7: sc in each st around. (24 sts)
- Rnd 8: (sc in next 2 sts, dec) around. (18 sts)
Stuff head lightly — it should be soft but not overly firm.
- Rnd 9: (sc in next st, dec) around. (12 sts)
- Rnd 10: dec around. (6 sts)
Fasten off, leaving a long tail for sewing. Sew head to body, slightly offset to one side for character. This gives each gnome a unique, charming personality.
GNOME BEARD (make 3)
With color C, ch 12.
- Row 1: sc in 2nd ch from hook and in each ch across. (11 sts)
- Row 2: ch 1, turn, sc in next 5 sts, dec, sc in next 4 sts. (10 sts)
- Row 3: ch 1, turn, sc in next 4 sts, dec, sc in next 4 sts. (9 sts)
- Row 4: ch 1, turn, sc in next 3 sts, dec, sc in next 4 sts. (8 sts)
- Row 5: ch 1, turn, sc in next 3 sts, dec, sc in next 3 sts. (7 sts)
- Row 6: ch 1, turn, sc in next 2 sts, dec, sc in next 3 sts. (6 sts)
Fasten off, leaving a long tail. Sew beard onto face, just below the eyes. Important: Embroider eyes with black yarn or attach safety eyes before sewing on the beard, so the eyes are visible above the fluffy beard.
GNOME NOSE (make 3)
- Rnd 1: With color D, mr, 6 sc in ring. (6 sts)
- Rnd 2: inc in each st around. (12 sts)
- Rnd 3-4: sc in each st around. (12 sts)
Stuff lightly, fasten off, leaving a tail. Sew nose onto the center of the beard, positioning it slightly above the middle for a cute, button-like appearance.
GNOME HAT (make 3)
- Rnd 1: With color A, mr, 6 sc in ring. (6 sts)
- Rnd 2: inc in each st around. (12 sts)
- Rnd 3: (sc in next st, inc) around. (18 sts)
- Rnd 4: (sc in next 2 sts, inc) around. (24 sts)
- Rnd 5-8: sc in each st around. (24 sts)
- Rnd 9: (sc in next 2 sts, dec) around. (18 sts)
- Rnd 10: sc in each st around. (18 sts)
- Rnd 11: (sc in next st, dec) around. (12 sts)
- Rnd 12: sc in each st around. (12 sts)
- Rnd 13: dec around. (6 sts)
Fasten off, leaving a long tail. Sew hat onto head, pulling the tip to one side and stitching it in place for a jaunty, whimsical look. Add a small bell or pompom to the tip if desired for extra charm.
GNOME BELT (optional, make 3)
With color E, ch 24, sl st to form a ring. Fasten off, weave in ends. Place around body just below the head, secure with a few stitches to keep it in place.
GNOME BOOTS (make 6, 2 per gnome)
- Rnd 1: With color F, mr, 6 sc in ring. (6 sts)
- Rnd 2: inc in each st around. (12 sts)
- Rnd 3-4: sc in each st around. (12 sts)
- Rnd 5: dec around. (6 sts)
Fasten off, leaving a tail. Sew boots to the bottom of the body, positioning them so the gnome sits or stands stably. For a seated gnome, angle the boots slightly forward.
Assembly
Sew all parts together securely, using the long tails left from each piece. Embroider eyes with black yarn or use safety eyes for a more defined look. Add rosy cheeks with pink yarn or blush for a sweet, flushed appearance. Weave in all ends carefully to ensure a clean finish.
Finishing Touches
Your gnome trio is complete! Display them on a shelf, mantel, or as a table centerpiece. They also make wonderful handmade gifts for friends and family. For an extra cozy touch, consider brushing the beard yarn gently with a wire brush to create a fluffier texture, matching the whimsical woodland aesthetic.
These charming garden guardians are sure to bring smiles and warmth wherever they're placed. Happy crocheting!


