Whimsical Woodland Gnome Family Free Pattern – Crocheted Rooted Cottage Trio
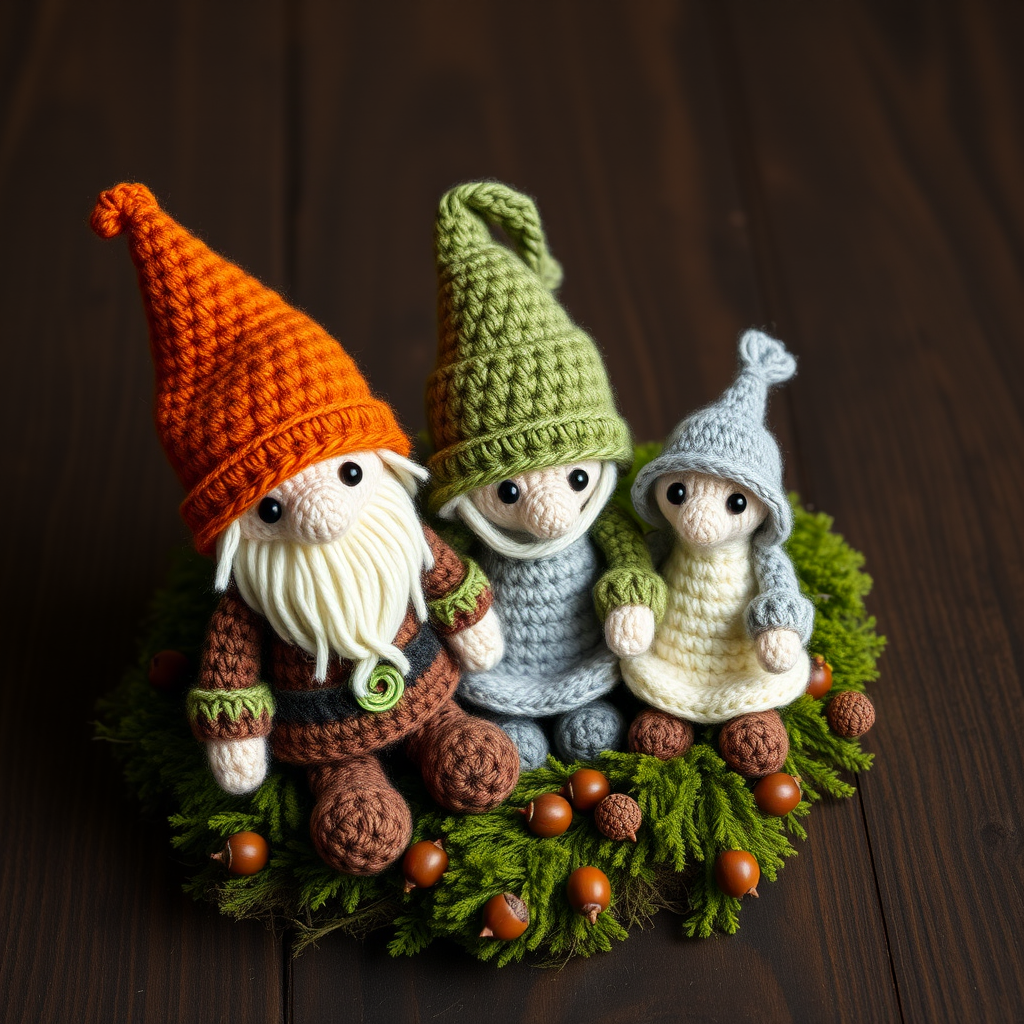
Bring Enchanted Forest Charm to Your Home: The Whimsical Woodland Gnome Family
There's something undeniably magical about a handmade gnome. With their pointy hats, mossy beards, and rosy noses, they seem to carry a little bit of forest folklore wherever they go. Today, I'm thrilled to share a complete, beginner-friendly pattern for a Whimsical Woodland Gnome Family—a trio of crocheted cuties (Papa, Mama, and Baby) that will bring cozy, enchanted charm to any shelf, mantel, or gift box.
This pattern is perfect for those who love amigurumi but want something a little different from the usual animals. The gnomes are worked in simple continuous spirals, making them a fantastic project for beginners while still offering plenty of personality. Whether you're crafting for seasonal decor, a housewarming gift, or just because you need a little woodland magic in your life, this trio is sure to delight.
Let's gather our supplies and get started on this delightful crochet adventure!
Materials Needed
Before we dive into the stitches, let's make sure you have everything you need. The beauty of this pattern is that it uses simple, readily available materials.
Yarn
You'll need worsted weight yarn in these earthy, cozy tones:
- Moss Green (for Mama's hat and accents)
- Bark Brown (for Papa's tunic and limbs)
- Cream (for beards and Mama's dress)
- Rust Orange (for Papa's hat)
- Soft Gray (for Baby's hat and Mama's beard)
Hook & Notions
- 3.5mm (E) crochet hook – This is the perfect size for worsted weight yarn to create a tight, firm fabric that holds its shape.
- Stitch markers – Essential for keeping track of your rounds, especially when working in spirals.
- Tapestry needle – For sewing pieces together and weaving in ends.
- Polyester fiberfill stuffing – To give your gnomes their cuddly, squishy bodies.
- Small amount of black yarn – For embroidering the eyes and smiles.
Gauge
4 sc x 4 rows = 1 inch (not critical for amigurumi, but consistent tension is key to a professional finish).
Step-by-Step Instructions
This pattern creates three distinct gnomes. We'll start with the largest (Papa), then adapt for Mama and Baby. All pieces are worked in continuous spirals unless otherwise noted. Always use a stitch marker to mark the beginning of your round.
PAPA GNOME
Head & Body (worked as one piece)
We'll start from the top of the head and work down to the bottom of the body.
- Round 1: Magic ring, 6 sc in ring. (6)
- Round 2: 2 sc in each st around. (12)
- Round 3: (sc in next st, 2 sc in next st) around. (18)
- Round 4: (sc in next 2 sts, 2 sc in next st) around. (24)
- Round 5: (sc in next 3 sts, 2 sc in next st) around. (30)
- Rounds 6-10: Sc in each st around. (30) This creates the head shape.
- Round 11: (sc in next 3 sts, sc2tog) around. (24) We begin shaping the neck.
- Round 12: (sc in next 2 sts, sc2tog) around. (18)
Stuff firmly at this point, as you'll be closing the opening soon.
- Round 13: (sc in next st, sc2tog) around. (12)
- Round 14: sc2tog around. (6)
- Fasten off, weave in end.
Nose
The nose is a tiny sphere that gives Papa his character.
- Round 1: Magic ring, 6 sc in ring. (6)
- Round 2: 2 sc in each st around. (12)
- Rounds 3-4: Sc in each st around. (12)
- Fasten off, leaving a long tail for sewing. Stuff lightly and sew to the center of the face.
Beard (worked in rows)
This is a flat piece that drapes over the body. We'll use decreases to create a triangular shape.
- Row 1: With cream yarn, ch 16, sc in 2nd ch from hook and across. (15)
- Row 2: Ch 1, turn, sc in next 3 sts, (sc2tog) 3 times, sc in next 3 sts. (12) You're decreasing in the middle to shape the beard.
- Row 3: Ch 1, turn, sc in next 2 sts, (sc2tog) 3 times, sc in next 2 sts. (9)
- Row 4: Ch 1, turn, sc in next st, (sc2tog) 3 times, sc in next st. (6)
- Fasten off, leaving a tail. Sew beard under the nose, allowing it to drape over the body.
Hat
The iconic pointed hat! We'll increase, work even, then decrease to a point.
- Round 1: With rust orange yarn, magic ring, 6 sc in ring. (6)
- Round 2: 2 sc in each st around. (12)
- Round 3: (sc in next st, 2 sc in next st) around. (18)
- Round 4: (sc in next 2 sts, 2 sc in next st) around. (24)
- Rounds 5-7: Sc in each st around. (24)
- Round 8: (sc in next 4 sts, 2 sc in next st) around. (30) This increase widens the brim.
- Rounds 9-12: Sc in each st around. (30)
- Round 13: (sc in next 4 sts, sc2tog) around. (25) Now we taper to a point.
- Round 14: (sc in next 3 sts, sc2tog) around. (20)
- Round 15: (sc in next 2 sts, sc2tog) around. (15)
- Round 16: (sc in next st, sc2tog) around. (10)
- Round 17: sc2tog around. (5)
- Fasten off, weave in end. Fold up the brim slightly and sew the hat to the head.
Arms (make 2)
- Round 1: With bark brown yarn, magic ring, 6 sc in ring. (6)
- Rounds 2-6: Sc in each st around. (6)
- Fasten off, leaving a tail. Sew to the sides of the body.
Legs (make 2)
- Round 1: With bark brown yarn, magic ring, 6 sc in ring. (6)
- Round 2: 2 sc in each st around. (12)
- Rounds 3-5: Sc in each st around. (12)
- Fasten off, leaving a tail. Stuff lightly and sew to the bottom of the body.
MAMA GNOME
Mama follows the same basic structure as Papa, with a few feminine tweaks. Follow the Papa instructions for the head, body, nose, arms, and legs, but make these changes:
- Yarn Colors: Use cream yarn for the body (her dress) and moss green for the hat.
- Beard: Use a smaller version. Ch 10, sc in 2nd ch from hook and across. (9). Then decrease as for Papa, but with fewer stitches: Row 2: sc in next 2 sts, (sc2tog) 2 times, sc in next 2 sts. (7). Row 3: sc in next st, (sc2tog) 2 times, sc in next st. (5). Fasten off.
- Hat Brim: After completing Round 7 of the hat, add a folded brim. Ch 1, turn, sc in each st around for 2 rows. Then continue with Round 8 as written for Papa.
BABY GNOME
The baby is the quickest to make and utterly adorable.
Head & Body
- Round 1: Magic ring, 6 sc in ring. (6)
- Round 2: 2 sc in each st around. (12)
- Round 3: (sc in next st, 2 sc in next st) around. (18)
- Rounds 4-6: Sc in each st around. (18)
- Round 7: (sc in next st, sc2tog) around. (12)
- Stuff firmly.
- Round 8: sc2tog around. (6)
- Fasten off, weave in end.
Nose
- Round 1: Magic ring, 6 sc in ring. (6)
- Fasten off, leaving a tail. Sew to face.
Beard
- Ch 8, sc in 2nd ch from hook and across. (7)
- Fasten off, leaving a tail. Sew under the nose.
Hat
- Round 1: With soft gray yarn, magic ring, 6 sc in ring. (6)
- Round 2: 2 sc in each st around. (12)
- Round 3: (sc in next st, 2 sc in next st) around. (18)
- Rounds 4-5: Sc in each st around. (18)
- Round 6: (sc in next st, sc2tog) around. (12)
- Round 7: sc2tog around. (6)
- Fasten off, weave in end. Sew to head.
Arms & Legs
Make as for Papa, but only 4 rounds for arms and 3 rounds for legs.
Assembly & Final Touches
Now for the fun part—bringing your gnomes to life!
- Sew all parts securely using the long tails you left. Make sure arms are attached at the sides of the body, and legs are centered at the bottom.
- Embroider the eyes: Use black yarn to create simple French knots or small straight stitches for the eyes. Place them just above the nose.
- Add a smile: With black yarn, embroider a small, gentle smile just below the nose.
- Extra charm for Papa: Crochet a tiny leaf in moss green (ch 4, sc in 2nd ch, hdc in next, sc in last) and sew it to his hat for a woodland flourish.
And there you have it—your very own Whimsical Woodland Gnome Family! These little guys are perfect for gifting, decorating, or simply brightening your own space. The pattern is forgiving and fun, so don't be afraid to experiment with different color combinations to make them truly your own.
Happy crocheting, and may your home be filled with a little bit of forest magic!


