Whimsical Woodland Berry Crochet Necklace Free Pattern – Cozy Textured Charm
Whimsical Woodland Berry Crochet Necklace – Free Pattern
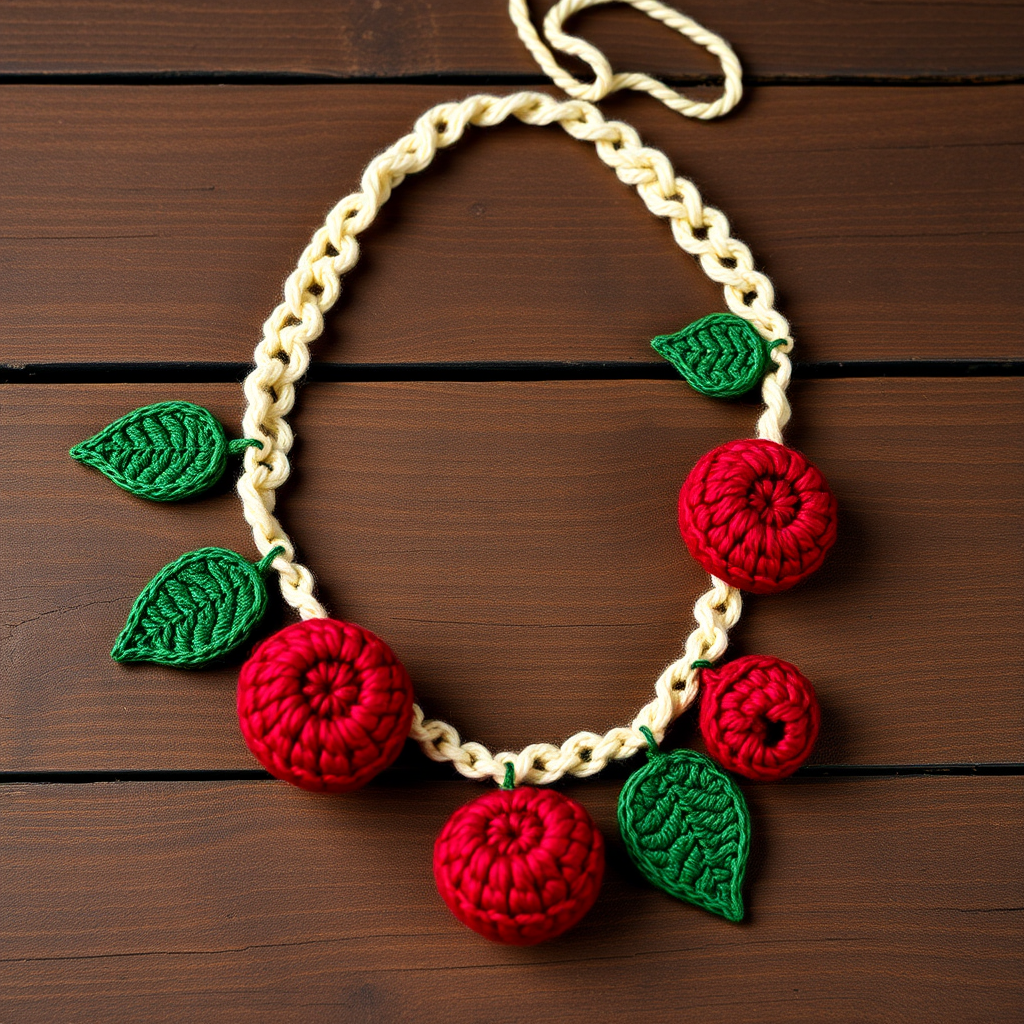
Bring a touch of enchanted forest charm to your jewelry collection with this delightful crochet necklace pattern. Featuring plush, textured berry motifs and delicate green leaves strung on a soft cream chain, this accessory is perfect for cozy layering and adds a handmade, rustic touch to any outfit. Whether you're a seasoned crocheter or a curious beginner, this project is a joy to create and wear.
This free pattern guides you through every step, from crafting the dimensional berries to assembling the final piece. The result is a whimsical, nature-inspired necklace that’s as fun to make as it is to wear. Let’s gather your materials and get started!
Materials Needed
Before you begin, make sure you have the following supplies on hand. The gauge is not critical for this project, but aim for tight stitches to help the berries hold their plump shape.
- Yarn: Worsted weight cotton or acrylic yarn in the following amounts:
- 20g deep berry red (for berries)
- 15g forest green (for leaves)
- 10g warm cream (for the chain)
- Crochet Hook: 3.5mm (E) crochet hook
- Yarn needle for weaving in ends and assembly
- Scissors
- Optional: Small stitch markers to keep track of rounds
Abbreviations (US Terms)
- ch – chain
- sc – single crochet
- hdc – half double crochet
- dc – double crochet
- sl st – slip stitch
- mr – magic ring
- inc – increase (2 sc in the same stitch)
- dec – decrease (sc 2 stitches together)
Finished Size: Approximately 16 inches (40 cm) long. You can easily adjust the length by adding or removing chain stitches in Part 3.
Step-by-Step Instructions
Part 1: Berry Motifs (Make 5)
These plump, textured berries are the stars of the necklace. Take your time with the magic ring and keep your tension consistent for a neat, rounded shape.
Round 1: With berry red yarn, make a magic ring (mr). Chain 1 (this does not count as a stitch), then work 6 single crochet (sc) into the ring. Pull the tail to close the ring tightly. Join with a slip stitch (sl st) to the first sc. (6 sc)
Round 2: Chain 1. Work an increase (inc) in each stitch around. This means 2 sc in every stitch. Join with a sl st to the first sc. (12 sc)
Round 3: Chain 1. *Sc in the next stitch, inc in the next stitch.* Repeat from * to * around. Join with a sl st. (18 sc)
Round 4: Chain 1. *Sc in the next 2 stitches, inc in the next stitch.* Repeat from * to * around. Join with a sl st. (24 sc)
Round 5: Chain 1. Sc in each stitch around. This round creates the sides of the berry. Join with a sl st. (24 sc)
Round 6: Chain 1. *Sc in the next 2 stitches, decrease (dec) in the next stitch.* Repeat from * to * around. Join with a sl st. (18 sc)
Round 7: Chain 1. *Sc in the next stitch, dec in the next stitch.* Repeat from * to * around. Join with a sl st. (12 sc)
Round 8: Chain 1. Dec around (sc 2 together 6 times). Join with a sl st. (6 sc)
Finishing the Berry: Fasten off, leaving a long tail (about 12 inches) for assembly. Before closing the hole completely, stuff the berry lightly with small yarn scraps or fiberfill. Then, thread the tail onto a yarn needle and weave it through the front loops of the remaining 6 stitches. Pull tight to cinch the opening closed. Secure the tail with a knot and weave the end inside the berry to hide it.
Part 2: Leaf Motifs (Make 6)
These simple leaves add a natural, forest-inspired contrast to the berries. They are worked in rows, not rounds.
Row 1: With forest green yarn, chain (ch) 6. Starting in the 2nd chain from the hook, work a sc in the next 2 chains, then a hdc in the next chain, and a dc in the next chain. In the last chain, work 5 double crochet (dc) stitches. This creates the pointed tip of the leaf. Now, working on the other side of the foundation chain: dc in the next chain, hdc in the next chain, and sc in the next 2 chains. Join with a sl st to the very first sc to close the leaf shape.
Finishing the Leaf: Fasten off, leaving a tail for sewing. Repeat this process to make a total of 6 leaves.
Part 3: Necklace Chain
This simple chain forms the base of your necklace. The single crochet stitches create a sturdy, comfortable cord.
Row 1: With warm cream yarn, chain 160 (or your desired length for a 16-inch necklace). Starting in the 2nd chain from the hook, work 1 sc in each chain across the entire row. Fasten off, leaving a long tail for assembly.
Part 4: Assembly
Now for the fun part – bringing all the pieces together to create your woodland masterpiece.
- Arrange: Lay the cream chain flat on a table. Arrange the 5 berries and 6 leaves along the chain, spacing them evenly. For a balanced, natural look, place a leaf between each berry, and position one leaf at each end of the necklace.
- Sew: Using the yarn tails left on the berries and leaves, sew each motif securely onto the chain. Make sure to attach them firmly so they don't dangle too much. Weave the tails through the chain stitches and the motif bases for a secure hold.
- Weave in Ends: Use the yarn needle to weave in all loose ends carefully, both on the motifs and the chain ends.
- Wear: To wear, simply wrap the chain around your neck and tie the ends in a loose knot, or attach a small clasp if you prefer. The necklace can also be worn doubled for a trendy, layered look.
Tips for Success
- For floppier leaves: Use a slightly larger hook (like a 4.0mm) for the leaves to give them a softer, more relaxed drape.
- Mix it up: Don't be afraid to experiment with berry colors! Try raspberry, cranberry, or even a mix of shades for a playful, vibrant effect.
- Adjustable length: If you prefer a longer necklace, simply add more chains at the start of Part 3. For a choker-style, reduce the number of chains.
Your whimsical woodland berry necklace is now complete! This cozy, textured accessory is perfect for adding a handmade touch to your wardrobe or for gifting to a fellow nature lover. Enjoy your beautiful creation!