Whimsical Meadow Crochet Bookmark Free Pattern
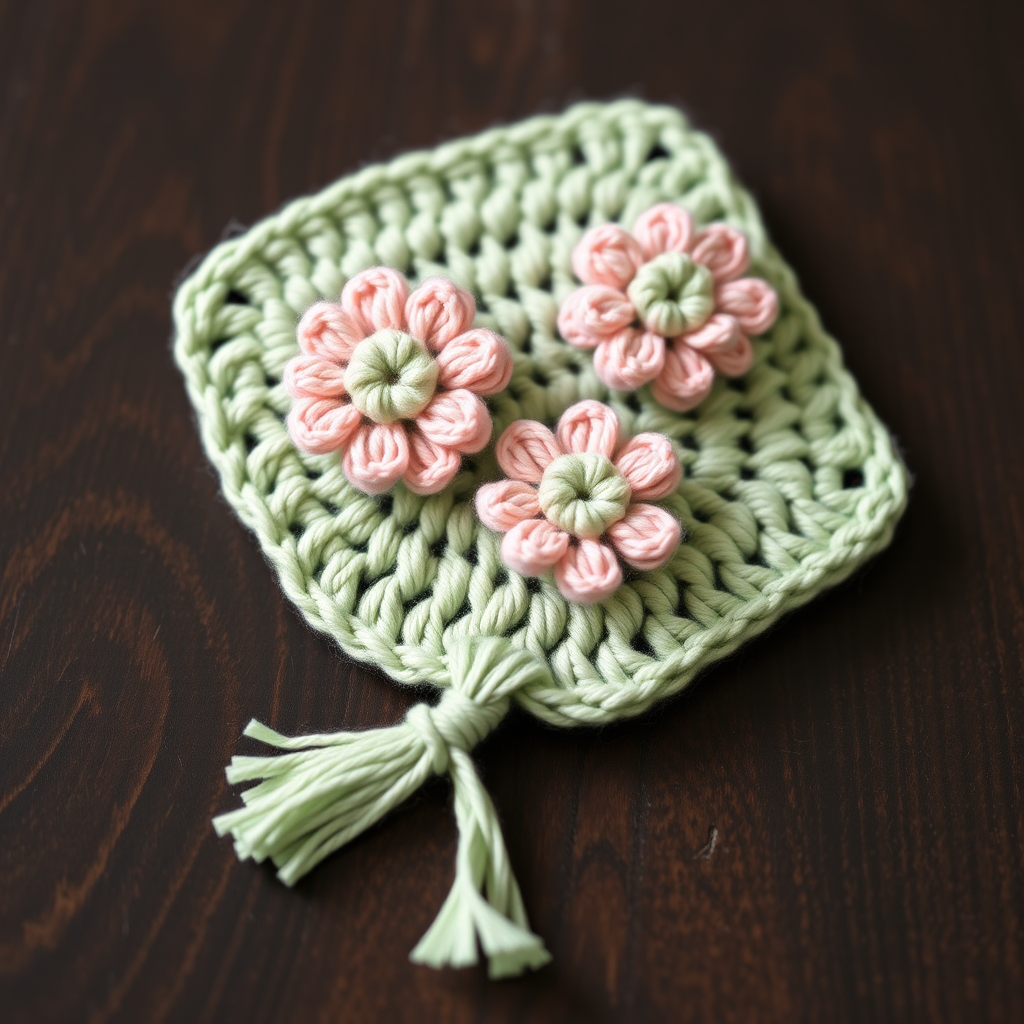
Whimsical Meadow Crochet Bookmark: A Free Pattern for Book Lovers
There's something magical about combining the love of reading with the art of handmade crafts. Today, I'm thrilled to share this delightful Whimsical Meadow Crochet Bookmark pattern—a charming accessory that brings a touch of spring to every page you turn. This easy pattern uses basic crochet stitches to create a soft, textured bookmark adorned with delicate flower circles, making it the perfect gift for bookworms, teachers, or anyone who appreciates handmade beauty.
Whether you're a seasoned crocheter looking for a quick weekend project or a beginner eager to practice your skills, this pattern is designed with you in mind. The combination of a sturdy single crochet base with whimsical flower appliqués creates a piece that's both functional and beautiful. Let's dive into this delightful project that celebrates the simple joy of reading!
Materials Needed
Before we begin our crochet journey, let's gather all the necessary supplies. This project requires minimal materials, making it perfect for using up yarn from your stash or trying out new color combinations.
Yarn Requirements
- Main Color (MC): Worsted weight cotton yarn in soft sage green (approximately 50 yards)
- Contrast Color (CC): Worsted weight cotton yarn in blush pink (approximately 20 yards)
Pro tip: Cotton yarn works beautifully for bookmarks because it's durable, holds its shape well, and has a lovely natural sheen. However, any worsted weight yarn you have on hand will work perfectly!
Tools and Notions
- Crochet Hook: 4 mm (G/6) crochet hook
- Yarn needle: For weaving in ends and sewing flowers
- Scissors: For cutting yarn
- Optional: Ribbon or additional yarn for tassel
Gauge Information
Gauge is not critical for this project, but aim for a firm tension to keep the bookmark sturdy. The recommended gauge is 4 single crochet stitches = 1 inch. This ensures your bookmark will be dense enough to hold its shape while remaining flexible enough to mark your pages gently.
Step-by-Step Instructions
This beautiful bookmark is worked in three parts: the base, the decorative flower circles, and the final assembly. Each section is simple and builds upon basic crochet techniques. Let's get started!
Part 1: Bookmark Base
The base of our bookmark creates a sturdy, rectangular foundation using basic single crochet stitches. This section includes a clever buttonhole row that adds both functionality and charm.
Row 1: With your Main Color (sage green) yarn, chain 41 stitches. Work 1 single crochet (sc) in the 2nd chain from your hook, then continue working 1 sc in each chain across the row. You should have 40 single crochet stitches total.
Row 2: Chain 1 and turn your work. Work 1 sc in each stitch across the row. (40 sc)
Rows 3-6: Repeat Row 2 four more times. Each row should have 40 single crochet stitches. This creates a solid, dense fabric that will form the main body of your bookmark.
Row 7 (Buttonhole Row): Chain 1 and turn. Work 1 sc in the first 2 stitches. *Chain 3, skip 2 stitches, then work 1 sc in each of the next 2 stitches.* Repeat from * to * across the row, ending with 1 sc in the last 2 stitches. This creates a series of small buttonholes that will be perfect for threading ribbon or attaching a tassel.
Row 8: Chain 1 and turn. Work 1 sc in each sc and in each chain space across the row. This means you'll work 1 sc in each of the 2 sc stitches, then 3 sc in the chain-3 space, repeating across. You should end with 40 sc total.
Row 9: Chain 1 and turn. Work 1 sc in each stitch across the row. (40 sc)
Fasten off your yarn, leaving a 6-inch tail. Weave in this end carefully using your yarn needle to ensure your bookmark base is secure and neat.
Part 2: Flower Circles (Make 3)
Now for the whimsical part—the delicate flower circles that give this bookmark its meadow charm! These flowers are worked in the round using a magic ring technique, creating beautiful spiral-like centers with slightly ruffled edges.
Round 1: With your Contrast Color (blush pink) yarn, create a magic ring. Chain 1, then work 6 single crochet stitches into the ring. Pull the ring tight to close the center. Join with a slip stitch to the first single crochet. (6 sc)
Round 2: Chain 1. Work 2 single crochet stitches in each single crochet around. Join with a slip stitch to the first single crochet. (12 sc)
Round 3: Chain 1. *Work 1 sc in the next stitch, then 2 sc in the following stitch.* Repeat from * to * around the circle. Join with a slip stitch to the first single crochet. (18 sc)
Round 4: Chain 1. *Work 1 sc in each of the next 2 stitches, then 2 sc in the following stitch.* Repeat from * to * around the circle. Join with a slip stitch to the first single crochet. (24 sc)
Fasten off, leaving a long tail (approximately 12 inches) for sewing the flower to the bookmark base.
Repeat this process to create three identical flower circles. Each flower will have a lovely raised center and gently ruffled edges, resembling small daisies in a spring meadow.
Part 3: Assembly and Finishing Touches
Now comes the exciting part—bringing all the pieces together to create your finished bookmark!
Step 1: Position the Flowers
Lay your bookmark base flat with the right side facing up. Arrange the three flower circles evenly along the length of the bookmark, spacing them approximately 1 inch apart. The flowers should be centered horizontally on the bookmark, creating a balanced, pleasing arrangement.
Step 2: Sew the Flowers
Using the long tail from each flower and your yarn needle, sew each flower securely to the bookmark base. Work your stitches through the back loops of the flower's outer edge and through the bookmark fabric, being careful to keep your stitches neat and invisible from the front. Make several passes to ensure each flower is firmly attached.
Step 3: Create the Tassel (Optional)
For a beautiful finishing touch, create a small tassel using your Main Color yarn. Cut 8-10 strands of yarn, each about 6 inches long. Fold them in half and use a separate piece of yarn to tie them together at the fold. Wrap another piece of yarn around the tassel about 1/2 inch below the top to create the tassel head. Trim the bottom edges evenly. Attach the tassel to the bottom edge of your bookmark by threading the tie through one of the buttonholes.
Alternative: Instead of a tassel, you can weave a pretty ribbon through the buttonhole row for a different look.
Step 4: Final Weaving
Weave in all remaining ends using your yarn needle. Take care to hide all yarn tails within the stitches so they're invisible from both sides of the bookmark.
Tips for Perfect Results
To ensure your Whimsical Meadow Bookmark turns out beautifully, keep these helpful tips in mind:
- Maintain consistent tension: Keep your stitches firm but not too tight. This creates a sturdy bookmark that will hold its shape for years.
- Count your stitches: Especially in the base rows, counting ensures your bookmark stays straight and even.
- Block your work: If your bookmark curls at the edges, gently block it by pinning it flat and lightly steaming it (if using cotton yarn).
- Experiment with colors: While sage green and blush pink create a lovely spring meadow feel, don't be afraid to try other color combinations—autumn oranges, ocean blues, or even rainbow brights!
Creative Variations
Once you've mastered this pattern, consider these fun variations:
- Seasonal themes: Use white and yellow for summer daisies, or deep reds and greens for winter berries.
- Add leaves: Crochet small leaf shapes in green and sew them between the flowers for extra detail.
- Make it longer: Add more rows to the base and additional flowers for a longer bookmark suitable for larger books.
- Personalize it: Add a small crocheted initial or heart to make it a special gift.
Conclusion
This Whimsical Meadow Crochet Bookmark is more than just a practical accessory—it's a little piece of handmade joy that makes every reading session feel special. Whether you're crafting it for yourself or as a thoughtful gift for a fellow book lover, this pattern is sure to bring smiles and warmth.
The combination of simple stitches, beautiful colors, and the charming flower details creates a piece that looks far more complex than it actually is. As you work through this pattern, you'll find yourself falling in love with the meditative rhythm of crochet and the satisfaction of creating something both beautiful and useful.
I'd love to see your finished bookmarks! Share your creations on social media with the hashtag #WhimsicalMeadowBookmark, and don't forget to tag me so I can admire your handiwork. Happy crocheting, and happy reading!


