Waddles the Baby Penguin Free Crochet Pattern – Cozy Holiday Amigurumi
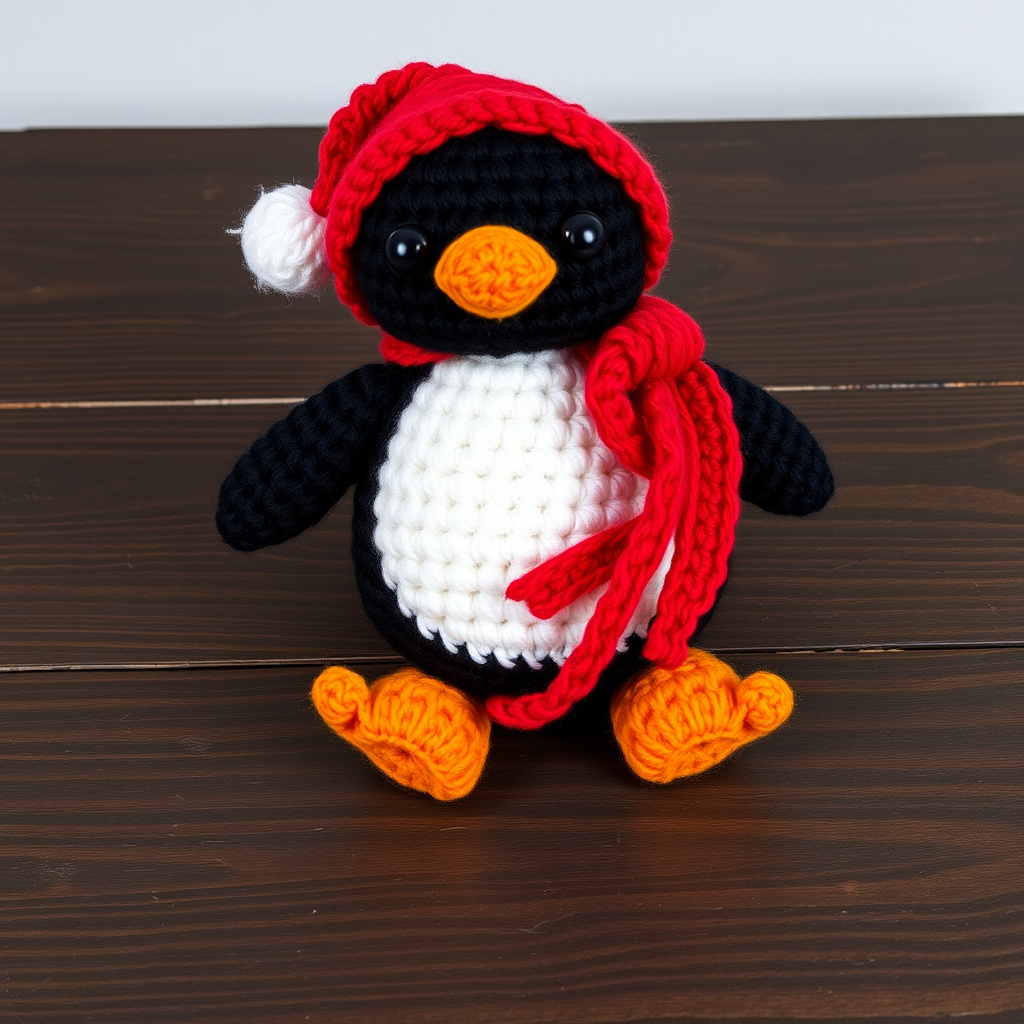
Waddles the Baby Penguin: A Cozy Holiday Amigurumi Free Crochet Pattern
There's something undeniably magical about creating a handmade gift that brings warmth and joy to the holiday season. Today, I'm thrilled to share with you the pattern for Waddles the Baby Penguin – an adorable, textured amigurumi that's perfect for holiday gifting, nursery decor, or simply adding a touch of whimsy to your winter home. This charming little penguin comes dressed in a festive Santa hat and scarf, making him the ideal companion for cozy winter evenings.
What makes this pattern particularly special is its accessibility. Using soft, chunky yarn and simple stitches, even beginners can create a professional-looking plush toy in just a few relaxing sessions. The pattern focuses on basic single crochet techniques with strategic increases and decreases to shape the body, making it a satisfying project that builds confidence while producing stunning results.
Whether you're an experienced crocheter looking for a quick weekend project or a newcomer eager to try your hand at amigurumi, Waddles is designed to bring a smile to your face and warmth to your heart. Let's dive into this delightful pattern!
Materials Needed
Before we begin our crochet adventure, let's gather all the necessary supplies. Here's what you'll need to create your very own Waddles:
Yarn Requirements
- Worsted weight yarn in the following colors:
- Black (for body and head)
- White (for belly)
- Orange (for beak and feet)
- Red (for Santa hat and scarf)
- Green (optional, for scarf stripes or pom-pom accent)
Tools and Notions
- 3.5mm (E) crochet hook – This size creates a tight, firm fabric that prevents stuffing from showing through
- Safety eyes (8mm) – Or black yarn for embroidered eyes if you prefer a child-safe option
- Polyester fiberfill stuffing – For a plump, huggable finish
- Yarn needle – For sewing pieces together and weaving in ends
- Scissors – For cutting yarn
- Stitch markers – To keep track of your rounds (optional but helpful)
Gauge note: Gauge is not critical for this project, but aim for a tight tension to prevent stuffing from showing. If your stitches are loose, consider using a smaller hook.
Abbreviations Used in This Pattern
- MR: Magic ring
- sc: Single crochet
- inc: Increase (2 sc in same stitch)
- dec: Decrease (invisible decrease recommended)
- st(s): Stitch(es)
- rnd: Round
- ch: Chain
Step-by-Step Instructions
Now, let's create Waddles piece by piece. Remember to work in continuous rounds unless otherwise specified, and use stitch markers to track your progress. Take your time and enjoy the process!
Body (Worked in Continuous Rounds, Starting with White for Belly)
The body is worked from the bottom up, starting with the white belly and transitioning to black. This creates the classic penguin look with minimal seaming.
- Round 1: Magic ring, 6 sc (6 stitches)
- Round 2: Inc in each stitch around (12 stitches)
- Round 3: (sc, inc) around (18 stitches)
- Round 4: (2 sc, inc) around (24 stitches)
- Round 5: (3 sc, inc) around (30 stitches)
- Round 6: (4 sc, inc) around (36 stitches)
- Rounds 7-10: Sc in each stitch around (36 stitches) – 4 rounds
- Round 11: (5 sc, inc) around (42 stitches)
- Rounds 12-14: Sc in each stitch around (42 stitches) – 3 rounds
- Round 15: (6 sc, inc) around (48 stitches)
- Rounds 16-18: Sc in each stitch around (48 stitches) – 3 rounds
- Round 19: (6 sc, dec) around (42 stitches)
- Round 20: (5 sc, dec) around (36 stitches)
- Round 21: (4 sc, dec) around (30 stitches)
- Round 22: (3 sc, dec) around (24 stitches)
- Round 23: (2 sc, dec) around (18 stitches)
- Round 24: (sc, dec) around (12 stitches)
- Round 25: Dec around (6 stitches)
Finishing: Fasten off, leaving a long tail. Weave the tail through the front loops of the remaining 6 stitches, pull tight to close, and secure. Stuff the body firmly before closing, shaping it into a plump, rounded form.
Head (Black Yarn)
The head is worked separately and attached to the body, allowing for proper positioning of the face features.
- Round 1: Magic ring, 6 sc (6 stitches)
- Round 2: Inc in each stitch around (12 stitches)
- Round 3: (sc, inc) around (18 stitches)
- Round 4: (2 sc, inc) around (24 stitches)
- Round 5: (3 sc, inc) around (30 stitches)
- Rounds 6-10: Sc in each stitch around (30 stitches) – 5 rounds
- Round 11: (3 sc, dec) around (24 stitches)
- Round 12: (2 sc, dec) around (18 stitches)
- Round 13: (sc, dec) around (12 stitches)
- Round 14: Dec around (6 stitches)
Finishing: Fasten off, leaving a long tail. Stuff the head firmly before closing. Weave the tail through the front loops, pull tight, and secure.
Wings (Make 2, Black Yarn)
These little flippers are simple and quick to make. They should be slightly flattened rather than heavily stuffed.
- Round 1: Magic ring, 6 sc (6 stitches)
- Round 2: (sc, inc) around (9 stitches)
- Rounds 3-5: Sc in each stitch around (9 stitches) – 3 rounds
- Round 6: (sc, dec) around (6 stitches)
- Rounds 7-8: Sc in each stitch around (6 stitches) – 2 rounds
Finishing: Fasten off, leaving a long tail. Do not stuff tightly; flatten slightly to create a flipper-like shape. This will help them lay nicely against the body.
Feet (Make 2, Orange Yarn)
These cute little feet are lightly stuffed to maintain their shape while remaining flexible.
- Round 1: Magic ring, 6 sc (6 stitches)
- Round 2: (sc, inc) around (9 stitches)
- Round 3: (2 sc, inc) around (12 stitches)
- Rounds 4-5: Sc in each stitch around (12 stitches) – 2 rounds
Finishing: Fasten off, leaving a long tail. Stuff lightly and set aside for assembly.
Beak (Orange Yarn)
The small beak adds so much character to Waddles' face. It's quick to make and easy to position.
- Round 1: Magic ring, 4 sc (4 stitches)
- Round 2: (sc, inc) around (6 stitches)
- Round 3: Sc in each stitch around (6 stitches)
Finishing: Fasten off, leaving a long tail. This tiny piece doesn't need stuffing – it will naturally hold its shape when sewn onto the face.
Santa Hat (Red Yarn)
This festive hat is worked from the tip down, creating a natural cone shape that fits perfectly on Waddles' head.
- Round 1: Magic ring, 6 sc (6 stitches)
- Round 2: Inc in each stitch around (12 stitches)
- Round 3: (sc, inc) around (18 stitches)
- Rounds 4-6: Sc in each stitch around (18 stitches) – 3 rounds
- Round 7: (2 sc, inc) around (24 stitches)
- Rounds 8-10: Sc in each stitch around (24 stitches) – 3 rounds
- Round 11: (3 sc, inc) around (30 stitches)
- Rounds 12-14: Sc in each stitch around (30 stitches) – 3 rounds
- Round 15: (4 sc, inc) around (36 stitches)
- Rounds 16-18: Sc in each stitch around (36 stitches) – 3 rounds
Finishing: Fasten off, leaving a long tail. Fold up the brim slightly and sew onto the head at a jaunty angle. Add a white pom-pom at the tip using this quick method: make a small magic ring with 6 sc, increase to 12, then decrease back to 6, fasten off, and sew to the hat tip.
Scarf (Red Yarn)
The finishing touch that completes Waddles' holiday look.
- Chain 30 stitches
- Sc in the 2nd chain from hook and across (29 stitches)
- Fasten off
Finishing: Attach fringe to the ends if desired, or leave as is. Wrap around the neck and sew in place with a few discreet stitches.
Assembly Instructions
Now comes the exciting part – bringing all the pieces together to create your adorable baby penguin!
- Attach the head to the body: Position the head on top of the body, ensuring the white belly is centered on the front. Sew securely using the long tail from the head.
- Add the eyes: Attach safety eyes between rounds 8 and 9 of the head, about 6 stitches apart. If using yarn, embroider eyes with black yarn using a French knot or satin stitch.
- Sew on the beak: Position the beak between the eyes, slightly lower. Sew securely using the long tail.
- Attach the wings: Sew the wings to the sides of the body, about 2 rounds below the head. Position them slightly forward for a natural look.
- Add the feet: Sew the feet to the bottom of the body, slightly apart for stability. Make sure they're evenly positioned.
- Place the Santa hat: Position the hat on the head, angled slightly to one side for a playful look. Sew in place securely.
- Wrap the scarf: Wrap the scarf around the neck area and secure with a few stitches at the back.
- Final touches: Weave in all ends carefully. Give Waddles a gentle squeeze to ensure everything is secure.
Tips for Perfect Results
- Maintain consistent tension: Keep your stitches even throughout for a professional finish
- Use the invisible decrease: This technique creates a smoother finish than regular decreases – insert hook into front loop of first stitch, then front loop of second stitch, yarn over, and pull through all loops
- Stuff as you go: For the body, stuff firmly before closing to achieve that plump, huggable look
- Position features carefully: Before sewing on eyes and beak, pin them in place to check the positioning
- Take breaks: Crocheting should be relaxing – don't rush the process
Customization Ideas
While Waddles is adorable as designed, don't be afraid to make him your own! Consider these variations:
- Color swaps: Use pastel colors for a spring-themed penguin, or blue and white for a winter wonderland version
- Different accessories: Try a tiny bow tie, a mini sweater, or even a little book for a reading-themed penguin
- Size variations: Use thinner yarn and a smaller hook for a mini version, or bulky yarn for an extra-large cuddly companion
- Personal touches: Add a small heart on the belly, embroider a name, or attach a small bell to the hat
Care Instructions
To keep your handmade penguin looking its best:
- Spot clean with a damp cloth if needed
- Avoid machine washing – hand washing is gentler on the yarn and stuffing
- Air dry flat, reshaping as needed
- Store in a cool, dry place away from direct sunlight
Share Your Creation
I absolutely love seeing how crafters personalize their projects! Whether you follow the pattern exactly or add your own creative touches, I'd be delighted to see your finished Waddles. Share your photos on social media with the hashtag #WaddlesThePenguin and tag me so I can admire your work.
This pattern is perfect for:
- Holiday gift giving
- Nursery or children's room decor
- Christmas tree ornaments (make a smaller version!)
- Charity donations to children's hospitals
- Teacher or hostess gifts
Remember, every stitch you make carries love and intention. Whether you're creating Waddles for a special little one in your life, as a decorative piece for your home, or simply for the joy of crafting, you're making something truly special.
Happy crocheting, and may your holidays be filled with warmth, creativity, and the satisfaction of handmade gifts!
Pattern notes: This pattern is for personal use only. Please do not sell items made from this pattern without permission, and always credit the designer when sharing your creations. If you have any questions or need clarification on any step, don't hesitate to reach out in the comments below.


