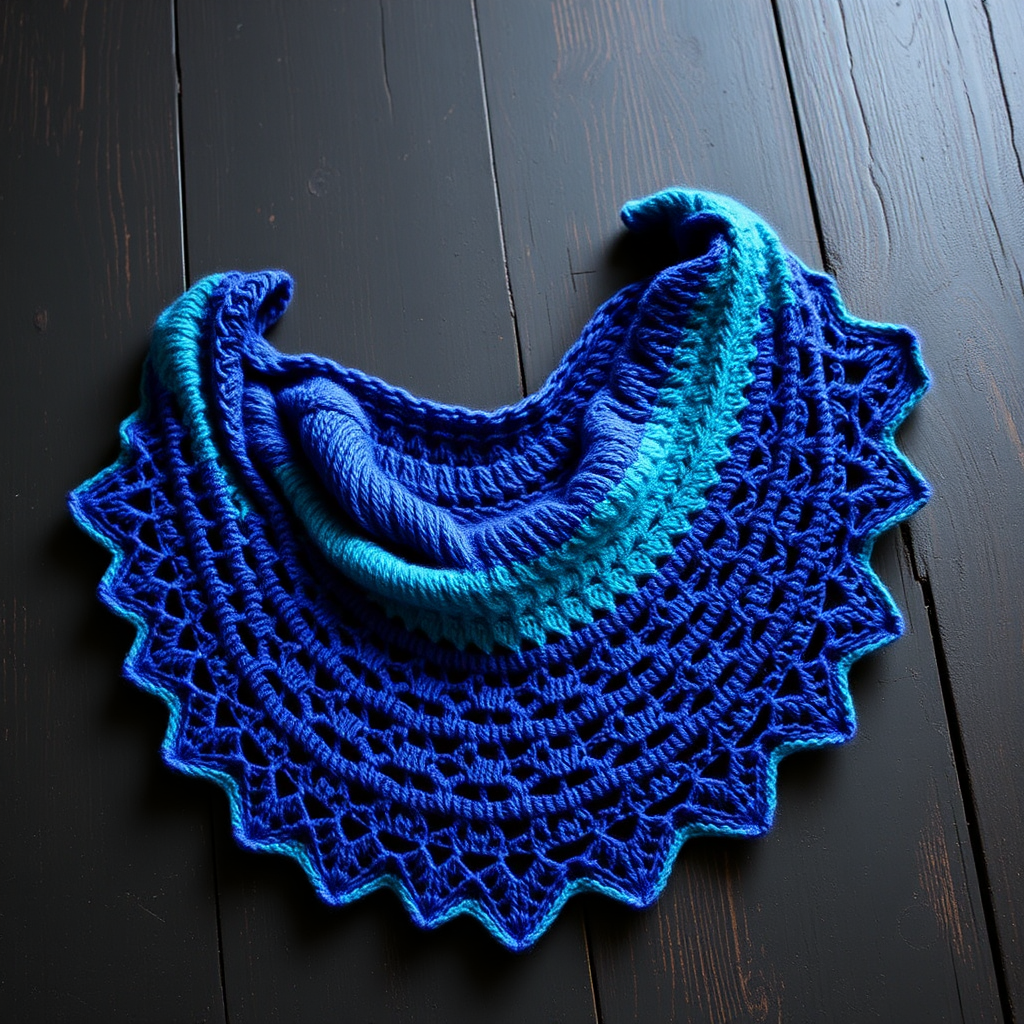
Venus Shell Shawl Free Knitting Pattern – Celestial Lace Wrap

Venus Shell Shawl Free Knitting Pattern – Celestial Lace Wrap
Wrap yourself in the ethereal beauty of the Venus Shell Shawl, a celestial lace knit that drapes like a whisper of stardust. This free pattern guides you through creating a stunning, shell-stitch crescent shawl perfect for twilight evenings. Whether you're a seasoned knitter looking for a meditative project or a confident beginner ready to tackle lacework, this shawl offers a rewarding journey into the world of delicate, handmade elegance.
The Venus Shell Shawl is knitted from the top center down, increasing to form a graceful crescent shape. Worked in a combination of stockinette and a delicate shell lace pattern, this design features intricate yarn-over holes that form fan-like motifs cascading from the center spine outward. The finished piece is an airy, light, and ethereal accessory with a subtle shimmer, designed to wrap around your shoulders like a celestial embrace.
Materials Needed
Before you begin your celestial knitting journey, gather the following materials:
- Yarn: Fingering weight yarn (approx. 400-450 yards), in a soft celestial blue or silver-grey. The sample shown uses a beautiful blue-silver gradient that evokes the night sky, but any fingering weight yarn will work beautifully.
- Needle: US 6 (4.0 mm) circular knitting needle, 32 inches or longer. The long circular needle is essential to accommodate the growing number of stitches as the shawl expands.
- Gauge: 20 stitches and 28 rows = 4 inches in stockinette stitch (blocked). While gauge is important for size, the shawl's drape is forgiving—just ensure your fabric is not too tight or too loose.
- Other tools: Stitch markers (at least 2), tapestry needle for weaving in ends, blocking pins and mats for finishing.
Step-by-Step Instructions
Abbreviations
Familiarize yourself with these standard knitting abbreviations before you begin:
- k = knit
- p = purl
- yo = yarn over
- k2tog = knit two together (right-leaning decrease)
- ssk = slip, slip, knit (left-leaning decrease)
- kfb = knit front and back (increase)
- pm = place marker
- sm = slip marker
- rep = repeat
- st(s) = stitch(es)
Pattern Notes
- The shawl begins with a garter tab cast-on, then increases are made on both sides of the center spine.
- The shell pattern is worked in multiples of 6 stitches plus 1, with increases at the edges and center.
- Blocking is essential to open up the lace and achieve the full drape. Do not skip this step!
- The first and last 3 stitches of every row are worked in garter stitch (knit on both sides) to create a neat, non-curling edge.
Garter Tab Cast-On
This clever cast-on creates a seamless, invisible starting point for your shawl.
- Cast on 3 stitches.
- Knit 6 rows of garter stitch (all knit). You will have a small rectangular tab.
- Turn work 90 degrees clockwise, pick up and knit 3 stitches along the side edge of the tab (you now have 3 stitches on the needle).
- Turn work again, pick up and knit 3 stitches from the cast-on edge. You now have 9 stitches total on your needle.
- Row 1 (RS): k3, yo, k3, yo, k3 (11 sts)
- Row 2 (WS): k3, p to last 3 sts, k3 (11 sts)
Your foundation is now complete. The center stitch (the 6th stitch) will be your guide for the spine increases throughout the shawl.
Increase Section
This section establishes the crescent shape by creating increases at both edges and at the center spine.
Row 3 (RS): k3, yo, k to center stitch (the 6th stitch), yo, k1 (center), yo, k to last 3 sts, yo, k3 (15 sts)
Row 4 (WS): k3, p to last 3 sts, k3
Repeat Rows 3-4 until you have 51 stitches on the needle, ending with a WS row. You will have increased 10 times, adding 4 stitches each repeat (2 at the edges and 2 at the center).
Pro tip: Place a stitch marker on either side of the center stitch to help you identify it quickly as the row progresses.
Shell Lace Pattern
Now the magic begins! You'll work the shell lace pattern while maintaining the garter edges (first and last 3 stitches) and the center spine increases. The pattern is written for one half of the shawl, then repeated on the other side of the center stitch.
Row 1 (RS): k3, yo, *k1, yo, k2tog, k3, yo, k1, yo, k2tog, k3* rep from * to * until 4 sts before center, k1, yo, k2tog, k1 (center), yo, k1, yo, k2tog, k1, then rep from * to * on the other side, ending k3, yo, k3.
Row 2 (WS): k3, p all sts to last 3 sts, k3
Row 3 (RS): k3, yo, *k2, yo, ssk, k1, k2tog, yo, k2, yo, ssk, k1* rep from * to * until 4 sts before center, k2, yo, ssk, k1 (center), yo, k1, yo, ssk, k2, then rep from * to * on other side, ending k3, yo, k3.
Row 4 (WS): k3, p all sts to last 3 sts, k3
Row 5 (RS): k3, yo, *k3, yo, ssk, k1, k2tog, yo, k3, yo, ssk* rep from * to * until 4 sts before center, k3, yo, ssk, k1 (center), yo, k1, yo, ssk, k3, then rep from * to * on other side, ending k3, yo, k3.
Row 6 (WS): k3, p all sts to last 3 sts, k3
Row 7 (RS): k3, yo, *k4, yo, ssk, k1, k2tog, yo, k4, yo* rep from * to * until 4 sts before center, k4, yo, ssk, k1 (center), yo, k1, yo, ssk, k4, then rep from * to * on other side, ending k3, yo, k3.
Row 8 (WS): k3, p all sts to last 3 sts, k3
Repeat Rows 1-8 until the shawl measures approximately 20 inches from the center spine, ending with a WS row. You will have increased 4 stitches every RS row (2 at the edges and 2 at the center), so the stitch count grows steadily. The lace pattern naturally accommodates these increases.
Note: As the shawl grows, the pattern repeats will multiply. Take your time to read your knitting and ensure the pattern is flowing correctly. The yarn-overs and decreases should align vertically to create the shell motifs.
Edging
Once your shawl reaches the desired length, it's time to add a clean, finished edge.
Work 4 rows of garter stitch (knit all stitches) across all stitches, maintaining the increases on RS rows (k3, yo, k to center, yo, k1, yo, k to last 3 sts, yo, k3) to keep the edge relaxed and prevent puckering.
Bind Off (Picot Edge)
This decorative bind-off creates tiny scalloped points along the entire perimeter, echoing the shell motifs of the lace.
Bind off loosely as follows: k2, *slip both stitches back to left needle, k2tog through back loop, k1, repeat from * until all stitches are bound off.
Tip: Work this bind-off very loosely to maintain the stretch and drape of the shawl. If needed, use a larger needle for the bind-off row.
Finishing
The final steps are crucial to transforming your knitted fabric into the ethereal lace shawl it's meant to be.
- Weave in all ends using a tapestry needle. Be sure to weave in securely but invisibly.
- Soak the shawl in lukewarm water with a gentle wool wash for 20 minutes. This allows the fibers to relax and the lace to open up.
- Gently squeeze out excess water (do not wring or twist—this can felt the yarn).
- Lay flat on a towel and roll up to remove more water. Press gently to absorb moisture.
- Pin out to shape on blocking mats. Stretch the lace points and the crescent curve, opening up the yarn-over holes to their full potential. Pay special attention to the picot edge, pinning each scallop.
- Allow to dry completely before unpinning. This may take 24-48 hours depending on humidity.
Once dry, your Venus Shell Shawl is ready to wear. Drape it over your shoulders for a twilight walk, or gift it to someone special who appreciates the celestial beauty of handmade lace. The delicate shell pattern and airy fabric will shimmer and flow with every movement, a true testament to the art of knitting.
Happy knitting, and may your shawl bring a touch of stardust to every evening!