Aurora Lace Wrap Free Pattern
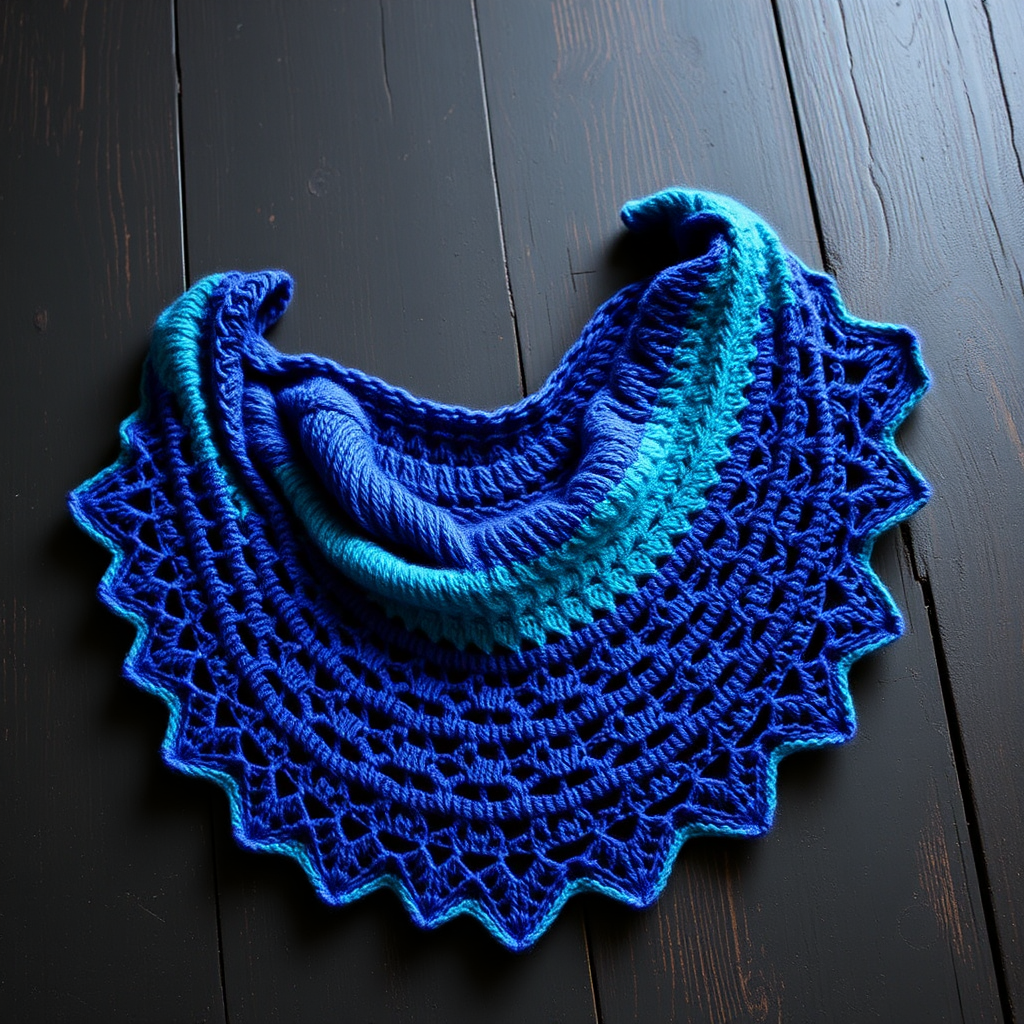
Wrap Yourself in the Northern Lights: The Aurora Lace Wrap Knitting Pattern
There are some knitting projects that are more than just yarn and needles—they are experiences. The Aurora Lace Wrap is precisely that kind of project. This crescent-shaped shawl captures the ethereal, dancing colors of the northern lights in a delicate, heirloom-quality piece. Designed for the adventurous intermediate knitter, this pattern pairs a soothing, rhythmic lace repeat with a striking two-color gradient that feels like magic flowing through your hands. Whether you are looking for a statement piece for a special occasion or a cozy, artistic layer for cool evenings, this wrap delivers. Let’s dive into the pattern and create something truly breathtaking.
Materials Needed: Gathering Your Aurora Palette
Before you cast on, let’s ensure you have everything you need. The beauty of this pattern lies in the yarn selection, so choose colors that speak to your soul—think deep twilight blues, vibrant teals, and shimmering purples.
- Yarn: DK weight yarn in two colors:
- Color A (Main): 400 yards (e.g., a deep stormy blue)
- Color B (Contrast): 200 yards (e.g., a vibrant teal or purple)
- Needles: US 6 (4.0 mm) circular knitting needle, 32-inch (80 cm) or longer. The long cord is essential to hold the increasing number of stitches.
- Notions: Stitch markers (at least 2), a tapestry needle for weaving in ends, and blocking pins/mats.
- Gauge: 20 stitches and 28 rows = 4 inches in stockinette stitch (blocked). Gauge is important for yardage, but since this is a shawl, exact gauge is less critical than achieving a fabric you love.
Step-by-Step Instructions: Knitting the Aurora Lace Wrap
This pattern is worked from the top center down, increasing on both sides and at the center to create the crescent shape. We'll break it down into manageable sections. Pro Tip: Place a lifeline every 10 rows to easily rip back if you make a mistake—it will save you hours of frustration!
Special Stitches & Abbreviations
- k2tog: Knit two stitches together (decrease).
- ssk: Slip, slip, knit (left-leaning decrease).
- yo: Yarn over (increase, creates a hole).
- pm: Place marker.
- sm: Slip marker.
Part 1: The Setup (Creating the Foundation)
We begin with a simple garter stitch tab that will form the center spine of your shawl.
- Cast On: With Color A, cast on 5 stitches.
- Row 1 (Right Side): k2, yo, k1, yo, k2. (You now have 7 stitches).
- Row 2 (Wrong Side): k2, purl to the last 2 stitches, k2. (This creates a neat garter edge).
- Row 3 (RS): k2, yo, k1, yo, k1, yo, k1, yo, k2. (You now have 11 stitches).
- Row 4 (WS): k2, purl to the last 2 stitches, k2.
Part 2: The Body (Building the Crescent)
Now we establish the rhythm of the shawl. You will increase on every right-side row at the edges and at the center stitch. Place a marker on either side of the center stitch to keep track.
- Row 5 (RS): k2, yo, knit to the center marker, yo, sm, k1, yo, knit to the last 2 stitches, yo, k2.
- Row 6 (WS): k2, purl to the last 2 stitches, k2.
- Repeat Rows 5 and 6 until you have 101 stitches on your needle. Ensure you end with a Wrong Side row.
Part 3: The Lace Pattern (Adding the Magic)
This is where the Aurora comes alive. We will now incorporate a delicate lace motif between the edge increases and the center. The pattern is a simple 4-row repeat that creates a wave-like eyelet pattern.
- Row 1 (RS): k2, yo, *k2tog, yo* repeat from * to * until 2 stitches before the center marker, k2, yo, sm, k1, yo, k2, *yo, ssk* repeat from * to * until 3 stitches before the end, yo, k2.
- Row 2 (WS): k2, purl to the last 2 stitches, k2.
- Row 3 (RS): k2, yo, *yo, ssk* repeat from * to * until 2 stitches before the center marker, k2, yo, sm, k1, yo, k2, *k2tog, yo* repeat from * to * until 3 stitches before the end, yo, k2.
- Row 4 (WS): k2, purl to the last 2 stitches, k2.
Repeat these 4 rows until the shawl measures approximately 20 inches from the cast-on edge, ending with a WS row. You should have about 201 stitches on your needle.
Part 4: The Contrast Border (Introducing Color B)
Time to introduce the second color for a striking visual shift. Cut Color A, leaving a 6-inch tail, and join Color B.
- Row 1 (RS): k2, yo, *k2tog, yo* repeat from * to * until 2 stitches before the center marker, k2, yo, sm, k1, yo, k2, *yo, ssk* repeat from * to * until 3 stitches before the end, yo, k2.
- Row 2 (WS): k2, purl to the last 2 stitches, k2.
- Row 3 (RS): k2, yo, *yo, ssk* repeat from * to * until 2 stitches before the center marker, k2, yo, sm, k1, yo, k2, *k2tog, yo* repeat from * to * until 3 stitches before the end, yo, k2.
- Row 4 (WS): k2, purl to the last 2 stitches, k2.
Repeat these 4 rows once more with Color B. Then, work 2 rows in simple stockinette (RS knit, WS purl) with Color B to create a smooth base for the bind-off.
Part 5: The Picot Bind-Off (A Scalloped Finish)
This decorative bind-off gives the shawl its beautiful, scalloped edge. It looks complex but is surprisingly simple.
- With Color B, knit 2 stitches.
- *Slip both stitches back to the left needle (they will be twisted).
- Knit those 2 stitches together through the back loop (k2tog tbl).
- Knit 1 stitch from the left needle.
- Repeat from * until all stitches are bound off.
Note: This creates a series of little "picot" bumps along the edge. Weave in all loose ends with your tapestry needle.
Part 6: Blocking (The Final Transformation)
Blocking is non-negotiable for lace. It opens up the stitches and transforms your fabric from a wrinkled mass into a stunning, drapey shawl.
- Soak the shawl in lukewarm water with a drop of wool wash for 20 minutes.
- Gently squeeze out excess water—do not wring or twist.
- Lay the shawl on a clean towel, roll it up to remove more water.
- Pin the shawl out to shape on a blocking mat. Stretch the lace points gently to open up the eyelets. Focus on the crescent curve and the scalloped edge.
- Allow it to dry completely before unpinning.
Once dry, your Aurora Lace Wrap is ready to wear. Drape it over your shoulders and enjoy the fruits of your labor—a wearable piece of art that truly captures the magic of the night sky. Happy knitting!


