The Whisker Haven: A Free Pattern for a Cozy Crochet Cat Cave
The Whisker Haven: A Free Pattern for a Cozy Crochet Cat Cave
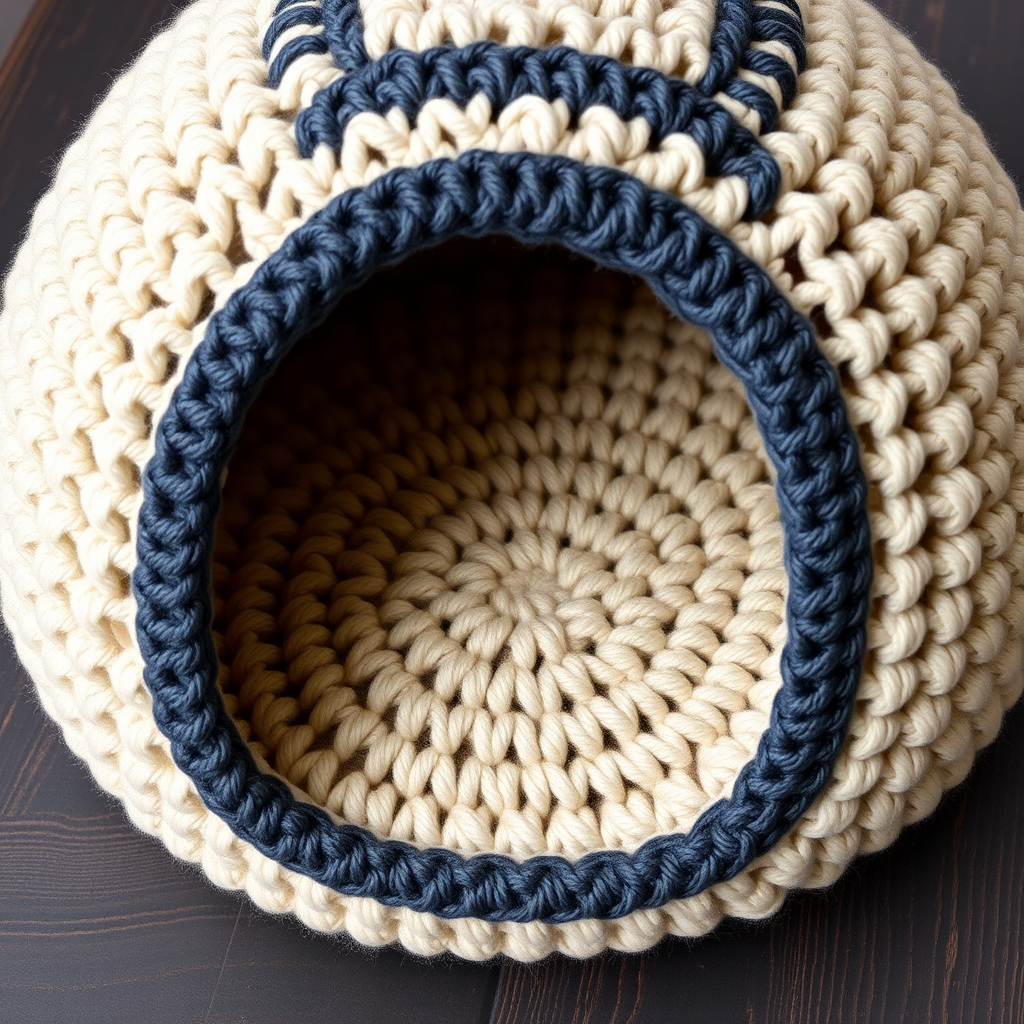
Transform your living space into a feline sanctuary with this modern, handcrafted cat cave that combines comfort with contemporary style. This free pattern guides you through creating a plush, textured hideaway your cat will adore. Whether you're a seasoned crocheter or a confident beginner looking for a rewarding project, this dome-shaped cat cave is the perfect addition to your home decor. Made with warm, worsted-weight yarn and featuring a stylish contrasting band, this cave is as beautiful as it is functional—your furry friend will love curling up inside their very own handmade haven.
Materials Needed
Before you begin, gather the following materials to ensure a smooth and enjoyable crocheting experience:
- Yarn: Worsted weight (4) yarn in two colors:
- Color A (main) – 350g (e.g., Lion Brand Wool-Ease in 'Oatmeal')
- Color B (accent) – 150g (e.g., Lion Brand Wool-Ease in 'Charcoal')
- Crochet Hook: 5.5 mm (I-9) crochet hook
- Other Supplies: Yarn needle for weaving in ends, stitch markers (optional but helpful), scissors, and polyfill or a round cushion insert (approx. 18 inches in diameter) for the base.
Gauge: 14 single crochet (sc) and 16 rows = 4 inches (10 cm) in single crochet. Always check your gauge to ensure the correct size—if your tension is off, adjust your hook size accordingly.
Step-by-Step Instructions
This pattern is worked in continuous rounds (unless otherwise noted), meaning you will not join at the end of each round unless specified. Use a stitch marker to keep track of your rounds. Let's dive into creating your cat's new favorite spot!
Base (Make 2 Identical Pieces)
The base provides a sturdy, flat foundation for the cave. You'll make two identical circles—one for the bottom and one to insert inside for extra support.
- Round 1: With Color A, make a magic ring. Chain 1 (does not count as a stitch), work 8 single crochet (sc) into the ring. Pull the tail to close the ring tightly. Do not join—continue in a spiral. (8 sts)
- Round 2: Work 2 sc in each stitch around. (16 sts)
- Round 3: *Sc in the next stitch, 2 sc in the next stitch*; repeat from * to * around. (24 sts)
- Round 4: *Sc in the next 2 stitches, 2 sc in the next stitch*; repeat around. (32 sts)
- Round 5: *Sc in the next 3 stitches, 2 sc in the next stitch*; repeat around. (40 sts)
- Round 6: *Sc in the next 4 stitches, 2 sc in the next stitch*; repeat around. (48 sts)
- Round 7: *Sc in the next 5 stitches, 2 sc in the next stitch*; repeat around. (56 sts)
- Round 8: *Sc in the next 6 stitches, 2 sc in the next stitch*; repeat around. (64 sts)
- Round 9: *Sc in the next 7 stitches, 2 sc in the next stitch*; repeat around. (72 sts)
- Round 10: *Sc in the next 8 stitches, 2 sc in the next stitch*; repeat around. (80 sts)
- Round 11: *Sc in the next 9 stitches, 2 sc in the next stitch*; repeat around. (88 sts)
- Round 12: *Sc in the next 10 stitches, 2 sc in the next stitch*; repeat around. (96 sts)
- Round 13: *Sc in the next 11 stitches, 2 sc in the next stitch*; repeat around. (104 sts)
- Round 14: *Sc in the next 12 stitches, 2 sc in the next stitch*; repeat around. (112 sts)
- Round 15: *Sc in the next 13 stitches, 2 sc in the next stitch*; repeat around. (120 sts)
- Round 16: Sc in each stitch around. (120 sts) Fasten off and weave in the end.
Repeat the entire process to create a second identical base piece. Set both aside.
Walls (Worked in Rounds, Starting from One Base)
The walls rise vertically from the base, creating the structure of the cave. We'll work in the back loops only for the first round to create a crisp, defined edge.
- Round 1: With Color A, join yarn to any single crochet stitch of one base piece. Chain 1 (does not count as a stitch). Working in the back loops only, sc in each stitch around. Slip stitch (sl st) to join to the first sc of the round. (120 sts)
- Rounds 2-10: Chain 1, sc in each stitch around (working through both loops now). Sl st to join at the end of each round. (120 sts)
- Round 11: Switch to Color B. Chain 1, sc in each stitch around. Sl st to join. (120 sts)
- Rounds 12-14: Continue with Color B, sc in each stitch around. Sl st to join at the end of each round. (120 sts)
- Round 15: Switch back to Color A. Chain 1, sc in each stitch around. Sl st to join. (120 sts)
- Rounds 16-20: Continue with Color A, sc in each stitch around. Sl st to join at the end of each round. (120 sts) Fasten off.
Your walls should now be a tall, open cylinder. This will form the main body of the cave.
Dome (Worked in Rounds, Decreasing)
Now we'll shape the top of the cave by gradually decreasing stitches, creating a cozy, igloo-like dome.
- Round 1: With Color A, join yarn to the top edge of the wall (the opposite side from the base). Chain 1, sc in each stitch around. Sl st to join. (120 sts)
- Round 2: Chain 1, *sc in the next 18 stitches, sc2tog (single crochet 2 together)*; repeat from * to * around. Sl st to join. (114 sts)
- Round 3: Chain 1, sc in each stitch around. Sl st to join. (114 sts)
- Round 4: Chain 1, *sc in the next 17 stitches, sc2tog*; repeat around. Sl st. (108 sts)
- Round 5: Chain 1, sc in each stitch around. Sl st. (108 sts)
- Round 6: Chain 1, *sc in the next 16 stitches, sc2tog*; repeat around. Sl st. (102 sts)
- Round 7: Chain 1, sc in each stitch around. Sl st. (102 sts)
- Round 8: Chain 1, *sc in the next 15 stitches, sc2tog*; repeat around. Sl st. (96 sts)
- Round 9: Chain 1, sc in each stitch around. Sl st. (96 sts)
- Round 10: Chain 1, *sc in the next 14 stitches, sc2tog*; repeat around. Sl st. (90 sts)
- Round 11: Chain 1, sc in each stitch around. Sl st. (90 sts)
- Round 12: Chain 1, *sc in the next 13 stitches, sc2tog*; repeat around. Sl st. (84 sts)
- Round 13: Chain 1, sc in each stitch around. Sl st. (84 sts)
- Round 14: Chain 1, *sc in the next 12 stitches, sc2tog*; repeat around. Sl st. (78 sts)
- Round 15: Chain 1, sc in each stitch around. Sl st. (78 sts)
- Round 16: Chain 1, *sc in the next 11 stitches, sc2tog*; repeat around. Sl st. (72 sts)
- Round 17: Chain 1, sc in each stitch around. Sl st. (72 sts)
- Round 18: Chain 1, *sc in the next 10 stitches, sc2tog*; repeat around. Sl st. (66 sts)
- Round 19: Chain 1, sc in each stitch around. Sl st. (66 sts)
- Round 20: Chain 1, *sc in the next 9 stitches, sc2tog*; repeat around. Sl st. (60 sts)
- Round 21: Chain 1, sc in each stitch around. Sl st. (60 sts)
- Round 22: Chain 1, *sc in the next 8 stitches, sc2tog*; repeat around. Sl st. (54 sts)
- Round 23: Chain 1, sc in each stitch around. Sl st. (54 sts)
- Round 24: Chain 1, *sc in the next 7 stitches, sc2tog*; repeat around. Sl st. (48 sts)
- Round 25: Chain 1, sc in each stitch around. Sl st. (48 sts)
- Round 26: Chain 1, *sc in the next 6 stitches, sc2tog*; repeat around. Sl st. (42 sts)
- Round 27: Chain 1, sc in each stitch around. Sl st. (42 sts)
- Round 28: Chain 1, *sc in the next 5 stitches, sc2tog*; repeat around. Sl st. (36 sts)
- Round 29: Chain 1, sc in each stitch around. Sl st. (36 sts)
- Round 30: Chain 1, *sc in the next 4 stitches, sc2tog*; repeat around. Sl st. (30 sts)
- Round 31: Chain 1, sc in each stitch around. Sl st. (30 sts)
- Round 32: Chain 1, *sc in the next 3 stitches, sc2tog*; repeat around. Sl st. (24 sts)
- Round 33: Chain 1, sc in each stitch around. Sl st. (24 sts)
- Round 34: Chain 1, *sc in the next 2 stitches, sc2tog*; repeat around. Sl st. (18 sts)
- Round 35: Chain 1, sc in each stitch around. Sl st. (18 sts)
- Round 36: Chain 1, *sc in the next stitch, sc2tog*; repeat around. Sl st. (12 sts)
- Round 37: Chain 1, sc2tog around. Sl st. (6 sts)
Fasten off, leaving a long tail (about 12 inches). Thread the tail through a yarn needle, weave it through the remaining 6 stitches, and pull tight to close the top securely. Weave in the end.
Entrance Opening
Now we'll create the rounded arch entrance for your cat to enter and exit comfortably.
- Fold the wall section flat so that the seam (where you joined rounds) is at the back. The front will be the opposite side. Mark the center front of the wall with a stitch marker—this is where your entrance will be.
- With Color B, join yarn at one side of the marked center. Chain 1, and single crochet evenly around the opening edge. You'll want to work about 40 stitches around the arch. To create a smooth curve, work more stitches around the bottom corners and fewer along the top. Tip: Try to keep the edge neat and even.
- Work 3 rounds of single crochet in the round (do not join—continue in a spiral) around this opening edge. This reinforces the opening and gives it a clean, finished look.
- Fasten off and weave in the ends.
Assembly
Now it's time to bring all the pieces together to form the finished cat cave.
- Take the second base piece you made earlier. This will be the inner bottom of the cave, providing extra cushioning and structure.
- Place this second base piece inside the cave, aligning it with the bottom edge of the walls. The right side of the crochet should be facing up.
- Using Color A and a yarn needle, whip stitch the second base to the bottom edge of the walls. Work your way around, but leave a small opening (about 6 inches) on one side.
- Through this opening, stuff the base with polyfill to create a soft, plush floor, or insert a pre-made round cushion (18 inches in diameter) for a firmer, more structured base.
- Once stuffed or cushioned, continue whip stitching to close the opening completely. Weave in all ends securely.
Finishing Touches
Your cat cave is almost complete! Now for the fun part—adding a personal touch.
- Weave in any remaining loose ends with your yarn needle.
- Optionally, you can add a decorative element to the top of the dome. Using Color B, crochet a simple flower or make a pompom and attach it securely to the gathered point at the top. This adds a charming, whimsical detail that elevates the overall look.
- Give your cave a gentle shaping by hand—fluff the walls and ensure the entrance is open and inviting.
Place the Whisker Haven in a quiet, cozy corner of your home, add a soft blanket inside if you like, and watch your feline friend discover their new favorite retreat. This project is not only a beautiful piece of handmade home decor but also a heartfelt gift for the cat who has everything. Happy crocheting!