Sun-Kissed Citrus Slice Sun Hat Free Crochet Pattern
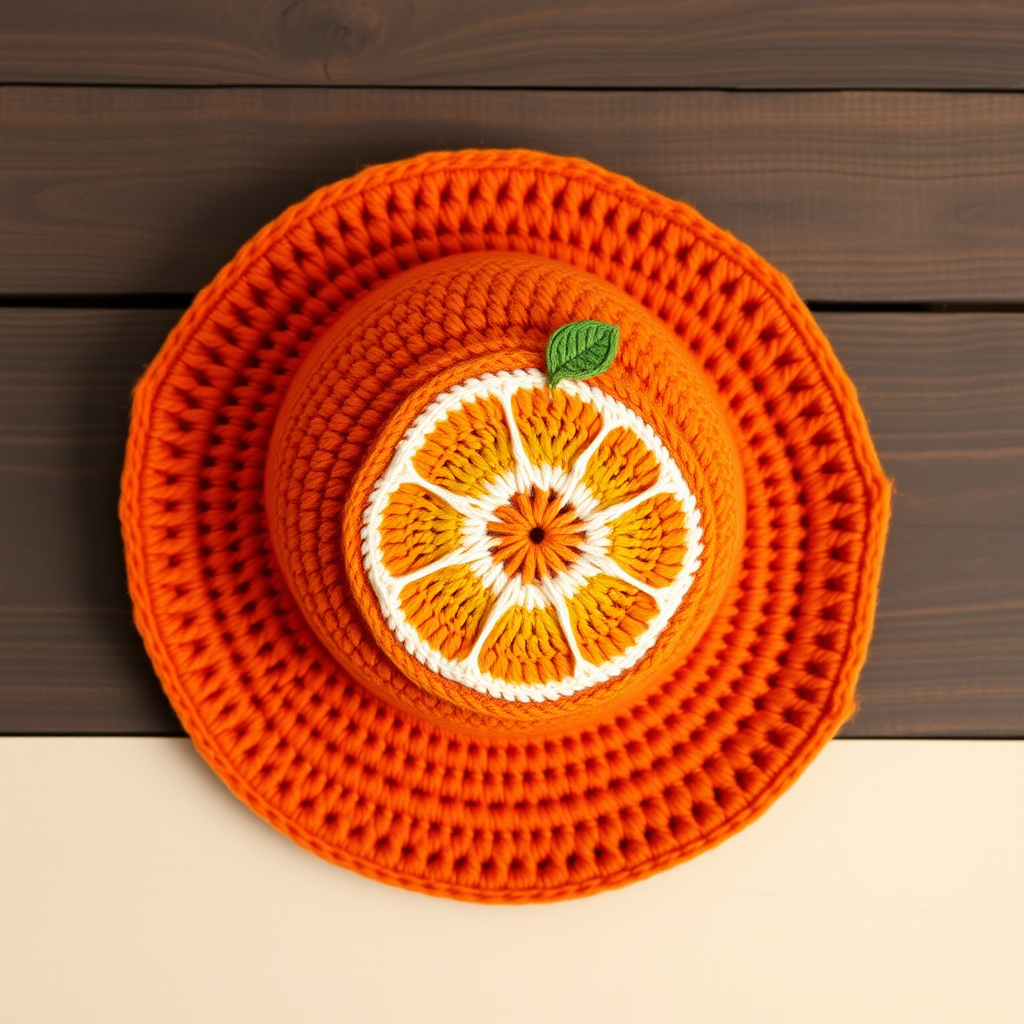
Sun-Kissed Citrus Slice Sun Hat: A Free Crochet Pattern for Summer
Bring a burst of summer to your handmade wardrobe with this cheerful, textured sun hat featuring a vibrant citrus slice motif. This unique design combines a classic, sturdy brim with playful fruit-inspired details for a fresh, handcrafted look that's perfect for sunny days. Whether you're heading to the beach, a farmers' market, or simply enjoying your garden, this hat is sure to turn heads and spark smiles.
This pattern is designed with beginners in mind, using basic crochet stitches and clear, step-by-step instructions. The dense, single-crochet construction creates a sturdy, straw-like texture that holds its shape beautifully, while the dimensional citrus slice adds a pop of color and whimsy. Let's dive in and create this delightful accessory together!
Materials Needed
Before you begin, gather the following supplies:
- Yarn: Worsted weight cotton yarn in orange, yellow, white, and green (approximately 250g total). Cotton is ideal for summer hats as it's breathable, durable, and holds its shape well.
- Hook: 5.0 mm crochet hook (or size needed to obtain gauge).
- Gauge: 16 sc x 18 rows = 4 x 4 inches. Always check your gauge to ensure the hat fits properly.
- Extras: Yarn needle for weaving in ends and sewing the motif, scissors.
Step-by-Step Instructions
Part 1: The Crown
The crown is worked in continuous rounds, increasing evenly to create a flat circle that forms the top of the hat.
- Round 1: Make a magic ring. Chain 1 (does not count as a stitch), work 8 single crochet (sc) into the ring. Pull the tail to tighten the ring closed. Slip stitch (sl st) to the first sc to join. (8 stitches)
- Round 2: Chain 1. Work 2 sc in each stitch around. Slip stitch to the first sc to join. (16 stitches)
- Round 3: Chain 1. *Sc in the next stitch, 2 sc in the next stitch.* Repeat from * to * around. Slip stitch to join. (24 stitches)
- Round 4: Chain 1. *Sc in the next 2 stitches, 2 sc in the next stitch.* Repeat from * to * around. Slip stitch to join. (32 stitches)
- Rounds 5-8: Continue increasing in this pattern, adding one more single crochet between increases each round. For example, Round 5 would be *sc in next 3 sts, 2 sc in next st*, Round 6 would be *sc in next 4 sts, 2 sc in next st*, and so on. Continue until you have 64 stitches total (approximately 8 rounds).
Part 2: The Body
Now we'll work even to create the depth of the hat, which will cover your head comfortably.
- Rounds 9-20: Chain 1. Work 1 sc in each stitch around. Slip stitch to the first sc to join. Repeat this round until the hat measures 6 inches from the center of the crown (approximately 12 rounds). Tip: Try the hat on at this point to ensure it fits snugly but comfortably.
Part 3: The Brim
The brim is created by increasing stitches to flare the hat outward, then working even rounds to make it sturdy and wide.
- Round 21: Chain 1. *Sc in the next 3 stitches, 2 sc in the next stitch.* Repeat from * to * around. Slip stitch to join. (80 stitches)
- Round 22: Chain 1. *Sc in the next 4 stitches, 2 sc in the next stitch.* Repeat from * to * around. Slip stitch to join. (96 stitches)
- Round 23: Chain 1. *Sc in the next 5 stitches, 2 sc in the next stitch.* Repeat from * to * around. Slip stitch to join. (112 stitches)
- Rounds 24-27: Chain 1. Work 1 sc in each stitch around. Slip stitch to join. Repeat this round 3 more times (for a total of 4 even rounds) to create a sturdy, well-defined brim.
- Finishing the Hat: Fasten off, leaving a 6-inch tail. Weave the tail through the last round of stitches and pull gently to tighten slightly, then weave in all ends securely.
Part 4: The Citrus Slice Motif
This dimensional motif is worked in the round with color changes to create the classic citrus look.
- Round 1 (Yellow): With yellow yarn, make a magic ring. Chain 2 (counts as first double crochet, dc). Work 11 more dc into the ring. Pull the tail to tighten. Slip stitch to the top of the beginning chain-2 to join. (12 stitches)
- Round 2 (White): Switch to white yarn. Chain 2 (counts as first dc). Work 2 dc in each stitch around. Slip stitch to the top of the beginning chain-2 to join. (24 stitches)
- Round 3 (Orange): Switch to orange yarn. Chain 2 (counts as first dc). *Dc in the next stitch, 2 dc in the next stitch.* Repeat from * to * around. Slip stitch to the top of the beginning chain-2 to join. (36 stitches)
- Finishing the Motif: Fasten off, leaving a long tail (at least 12 inches) for sewing the motif onto the hat.
Part 5: Assembly and Final Touches
- Positioning: Place the citrus slice motif on the front of the hat, centered and slightly above the brim (about 1-2 inches up from the brim edge). This placement creates a balanced, eye-catching look.
- Sewing: Thread the long orange tail onto a yarn needle. Sew the motif securely to the hat using a whip stitch or running stitch around the entire circumference of the motif. Make sure to catch both the motif and the hat fabric with each stitch to ensure it's firmly attached.
- Leaf Embellishment: With green yarn, embroider a small leaf or stem at the top of the citrus slice. Using a chain stitch, create a small curved line extending from the top edge of the orange ring. You can also add a small leaf shape by making a few straight stitches in a V-shape. Weave in the green yarn ends on the inside of the hat.
- Final Weave: Weave in all remaining ends on the inside of the hat to keep the exterior clean and polished.
And there you have it—your very own Sun-Kissed Citrus Slice Sun Hat! This playful accessory is perfect for adding a handmade touch to your summer wardrobe. The sturdy cotton yarn and dense stitch pattern make it both functional and fashionable. Enjoy wearing your creation, and don't forget to share your finished hat with fellow crafters!
Happy crocheting!


