Driftwood Sunset Earflap Cap Free Crochet Pattern
Driftwood Sunset Earflap Cap: A Free Beginner Crochet Pattern
Introduction
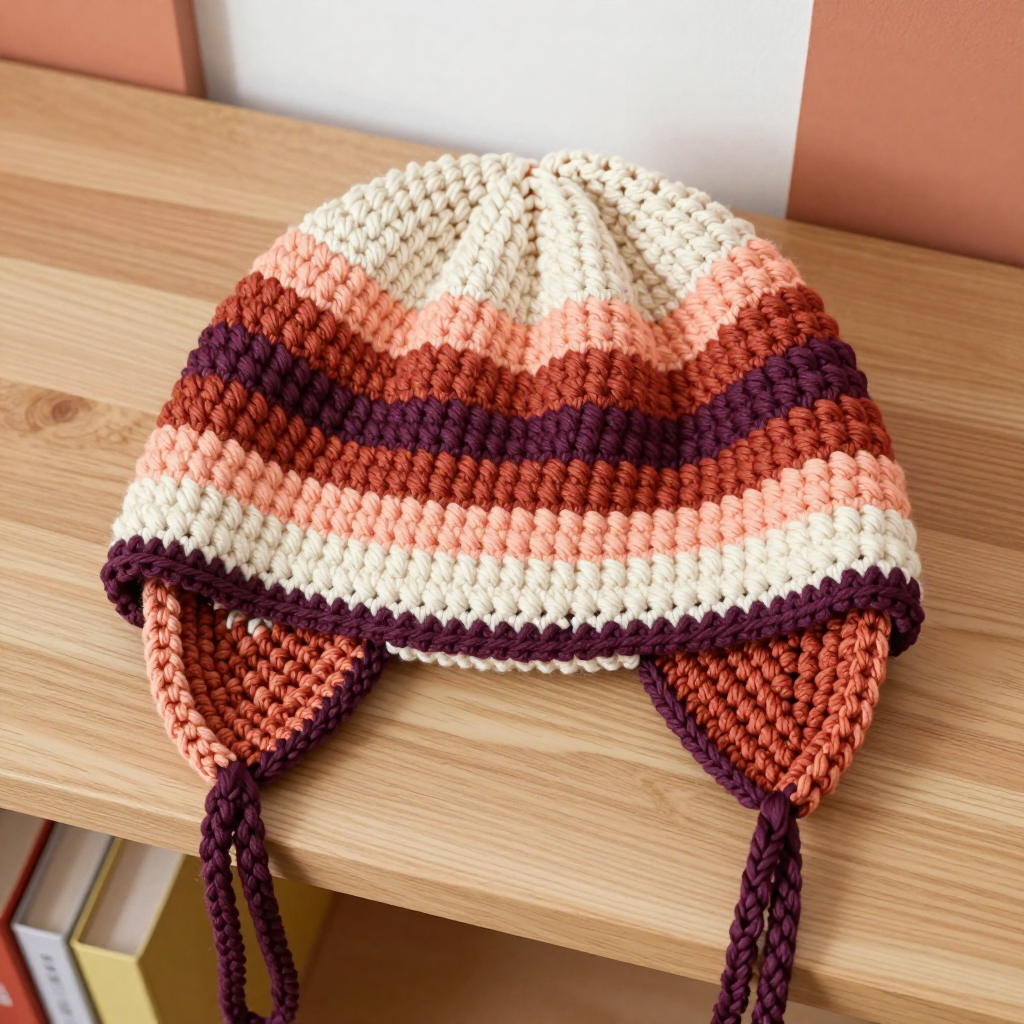
If you have never held a crochet hook before, this is the project to start with. The Driftwood Sunset Earflap Cap is worked as one simple flat rectangle, seamed into a tube, and topped with a gently gathered crown, so there is no complicated shaping to learn. The moss stitch (also called linen stitch) creates a nubby, woven texture that looks impressive but only uses two basic stitches you will master in minutes. Worked in super bulky yarn, it comes together in just a few cozy evenings, and the sunset ombre stripes move from warm cream through peach and terracotta to deep plum and back again. The finished hat is thick, soft, and squishy, with two triangular earflaps and braided ties that keep little ears warm all through pumpkin season.
Materials Needed
- Yarn: Super bulky (weight 6) yarn, approximately 150–170 yards total, divided as follows:
- Color A (warm cream): 50 yards
- Color B (peach): 35 yards
- Color C (terracotta): 35 yards
- Color D (deep plum): 30 yards
- Crochet hook: Size N/P (10 mm), or whatever size you need to match the gauge below.
- Stitch markers: At least 4 (or use scrap yarn loops).
- Tapestry needle: A large-eye yarn needle for seaming and weaving in ends.
- Scissors for cutting yarn.
- Finished size: Child size, fits a head circumference of 19–21 inches (48–53 cm). The finished hat measures approximately 18 inches (46 cm) around unstretched and 7.5 inches (19 cm) tall from brim to crown. Each earflap is approximately 4 inches (10 cm) deep.
Abbreviations and Beginner Glossary
- ch – chain. Make a loop with the yarn, pull a new loop through it. Each loop you pull through is one chain.
- sc – single crochet. Insert your hook into the stitch, yarn over (wrap yarn around hook), pull up a loop (you now have 2 loops on hook), yarn over again, and pull through both loops. One single crochet made.
- ch-1 sp – chain-one space. The small gap created under a single chain from the row below. You work your single crochet into this gap, not into the stitch itself.
- yo – yarn over. Wrap the working yarn around your hook from front to back.
- st(s) – stitch(es).
- sp(s) – space(s).
- turning ch – the chain made at the start of a row so your work has height. In this pattern it does not count as a stitch.
- fasten off – cut the yarn leaving a tail, then pull the tail all the way through the last loop on your hook to lock it.
- whipstitch – a simple seaming stitch: bring the needle through both edges from front to back, over and over, like a spiral of small stitches.
- slip stitch (sl st) – insert hook, yarn over, pull through the stitch and through the loop on your hook all at once.
- lark's head knot – fold a length of yarn in half, push the folded loop through a stitch, then pull the two loose ends through that loop and tighten.
Gauge
8 stitches x 8 rows = 4 inches (10 cm) in moss stitch (the sc, ch 1 pattern).
Gauge matters because it tells you whether your hat will actually fit. If your stitches are bigger than this, the hat will come out too large; if they are smaller, it will be too tight. To check, chain 17 and work 8 rows of moss stitch following Row 2 below, then lay the swatch flat and measure a 4-inch section in the middle. If you have more than 8 stitches in 4 inches, go up a hook size. If you have fewer, go down a hook size. Super bulky yarn works up fast, so a swatch takes only a few minutes.
Beginner Tips Before You Start
- Count your chain-one spaces, not your single crochets. Every row of moss stitch should have 18 single crochets and 18 chain-one spaces. If you lose your place, count the gaps.
- Do not pull the yarn too tight. Moss stitch needs a little breathing room. Keep your chain-one loops loose and even so the texture stays soft and the hat stays stretchy.
- Use a stitch marker in the first chain-one space of each row so you always know where the row begins and ends.
- Change colors at the very end of a row. Pull the new color through the last loop of the final single crochet, then carry on. This keeps the stripes clean.
- Work the single crochet into the gap, not the stitch. This is the single most important rule of moss stitch. If your fabric looks dense and stiff, you are probably working into the stitches instead of the spaces.
- Leave generous tails. Long tails make seaming and attaching earflaps much easier for a beginner.
Step-by-Step Instructions
Stitch Notes
Moss stitch (also called linen stitch): work (sc, ch 1) into each chain-one space, skipping the single crochets. Each row begins with ch 1 (which does not count as a stitch) and ends with a sc in the last chain-one space. Always work the sc into the chain-one space of the row below, not into the sc. To change colors, pull the new color through the last loop of the final sc of the row.
Hat Body (worked flat as a rectangle, then seamed)
With Color A, ch 37.
Row 1: Sc in 2nd ch from hook, ch 1, skip next ch, *sc in next ch, ch 1, skip next ch; repeat from * to last ch, sc in last ch. Turn. (18 sc, 18 ch-1 sps)
Row 2: Ch 1, sc in first ch-1 sp, ch 1, *sc in next ch-1 sp, ch 1; repeat from * across, sc in last ch-1 sp (the space formed by the turning ch). Turn. (18 sc, 18 ch-1 sps)
Rows 3–4: Repeat Row 2 in Color A. (18 sc, 18 ch-1 sps)
Rows 5–7: Repeat Row 2 in Color B (peach). (18 sc, 18 ch-1 sps)
Rows 8–10: Repeat Row 2 in Color C (terracotta). (18 sc, 18 ch-1 sps)
Rows 11–13: Repeat Row 2 in Color D (deep plum). (18 sc, 18 ch-1 sps)
Rows 14–16: Repeat Row 2 in Color C. (18 sc, 18 ch-1 sps)
Rows 17–19: Repeat Row 2 in Color B. (18 sc, 18 ch-1 sps)
Rows 20–22: Repeat Row 2 in Color A. (18 sc, 18 ch-1 sps)
Do not fasten off; leave a 24-inch (60 cm) tail for seaming.
Seaming Into a Tube
Fold the rectangle in half with right sides together, matching the first and last rows. Using the long tail and a tapestry needle (or a slip stitch with your hook), whipstitch or slip stitch the short ends together to form a tube. Fasten off.
Crown Shaping (gently rounded top)
Turn the tube right side out. With Color A, join yarn at the top edge. Work a gathering round: *insert hook under the top edge of the next stitch, yo, pull up a loop; repeat from * around the entire top edge (approximately 36 loops on hook), then yo and pull through all loops to close the crown. Pull tight, fasten off, and weave in the end. This creates a softly rounded crown.
Earflaps (make 2)
With Color C, ch 2.
Row 1: 3 sc in 2nd ch from hook. Turn. (3 sc)
Row 2: Ch 1, 2 sc in first sc, sc in next sc, 2 sc in last sc. Turn. (5 sc)
Row 3: Ch 1, sc in each sc across. Turn. (5 sc)
Row 4: Ch 1, 2 sc in first sc, sc in each sc to last sc, 2 sc in last sc. Turn. (7 sc)
Row 5: Ch 1, sc in each sc across. Turn. (7 sc)
Row 6: Ch 1, 2 sc in first sc, sc in each sc to last sc, 2 sc in last sc. Turn. (9 sc)
Rows 7–8: Ch 1, sc in each sc across. Turn. (9 sc)
Fasten off, leaving a 12-inch (30 cm) tail. (9 sc)
Attach Earflaps
Fold the hat flat to find the side center points. Measure approximately 3 inches (7.5 cm) from each side seam toward the front and back; mark these points with stitch markers. Position one earflap with its widest edge (9 sc) along the bottom brim edge, centered on the mark, and whipstitch or sc it in place. Repeat for the second earflap on the opposite side, aligning both flaps symmetrically.
Ties (make 2)
With Color D, ch 30 (approximately 12 inches / 30 cm). Fasten off. Fold the chain in half and attach to the bottom point of each earflap with a lark's head knot, or braid three 12-inch strands of yarn and knot at the end. Trim ends evenly.
Assembly and Finishing
Seam check: Turn the hat inside out and run your finger along the seam. If any gaps show, re-whipstitch those spots with the leftover tail. Turn right side out.
Weave in ends: Thread each tail onto the tapestry needle and weave it back and forth through the inside of the fabric for about 2 inches, changing direction once so it cannot work loose. Trim close to the fabric.
Blocking: Lightly steam block the earflaps and brim to settle the moss stitch texture. Hold a steam iron an inch or two above the fabric (never press it down, as super bulky yarn can flatten), let the steam penetrate, then pat the hat into shape and let it dry completely. The hat should measure approximately 18 inches around and 7.5 inches tall, with earflaps approximately 4 inches deep.
Pro Tips and Variations
- Change the color story: Swap the sunset palette for coastal blues and sandy creams, or use a single color for a classic look. Just keep the same row counts so the size stays true.
- Adjust the size: For a larger child or small adult, add 2 chains to the starting chain (each pair of chains adds about 1 inch of width) and add 2 rows to the body. For a smaller toddler hat, remove 2 chains and 2 rows.
- Substitute yarn: Bulky (weight 5) yarn works beautifully held double, or use a single strand of super bulky from your stash. Always re-check your gauge, since fiber content changes how the fabric stretches.
- Add a pompom or tassels: A fluffy pompom on the crown or a tassel at each tie end makes this hat extra playful and uses up leftover scraps.


