Paprika Pine Nordic Crochet Phone Case Free Pattern
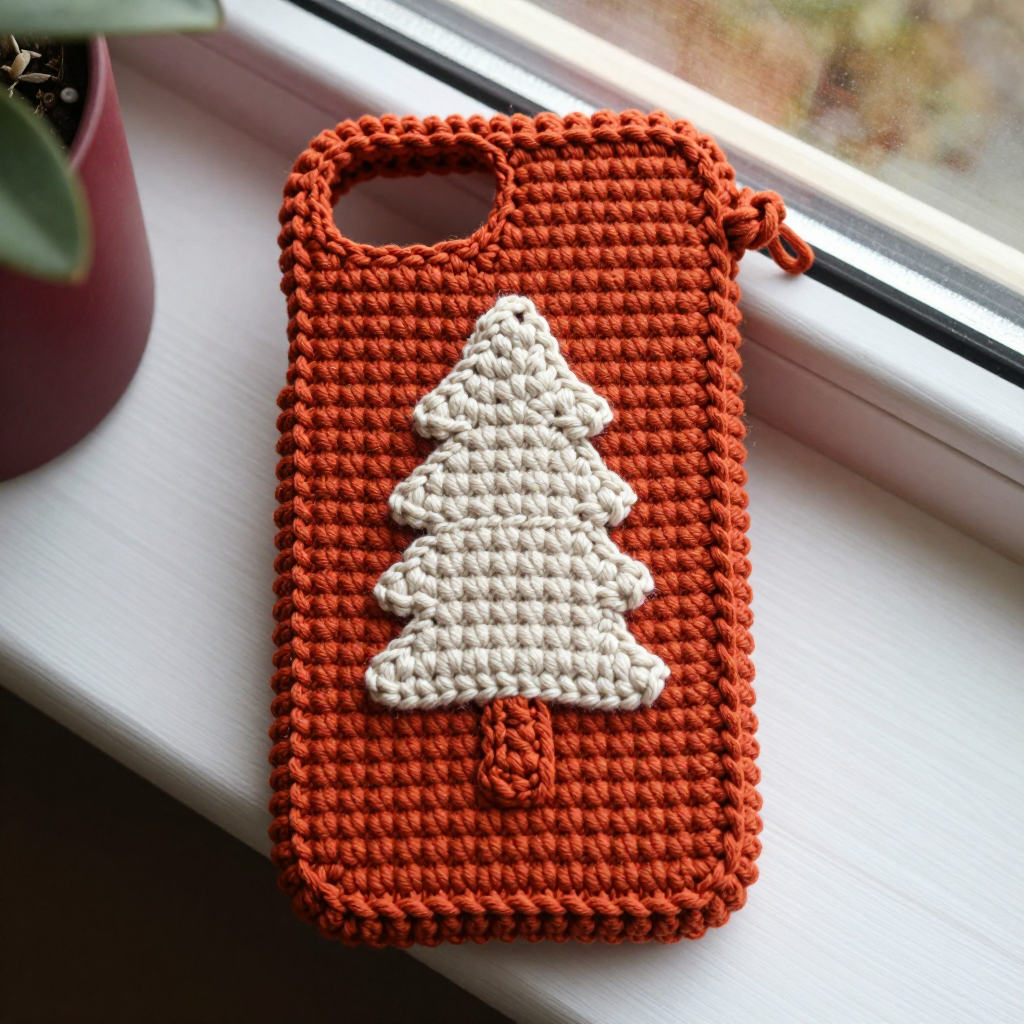
Paprika Pine Nordic Crochet Phone Case: A Complete Beginner's Guide
Welcome to your very first crochet project that you can actually use every single day! This Paprika Pine Nordic phone case is the perfect first "real" project for someone who has just learned the basic single crochet stitch and wants to make something beautiful, useful, and giftable. The warm paprika orange-red body wraps your phone in cozy, dense single crochet fabric, while a cream pine tree appliqué adds that charming Nordic winter feel you see in Scandinavian designs. When you're finished, you'll have a snug, slightly textured case that measures about 3.25 inches wide by 6.25 inches tall — small enough to slip in a pocket, special enough to show off to everyone you meet.
Materials Needed
- Yarn: Worsted weight (category 4) acrylic or cotton blend yarn — approximately 90 yards of paprika (main color) and 15 yards of cream (contrast color).
- Crochet hook: US H/8 (5.0 mm).
- Stitch markers: At least 2, to mark your corners and row counts.
- Tapestry needle (yarn needle): A large-eyed blunt needle for seaming and weaving in ends.
- Scissors: Sharp craft scissors for cutting yarn.
- Pins: A few sewing pins to hold the appliqué in place.
- Finished size: Case body approximately 3.25 inches wide x 6.25 inches tall (8.25 cm x 16 cm), sized to fit a standard smartphone about 2.75 inches wide x 5.75 inches tall (7 cm x 14.6 cm). The flat rectangle before folding measures about 6.5 inches wide x 12.5 inches tall.
Abbreviations and Beginner Glossary
- ch – chain. Make a slip knot, wrap yarn over hook, pull through the loop on your hook. This creates one chain stitch.
- sc – single crochet. Insert hook into stitch, yarn over, pull up a loop (2 loops on hook), yarn over, pull through both loops. One single crochet made.
- sc2tog – single crochet two together (a decrease). Insert hook into first stitch, yarn over, pull up a loop (2 loops on hook). Insert hook into next stitch, yarn over, pull up a loop (3 loops on hook). Yarn over, pull through all 3 loops. This turns two stitches into one.
- st / sts – stitch / stitches. One completed loop or "V" in your fabric.
- sl st – slip stitch. Insert hook into stitch, yarn over, pull through both the stitch and the loop on your hook at once. Creates a nearly invisible joining stitch.
- turn – flip your work over so you can work back across the row you just made.
- fasten off – cut yarn leaving a tail, then pull the tail all the way through the last loop to lock it.
- whipstitch – a simple sewing stitch: bring needle up through both layers, wrap over the edge, and go back down, repeating along the edge.
- mattress stitch – a seaming stitch that creates an invisible join by working under the horizontal bars between stitches on each edge.
- right side – the "good" side of the fabric that faces outward on the finished piece.
Gauge
Gauge: 7 single crochet stitches and 9 rows = 2 inches (5 cm) square.
Gauge matters because it tells you whether your stitches are the right size to make the finished case fit your phone. If your stitches are too big, the case will be baggy; too small, and your phone won't fit. To check: chain 15, single crochet in each chain across, and work about 12 rows. Lay the swatch flat and measure a 2-inch section in the middle. Count the stitches across and the rows up. If you have more than 7 stitches in 2 inches, switch to a larger hook; if fewer, switch to a smaller hook. Always check gauge before starting — it takes ten minutes and saves hours of frustration.
Beginner Tips Before You Start
- Count every row. Place a stitch marker at the end of every 10th row so you never lose track of where you are.
- Don't pull your yarn too tight. Tension should feel relaxed — if your hook squeaks or your hand aches, loosen up. Tight stitches make stiff, small fabric.
- Always chain 1 and turn at the start of each row. This chain does not count as a stitch, so your first single crochet goes into the very first stitch.
- Keep your starting chain untwisted. When you begin Row 1, make sure the chain lies flat and straight before you work into it.
- Weave in ends as you go. After fastening off each piece, thread the tail onto your tapestry needle and weave it through several stitches on the wrong side right away.
- Try the case on your phone before seaming. Fold the rectangle and slide your phone in to check the fit before you commit to the seam.
Step-by-Step Instructions
Case Body (make 1, paprika)
Row 1: Ch 24. Sc in the 2nd ch from hook and in each ch across. (23 sc)
Row 2: Ch 1, turn. Sc in each st across. (23 sc)
Rows 3–56: Repeat Row 2. (23 sc per row)
Fasten off, leaving a 24-inch tail for seaming. Your piece should measure approximately 6.5 inches wide x 12.5 inches tall (16.5 cm x 31.75 cm) before folding.
Pine Tree Appliqué (make 1, cream)
Worked flat in rows, increasing then decreasing to form a stylized triangular tree.
Row 1: Ch 2. Work 2 sc in the 2nd ch from hook. (2 sc)
Row 2: Ch 1, turn. 2 sc in first st, sc in next st. (3 sc)
Row 3: Ch 1, turn. Sc in each st across. (3 sc)
Row 4: Ch 1, turn. 2 sc in first st, sc in each st across. (4 sc)
Row 5: Ch 1, turn. Sc in each st across. (4 sc)
Row 6: Ch 1, turn. 2 sc in first st, sc in each st across. (5 sc)
Row 7: Ch 1, turn. Sc in each st across. (5 sc)
Row 8: Ch 1, turn. 2 sc in first st, sc in each st across. (6 sc)
Row 9: Ch 1, turn. Sc in each st across. (6 sc)
Row 10: Ch 1, turn. 2 sc in first st, sc in each st across. (7 sc)
Row 11: Ch 1, turn. Sc in each st across. (7 sc)
Row 12: Ch 1, turn. 2 sc in first st, sc in each st across. (8 sc)
Row 13: Ch 1, turn. Sc in each st across. (8 sc)
Row 14: Ch 1, turn. 2 sc in first st, sc in each st across. (9 sc)
Rows 15–16: Ch 1, turn. Sc in each st across. (9 sc)
Row 17: Ch 1, turn. Sc2tog, sc in each st across. (8 sc)
Row 18: Ch 1, turn. Sc in each st across. (8 sc)
Row 19: Ch 1, turn. Sc2tog, sc in each st across. (7 sc)
Row 20: Ch 1, turn. Sc in each st across. (7 sc)
Row 21: Ch 1, turn. Sc2tog, sc in each st across. (6 sc)
Row 22: Ch 1, turn. Sc in each st across. (6 sc)
Row 23: Ch 1, turn. Sc2tog, sc in each st across. (5 sc)
Row 24: Ch 1, turn. Sc in each st across. (5 sc)
Row 25: Ch 1, turn. Sc2tog, sc in each st across. (4 sc)
Row 26: Ch 1, turn. Sc in each st across. (4 sc)
Row 27: Ch 1, turn. Sc2tog, sc in each st across. (3 sc)
Row 28: Ch 1, turn. Sc in each st across. (3 sc)
Row 29: Ch 1, turn. Sc2tog, sc in next st. (2 sc)
Row 30: Ch 1, turn. Sc in each st across. (2 sc)
Row 31: Ch 1, turn. Sc2tog. (1 sc)
Fasten off, leaving a 12-inch tail. The tree should measure approximately 2.5 inches wide at its base and 3.5 inches tall (6.35 cm x 8.9 cm).
Tree Trunk (make 1, paprika)
Row 1: Ch 4. Sc in the 2nd ch from hook and in each ch across. (3 sc)
Row 2: Ch 1, turn. Sc in each st across. (3 sc)
Fasten off, leaving a 6-inch tail.
Hanging Loop
Work this directly onto the finished case after seaming (see Assembly below).
Assembly and Finishing
Step 1 — Fold and seam the body. Fold the rectangle in half with right sides together so the piece measures about 6.5 inches wide x 6.25 inches tall. Thread the long 24-inch tail onto your tapestry needle. Using whipstitch or mattress stitch, sew the two side edges closed, working from the fold up toward the open top. Leave the top edge open. Fasten off and weave in the end. Turn the case right side out.
Step 2 — Attach the appliqué. Center the cream pine tree on the front panel of the case, positioning the base about 1.5 inches above the bottom seam. Pin it in place. Using your yarn needle and matching cream yarn, whipstitch around the entire edge of the tree to secure it. Sew the small paprika trunk centered beneath the base of the tree. Weave in all ends.
Step 3 — Add the hanging loop. Join paprika yarn with a slip stitch at the top right corner of the case opening. Ch 10, then slip stitch back into the same corner to form a loop. Fasten off and weave in the end securely. The loop should measure about 1 inch (2.5 cm) long.
Step 4 — Weave in and block. Weave in all remaining ends on the wrong side, running the needle through several stitches in two directions so the tails never work loose. Gently steam-block the case if desired, holding a steam iron an inch above the fabric (never pressing down), and avoid steaming the appliqué. Let it dry completely, then slide your phone into the case through the open top.
Pro Tips and Variations
- Change the colors: Swap paprika for deep teal or mustard and cream for white for a completely different mood. Any two contrasting worsted weight colors work beautifully.
- Adjust the size: To fit a larger phone, add chains in multiples to Row 1 (each extra chain adds about 1/4 inch of width) and add rows to lengthen the body. Always check the fit before seaming.
- Substitute yarn: Cotton yarn gives a crisper, more durable case; acrylic is softer and stretchier. Just check your gauge again with any new yarn.
- Add a button closure: Sew a small button just below the top opening on the front and use the hanging loop to fasten the case closed for extra security.


