Lucky Coin Blossom Pillow Free Pattern – Crocheted Fortune Charm Cushion
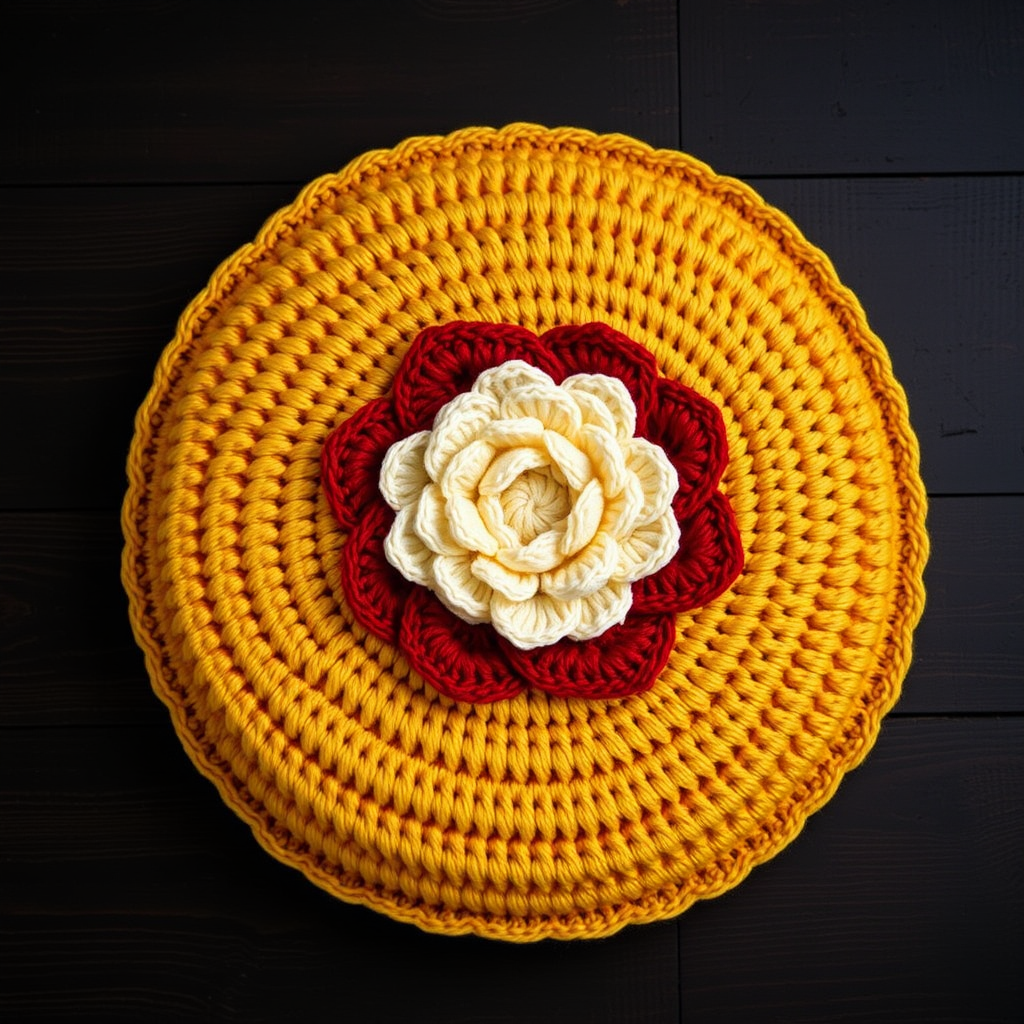
Lucky Coin Blossom Pillow Free Pattern – Crocheted Fortune Charm Cushion
Bring prosperity and cozy charm to your space with this crocheted pillow shaped like a giant lucky coin, adorned with a blooming peony motif. It's a soft, textured accent piece that blends traditional symbolism with modern comfort. Perfect for Chinese New Year decor, a thoughtful handmade gift, or simply a striking addition to your living room, this pillow is a celebration of color and craft.
This pattern is designed with beginners in mind. We'll walk you through every round, from the magic ring to the final seam, ensuring you can recreate this beautiful piece with confidence. The dense single crochet fabric creates a plush, sturdy surface, while the layered peony adds a touch of elegance. Let's get started!
Materials Needed
Before you begin, gather the following materials. Having everything ready will make your crafting session smooth and enjoyable.
- Yarn: Worsted weight cotton or acrylic yarn in the following colors:
- Gold (approx. 300g) – for the coin base
- Deep Red (approx. 200g) – for the peony petals
- Cream (approx. 100g) – for the peony center
- Crochet Hook: 5.0 mm (or size needed to obtain gauge)
- Gauge: 16 sc x 18 rows = 4 inches (10 cm) in single crochet. Always check your gauge to ensure the correct finished size.
- Other: Stitch marker, tapestry needle for weaving in ends, polyester fiberfill for stuffing, and scissors.
Step-by-Step Instructions
This pattern is worked in continuous rounds unless otherwise stated. Use a stitch marker to keep track of your rounds. Let's break this down into manageable sections.
Part 1: Coin Front (Make 2 Identical Pieces)
This creates the large, golden circle of the pillow. You will make two of these – one for the front and one for the back.
Round 1: With gold yarn, make a magic ring, work 6 sc into ring. (6)
Round 2: Inc in each st around. (12)
Round 3: (Sc in next st, inc) around. (18)
Round 4: (Sc in next 2 sts, inc) around. (24)
Round 5: (Sc in next 3 sts, inc) around. (30)
Round 6: (Sc in next 4 sts, inc) around. (36)
Round 7: (Sc in next 5 sts, inc) around. (42)
Round 8: (Sc in next 6 sts, inc) around. (48)
Round 9: (Sc in next 7 sts, inc) around. (54)
Round 10: (Sc in next 8 sts, inc) around. (60)
Round 11: (Sc in next 9 sts, inc) around. (66)
Round 12: (Sc in next 10 sts, inc) around. (72)
Round 13: (Sc in next 11 sts, inc) around. (78)
Round 14: (Sc in next 12 sts, inc) around. (84)
Round 15: (Sc in next 13 sts, inc) around. (90)
Round 16: (Sc in next 14 sts, inc) around. (96)
Round 17: (Sc in next 15 sts, inc) around. (102)
Round 18: (Sc in next 16 sts, inc) around. (108)
Round 19: (Sc in next 17 sts, inc) around. (114)
Round 20: (Sc in next 18 sts, inc) around. (120)
Round 21: (Sc in next 19 sts, inc) around. (126)
Round 22: (Sc in next 20 sts, inc) around. (132)
Round 23: (Sc in next 21 sts, inc) around. (138)
Round 24: (Sc in next 22 sts, inc) around. (144)
Round 25: (Sc in next 23 sts, inc) around. (150)
Round 26: (Sc in next 24 sts, inc) around. (156)
Round 27: (Sc in next 25 sts, inc) around. (162)
Round 28: (Sc in next 26 sts, inc) around. (168)
Round 29: (Sc in next 27 sts, inc) around. (174)
Round 30: (Sc in next 28 sts, inc) around. (180)
Fasten off, weave in ends. Repeat for the second piece.
Part 2: Peony Motif (Center of Coin)
This cream-colored circle forms the base of the flower. It's worked in the same continuous round style.
Round 1: With cream yarn, make a magic ring, work 8 sc into ring. (8)
Round 2: Inc in each st around. (16)
Round 3: (Sc in next st, inc) around. (24)
Round 4: (Sc in next 2 sts, inc) around. (32)
Round 5: (Sc in next 3 sts, inc) around. (40)
Round 6: (Sc in next 4 sts, inc) around. (48)
Round 7: (Sc in next 5 sts, inc) around. (56)
Round 8: (Sc in next 6 sts, inc) around. (64)
Round 9: (Sc in next 7 sts, inc) around. (72)
Round 10: (Sc in next 8 sts, inc) around. (80)
Round 11: (Sc in next 9 sts, inc) around. (88)
Round 12: (Sc in next 10 sts, inc) around. (96)
Round 13: (Sc in next 11 sts, inc) around. (104)
Round 14: (Sc in next 12 sts, inc) around. (112)
Round 15: (Sc in next 13 sts, inc) around. (120)
Round 16: (Sc in next 14 sts, inc) around. (128)
Round 17: (Sc in next 15 sts, inc) around. (136)
Round 18: (Sc in next 16 sts, inc) around. (144)
Round 19: (Sc in next 17 sts, inc) around. (152)
Round 20: (Sc in next 18 sts, inc) around. (160)
Round 21: (Sc in next 19 sts, inc) around. (168)
Round 22: (Sc in next 20 sts, inc) around. (176)
Round 23: (Sc in next 21 sts, inc) around. (184)
Round 24: (Sc in next 22 sts, inc) around. (192)
Fasten off, leaving a long tail for sewing.
Part 3: Peony Petals (Make 5)
These deep red petals are worked in rows, not rounds. They will be arranged around the cream center.
Foundation: With red yarn, ch 12.
Row 1: Sc in 2nd ch from hook, hdc in next, dc in next 6, hdc in next, sc in last. (11 sts)
Row 2: Ch 1, turn, sc in first st, hdc in next, dc in next 6, hdc in next, sc in last. (11 sts)
Row 3: Ch 1, turn, sc in first st, hdc in next, dc in next 6, hdc in next, sc in last. (11 sts)
Fasten off, leaving a long tail. Shape each petal by folding slightly at the base. Repeat to make a total of 5 petals.
Part 4: Assembly
Now for the fun part – bringing it all together!
- Attach the Peony Center: Sew the cream peony motif to the center of one gold coin piece using the long tail you left. Make sure it's centered.
- Attach the Petals: Arrange the 5 red petals around the peony motif, overlapping slightly, and sew them in place. They should radiate outward like a flower.
- Join the Coin Pieces: With right sides facing, place the two gold coin pieces together. Using gold yarn, single crochet through both layers around the entire edge, leaving a 6-inch opening for stuffing.
- Stuff the Pillow: Stuff the pillow firmly with polyester fiberfill. Make sure it's evenly distributed for a plush, round shape.
- Close the Opening: Continue single crocheting to close the opening. Fasten off and weave in all ends securely.
Optional Embroidery
For a personalized touch, you can embroider a Chinese character for 'fortune' (福) or 'luck' (吉) in the center of the peony motif using red yarn. Alternatively, leave it plain for a minimalist look that still carries all the traditional symbolism.
Your Lucky Coin Blossom Pillow is now complete! This beautiful piece is sure to be a conversation starter and a cherished part of your home decor. Enjoy your handmade creation and the prosperity it symbolizes!


