Just Peachy Tank Free Pattern – Textured Ribbed Knit Top
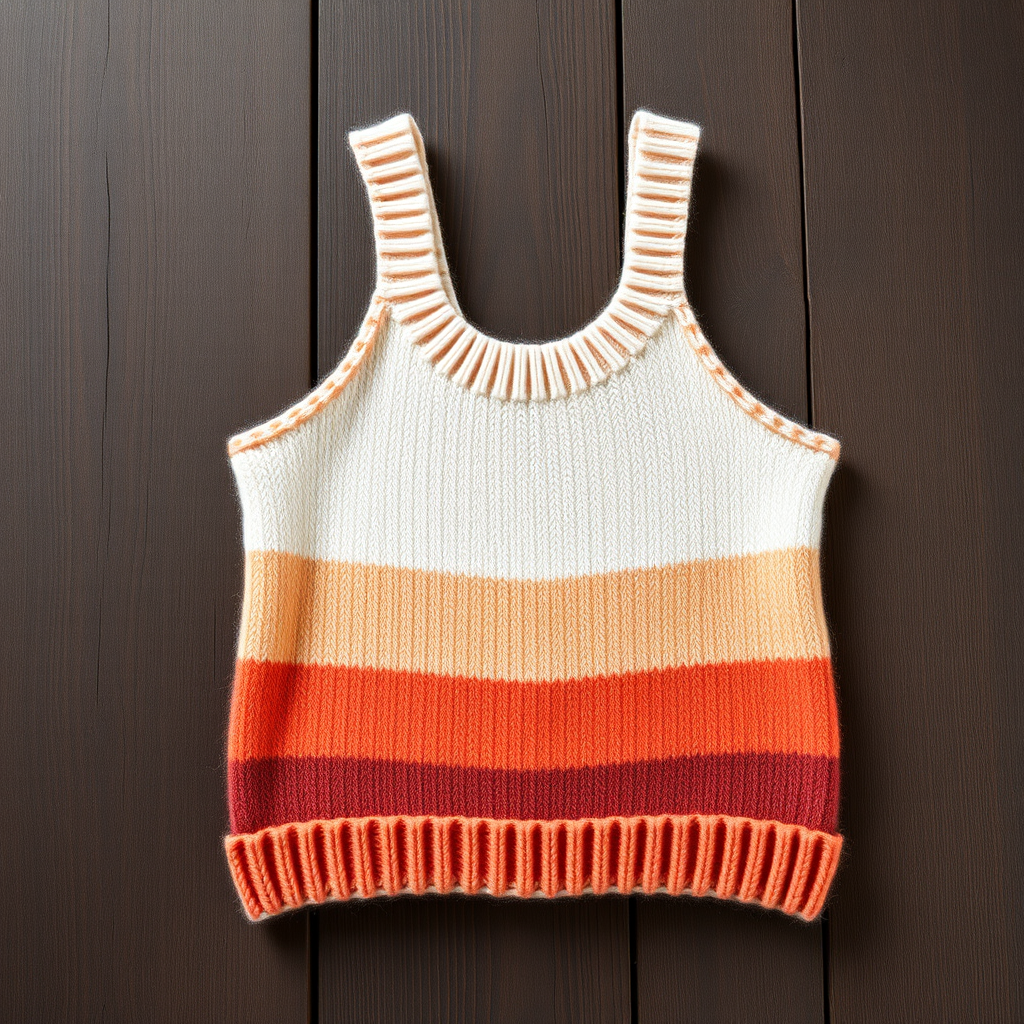
Introducing the Just Peachy Tank: A Beginner-Friendly Ribbed Knit Top
There's something undeniably fresh about a hand-knit tank top. The Just Peachy Tank is a modern, textured knit that brings a soft ombré of peach tones—pale blush, warm apricot, and deep coral—into a classic sleeveless silhouette. Whether you're layering it over a linen shirt or wearing it solo on a warm afternoon, this top offers a flattering ribbed texture and a smooth stockinette body that drapes beautifully.
Designed with beginners in mind, this pattern uses basic knit and purl stitches, simple decreases, and straightforward color blocking. The result is a polished, professional-looking garment that you'll be proud to say you made yourself. Let's dive into everything you need to create your own Just Peachy Tank.
Materials Needed
Before you cast on, gather these supplies to ensure a smooth knitting experience:
- Yarn: Worsted weight cotton or cotton-blend yarn in three shades of peach (light, medium, deep) – approximately 400g total. A cotton blend gives nice stitch definition and breathability for summer wear.
- Needles: US 7 (4.5mm) knitting needles – straight or circular, whichever you prefer for flat knitting.
- Notions: Stitch markers, tapestry needle for seaming and weaving in ends, and scissors.
- Gauge: 20 stitches and 26 rows = 4 inches in stockinette stitch (after blocking). Always knit a swatch first to ensure your tension matches!
Sizes and Abbreviations
This pattern is written for three sizes:
- S (M, L) – Finished bust: 34 (38, 42) inches
Here are the abbreviations you'll need to know:
- k = knit
- p = purl
- k2tog = knit two together (right-leaning decrease)
- ssk = slip slip knit (left-leaning decrease)
- st(s) = stitch(es)
- RS = right side
- WS = wrong side
Pattern Notes: The tank is worked flat in two pieces (front and back) from the bottom up, then seamed at the shoulders and sides. The ombré effect is achieved by changing yarn colors at specific row intervals—no complicated stranding or intarsia required!
Step-by-Step Instructions
Front Panel
Cast On and Ribbing:
With light peach yarn, cast on 85 (95, 105) stitches.
Rows 1–8: Work *K1, p1* ribbing across each row. This creates a stretchy, neat hem that will hold its shape beautifully.
Body – Stockinette with Color Blocks:
Now you'll switch to stockinette stitch (knit on RS rows, purl on WS rows) while working the color changes. Follow this sequence:
- Rows 9–24: Light peach
- Rows 25–40: Medium peach
- Rows 41–56: Deep peach
- Rows 57–72: Medium peach
- Rows 73–88: Light peach
Repeat this color block sequence until the piece measures 12 (13, 14) inches from the cast-on edge, ending with a WS row. When changing colors, simply drop the old yarn and pick up the new one at the side edge—no need to cut until you're done with that color block.
Shape Armholes:
Next row (RS): Bind off 5 (6, 7) stitches at the beginning of the next two rows. This creates the underarm shaping.
Decrease row (RS): K1, ssk, knit to the last 3 stitches, k2tog, k1.
Repeat this decrease row every RS row 4 (5, 6) more times. You should now have 65 (71, 77) stitches on your needle.
Continue straight in stockinette stitch until the armhole measures 7 (8, 9) inches from the bind-off edge, ending with a WS row.
Shape Neckline – Front:
Next row (RS): K22 (24, 26) stitches, bind off the center 21 (23, 25) stitches, then knit the remaining 22 (24, 26) stitches. You'll now work each shoulder separately.
Left Shoulder:
- Decrease 1 stitch at the neck edge every RS row 3 times. You'll have 19 (21, 23) stitches remaining.
- Work even (no decreases) until the armhole measures 8 (9, 10) inches. Bind off all stitches.
Right Shoulder:
Return to the right shoulder stitches, join yarn at the neck edge, and work to match the left shoulder exactly.
Back Panel
Work the back panel exactly as you did the front, including the armhole shaping. Continue straight in stockinette until the armhole measures 6 (7, 8) inches, ending with a WS row.
Shape Neckline – Back:
Next row (RS): K20 (22, 24) stitches, bind off the center 25 (27, 29) stitches, knit the remaining 20 (22, 24) stitches.
Left Shoulder:
- Decrease 1 stitch at the neck edge every RS row 2 times. You'll have 18 (20, 22) stitches.
- Work even until the armhole measures 8 (9, 10) inches. Bind off.
Right Shoulder:
Work to match the left shoulder.
Finishing Touches
Seaming:
Sew the shoulder seams using a mattress stitch or whip stitch. Then sew the side seams from the armhole down to the ribbing, matching the color blocks carefully.
Armhole Edging:
With the RS facing, pick up and knit 70 (78, 86) stitches evenly around each armhole. Work *K1, p1* ribbing for 4 rows. Bind off in pattern. This creates a tidy, stretchy edge that won't gap.
Neckline Edging:
With the RS facing, pick up and knit 90 (98, 106) stitches around the entire neckline. Work *K1, p1* ribbing for 4 rows. Bind off in pattern.
Weave in Ends and Block:
Weave in all loose ends with your tapestry needle. Block the finished tank to the specified measurements—this smooths the stitches and helps the color transitions lie flat.
Tips for Success
- Check your gauge before starting. A swatch takes 20 minutes and saves hours of frustration.
- Use stitch markers at the armhole bind-off points to help you measure accurately.
- When picking up stitches around the armholes and neckline, aim for a consistent rhythm (e.g., 3 stitches for every 4 rows) to keep the edging even.
- Blocking is non-negotiable for a professional finish—it evens out tension and opens up the stitch pattern.
The Just Peachy Tank is a rewarding project that teaches essential garment construction while producing a wearable, beautiful piece. The ombré color blocking adds visual interest without complicated techniques, making it perfect for knitters ready to move beyond scarves and into clothing. Happy knitting!


