Emberwood Slouchy Beanie Free Pattern – Textured Knitted Autumn Hat with Leaf Stitch
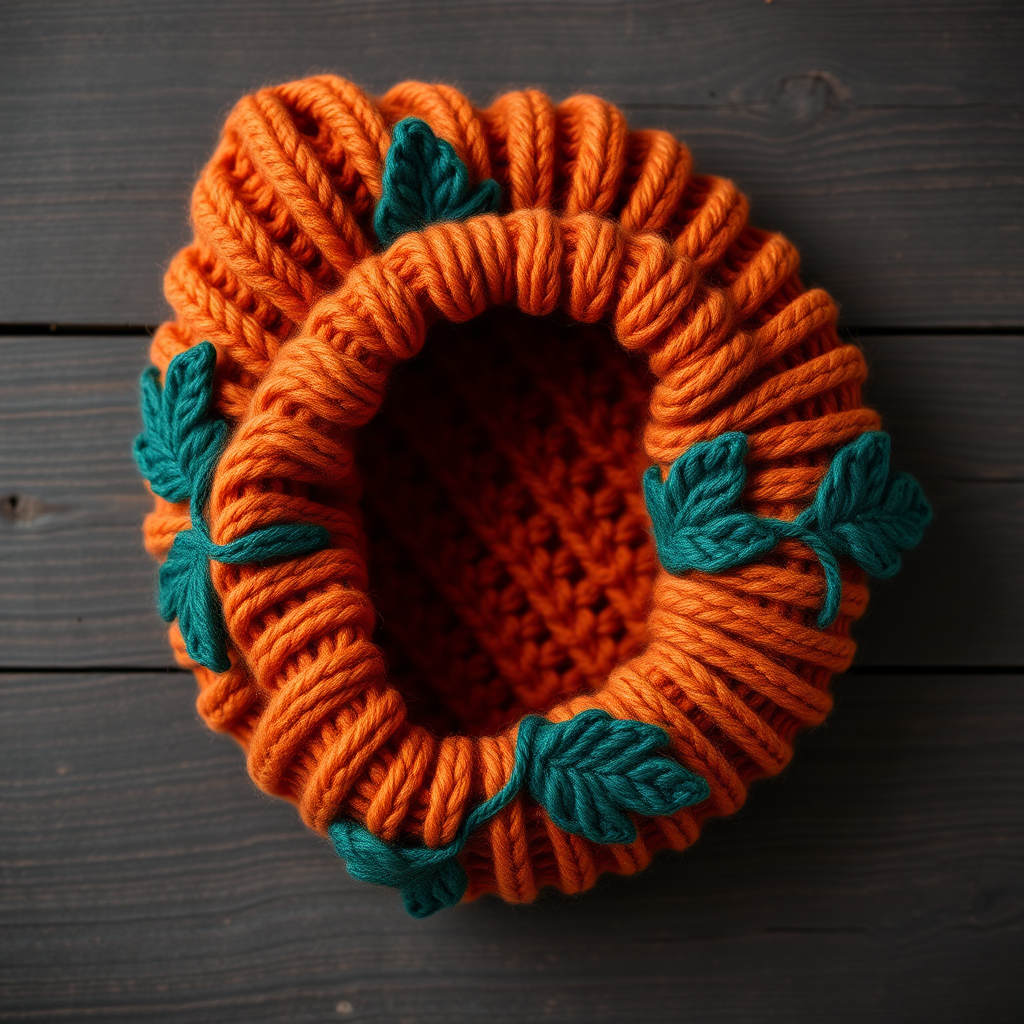
Emberwood Slouchy Beanie Free Pattern – Textured Knitted Autumn Hat with Leaf Stitch
Wrap yourself in the warmth of autumn with this richly textured slouchy beanie, featuring an intricate leaf-and-rib stitch pattern that mimics falling foliage. Knitted in cozy worsted-weight yarn, it's the perfect handmade companion for crisp woodland walks. The combination of burnt orange and deep forest green creates a stunning visual contrast that captures the essence of the season, while the slouchy crown drapes beautifully for a relaxed, modern silhouette.
This pattern is designed with intermediate knitters in mind, but with clear instructions and a bit of patience, even ambitious beginners can create this stunning accessory. The leaf stitch pattern is worked in panels between simple stockinette sections, making it easy to keep track of your place. Whether you're making it for yourself or as a heartfelt handmade gift, this beanie is sure to become a cold-weather favorite.
Materials Needed
Before you begin, gather the following materials to ensure a smooth knitting experience:
- Yarn: Worsted weight yarn (approximately 220 yards) in two colors:
- Main Color (MC): Burnt Orange
- Contrast Color (CC): Deep Forest Green
- Needles: US 7 (4.5 mm) 16-inch circular needle and US 7 double-pointed needles (or size needed to obtain gauge)
- Gauge: 20 stitches and 28 rows = 4 inches in stockinette stitch
- Notions: Stitch markers, tapestry needle for weaving in ends, scissors
Note: The gauge is crucial for achieving the correct fit. Always knit a swatch first to ensure your tension matches the pattern requirements.
Abbreviations
Familiarize yourself with these standard knitting abbreviations before starting:
- CO – cast on
- K – knit
- P – purl
- K2tog – knit two together (right-leaning decrease)
- P2tog – purl two together
- SSK – slip, slip, knit (left-leaning decrease)
- YO – yarn over
- PM – place marker
- SM – slip marker
- St(s) – stitch(es)
- Rep – repeat
- RS – right side
- WS – wrong side
Special Stitch Pattern – Leaf Panel (Worked over 12 Stitches)
This beautiful leaf motif is the heart of the design. Each panel is worked over 12 stitches and 24 rows. The yarn overs create the leaf shape while the decreases keep the stitch count consistent. Take your time with this section and refer to the chart-like instructions carefully.
Row 1 (RS): K6, P1, K5
Row 2 (WS): P5, K1, P6
Row 3: K4, K2tog, YO, P1, YO, SSK, K4
Row 4: P4, K1, P1, K1, P1, K1, P4
Row 5: K3, K2tog, YO, K1, P1, K1, YO, SSK, K3
Row 6: P3, K1, P1, K1, P1, K1, P1, K1, P3
Row 7: K2, K2tog, YO, K2, P1, K2, YO, SSK, K2
Row 8: P2, K1, P1, K1, P1, K1, P1, K1, P1, K1, P2
Row 9: K1, K2tog, YO, K3, P1, K3, YO, SSK, K1
Row 10: P1, K1, P1, K1, P1, K1, P1, K1, P1, K1, P1, K1
Row 11: K2tog, YO, K4, P1, K4, YO, SSK
Row 12: P5, K1, P6
Row 13: K5, P1, K6
Row 14: P6, K1, P5
Row 15: K4, YO, SSK, P1, K2tog, YO, K4
Row 16: P4, K1, P1, K1, P1, K1, P4
Row 17: K3, YO, SSK, K1, P1, K1, K2tog, YO, K3
Row 18: P3, K1, P1, K1, P1, K1, P1, K1, P3
Row 19: K2, YO, SSK, K2, P1, K2, K2tog, YO, K2
Row 20: P2, K1, P1, K1, P1, K1, P1, K1, P1, K1, P2
Row 21: K1, YO, SSK, K3, P1, K3, K2tog, YO, K1
Row 22: P1, K1, P1, K1, P1, K1, P1, K1, P1, K1, P1, K1
Row 23: YO, SSK, K4, P1, K4, K2tog, YO
Row 24: P5, K1, P6
Pro tip: Place a stitch marker at the beginning of each leaf panel so you can easily identify where the pattern repeats begin and end.
Step-by-Step Instructions
Step 1: Cast On and Join in the Round
With your Main Color (MC) yarn, cast on 100 stitches using your preferred method. Place a stitch marker to mark the beginning of the round, then join in the round, being extremely careful not to twist your stitches. The edge should form a clean circle without any spiraling.
Step 2: Knit the Ribbing
The ribbed brim provides structure and elasticity to the beanie. Work the following:
Rounds 1-10: *K2, P2; repeat from * around for all 10 rounds.
This creates a classic 2x2 rib that will form the fold-up brim. The ribbing should measure approximately 1.5 inches when relaxed.
Step 3: Begin the Body with Leaf Panels
Now you'll establish the beautiful leaf pattern. This first round sets up the placement of all five leaf panels around the hat:
Round 1: *K10, PM, work Leaf Panel Row 1 over next 12 sts, PM, K10, PM, work Leaf Panel Row 1 over next 12 sts, PM, K10, PM, work Leaf Panel Row 1 over next 12 sts, PM, K10, PM, work Leaf Panel Row 1 over next 12 sts, PM; repeat from * once more (total 5 leaf panels).
Let's break this down: You'll have five leaf panels evenly spaced around the hat, with 10 knit stitches between each panel. The stitch markers help you keep track of where each section begins and ends.
Step 4: Continue the Body Pattern
Now that the pattern is established, continue working in the round:
- Between leaf panels, knit all stitches (the 10-stitch sections remain in stockinette).
- Work the leaf panels in sequence, following Rows 1-24 as written.
- After completing Row 24 of the leaf pattern, begin again at Row 1.
Repeat the 24-row leaf pattern twice more, for a total of 72 rows of body knitting. This creates the slouchy length that makes this beanie so comfortable and stylish.
Remember to slip your markers as you come to them, and keep your tension consistent throughout. The yarn overs should be loose enough to create visible openings but not so loose that they create holes.
Step 5: Shape the Crown
Once the body reaches your desired length, it's time to shape the crown. Switch to double-pointed needles when the circular needle becomes too long for the decreasing stitch count.
Round 1: *K8, K2tog; repeat from * around (90 sts)
Round 2: Knit all stitches
Round 3: *K7, K2tog; repeat from * around (80 sts)
Round 4: Knit all stitches
Round 5: *K6, K2tog; repeat from * around (70 sts)
Round 6: Knit all stitches
Round 7: *K5, K2tog; repeat from * around (60 sts)
Round 8: Knit all stitches
Round 9: *K4, K2tog; repeat from * around (50 sts)
Round 10: *K3, K2tog; repeat from * around (40 sts)
Round 11: *K2, K2tog; repeat from * around (30 sts)
Round 12: *K1, K2tog; repeat from * around (20 sts)
Round 13: *K2tog; repeat from * around (10 sts)
The alternating decrease and plain knit rounds create a smooth, gradual taper that prevents the crown from looking bunched or puckered.
Step 6: Finish the Crown
Cut the yarn, leaving a long tail of approximately 8-10 inches. Thread the tail through a tapestry needle, then pass the needle through the remaining 10 stitches on your needles. Remove the needles and pull the yarn tight to gather the stitches closed. Secure with a few small stitches on the inside of the hat, then weave in the end.
Step 7: Weave in All Ends
Using your tapestry needle, carefully weave in all loose ends along the inside of the beanie. Take care to weave in the yarn from your cast-on edge and any color changes. Make sure the ends are secure so they won't work their way out with wear.
Step 8: Fold the Brim
Fold up the ribbed brim to your desired length. The classic look for this beanie is a fold of about 1-1.5 inches, but feel free to adjust based on your preference. The ribbing is naturally elastic and will hold the fold nicely.
Step 9: Block to Shape
To give your beanie a professional finish, block it gently. Wet block by soaking the hat in lukewarm water with a small amount of wool wash, then gently squeeze out excess water (never wring). Shape the hat on a clean towel or blocking form, paying attention to the leaf panels to ensure they lie flat and the stitch definition is visible. Allow to dry completely before wearing.
Tips for Success
- Color changes: When switching between MC and CC, carry the unused yarn loosely up the inside of the work to avoid puckering. Alternatively, use separate balls for each section.
- Stitch markers: Use different colored markers for the beginning of round versus the leaf panel markers to avoid confusion.
- Gauge swatch: Always knit a gauge swatch in the round to ensure accuracy. Adjust needle size if needed.
- Pattern reading: Consider printing out the leaf panel instructions and using a row counter to keep track of where you are in the pattern.
Final Thoughts
Your Emberwood Slouchy Beanie is now complete! The rich burnt orange and deep forest green combination captures the essence of autumn, while the intricate leaf stitch pattern adds texture and visual interest that will be admired by all who see it. This beanie makes a wonderful gift for nature lovers, knitters, or anyone who appreciates handcrafted accessories.
The slouchy fit is both fashionable and practical, keeping you warm during chilly fall days while adding a stylish touch to any outfit. Pair it with a chunky scarf and cozy sweater for the perfect autumn ensemble. Happy knitting!


