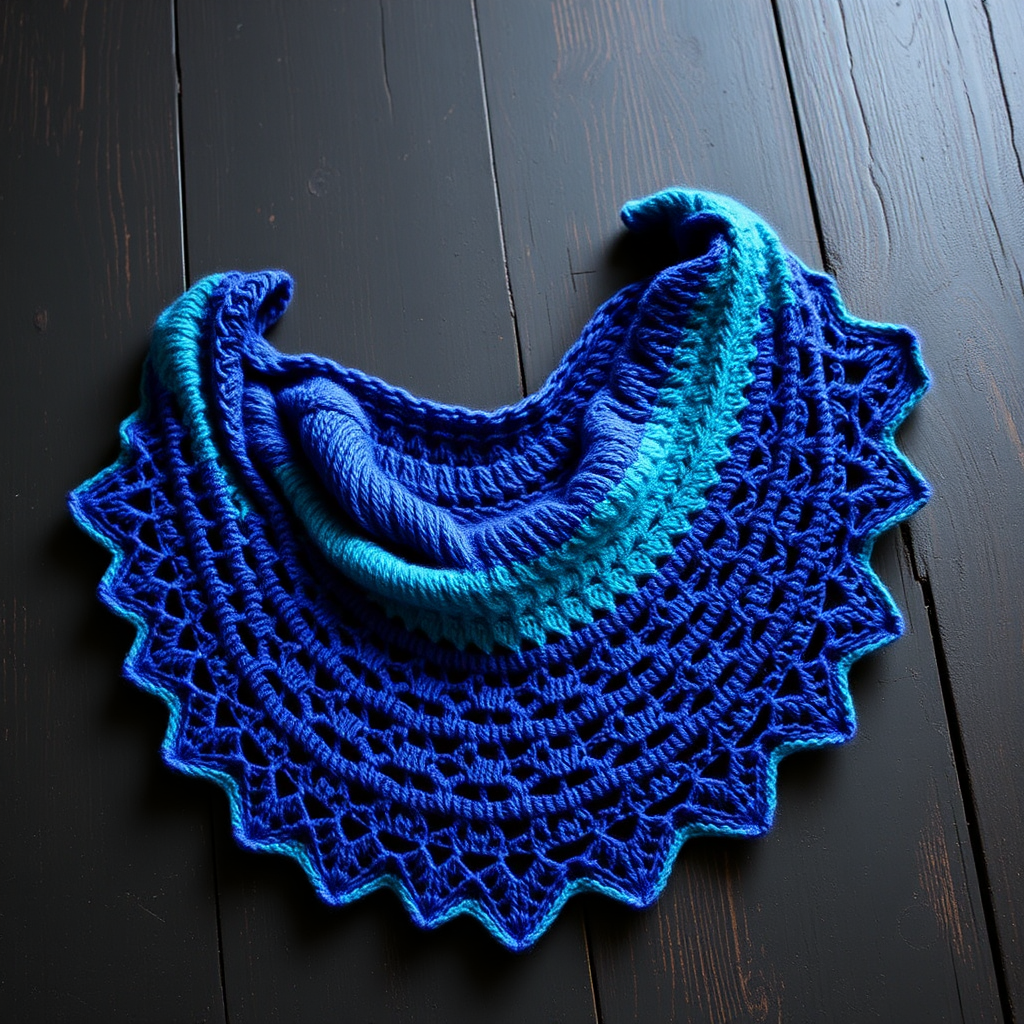
Emberfall Wrap with Secret Pockets Free Pattern

Wrap Yourself in Warmth: The Emberfall Wrap with Secret Pockets
There are some knitting projects that are more than just fabric—they become heirlooms, comfort objects, and everyday companions. The Emberfall Wrap is exactly that kind of piece. This generously sized shawl wraps you in a cozy embrace while hiding a delightful secret: two perfectly placed pockets for your hands, your phone, or a cherished treasure. The rich, gradient-inspired colorwork and textured stitches create a modern heirloom piece that looks far more complex than it actually is. Whether you're a seasoned knitter looking for a satisfying weekend project or a confident beginner ready for a challenge, this pattern will guide you through creating something truly special.
What makes the Emberfall Wrap so unique is its thoughtful design. The main body is worked from the top center down, with increases at the edges and center to form a beautiful triangle shape. The subtle alternating knit and purl texture creates a soft, ribbed pattern that catches the light beautifully. The eyelet border adds a delicate, feminine touch, while the contrasting pockets in a deep teal provide a striking pop of color. The result is a wrap that feels both rustic and refined—perfect for cozy evenings by the fire or elegant enough for a night out.
Materials Needed
Before you begin, gather your materials. The Emberfall Wrap is knit with worsted weight yarn, making it a quick and satisfying project. Here's what you'll need:
Yarn
- Main Color (MC): 800 yards of worsted weight yarn. A hand-dyed wool or acrylic blend works beautifully. Think of deep burnt orange, rich rust, or warm terracotta to capture that ember-inspired gradient.
- Contrast Color (CC): 400 yards of worsted weight yarn. Choose a deep teal, forest green, or navy for a striking contrast that grounds the piece.
Needles and Notions
- US Size 8 (5 mm) circular knitting needle, 32 inches or longer (the long cable is essential for accommodating the growing number of stitches)
- Stitch markers (at least 2)
- Yarn needle for weaving in ends and sewing pockets
- Scissors
- Measuring tape
Gauge
18 stitches and 24 rows = 4 inches in stockinette stitch, blocked. Gauge is important for achieving the correct size, so take a moment to knit a swatch before you begin. If your gauge is off, adjust your needle size accordingly.
Step-by-Step Instructions
This wrap is worked flat from the top center down, with increases at the edges and center to form a triangle. The pockets are knit as separate rectangles and sewn on afterward. Let's get started!
Abbreviations
- k = knit
- p = purl
- yo = yarn over
- k2tog = knit two together
- ssk = slip slip knit
- pm = place marker
- sm = slip marker
- st(s) = stitch(es)
- RS = right side
- WS = wrong side
Cast On and Foundation Rows
With your Main Color (MC), cast on 3 stitches using your preferred method (long-tail cast on works well).
Row 1 (RS): k1, yo, k1, yo, k1 (5 sts)
Row 2 (WS): k2, p1, k2 (5 sts)
Row 3: k1, yo, k1, yo, pm, k1, pm, yo, k1, yo, k1 (9 sts)
Row 4: k2, p to last 2 sts, k2
You've now established the foundation. Notice how the yarn overs create the increases at the edges and center. The stitch markers (pm) are placed on either side of the center stitch, which will guide your increases throughout the pattern.
Increase Section
Now we'll work the increase section, which builds the width of the wrap. Repeat Rows 5-8 until you have 99 stitches on your needle (or your desired width, about 18 inches).
Row 5 (RS): k1, yo, k to marker, yo, sm, k1, sm, yo, k to last st, yo, k1 (4 sts increased)
Row 6 (WS): k2, p to last 2 sts, k2
Row 7: k1, yo, k to marker, yo, sm, k1, sm, yo, k to last st, yo, k1
Row 8: k2, p to last 2 sts, k2
Pro tip: The edge stitches (k1 at the beginning and end of RS rows, k2 at the beginning and end of WS rows) create a neat, finished edge. The yarn overs on either side of the markers and at the edges are what create the triangular shape. As you work, you'll see the wrap growing symmetrically from the center.
Continue repeating Rows 5-8 until you have 99 stitches. This will take some time, but the rhythm becomes meditative. Remember to count your stitches periodically to ensure you're on track.
Texture Section
Once you've reached 99 stitches, it's time to introduce the beautiful textured pattern. This is where the wrap really comes alive! You'll continue the edge increases on every RS row while working the knit-purl texture across the body.
Row 9 (RS): k1, yo, *k1, p1* repeat from * to marker, yo, sm, k1, sm, yo, repeat * to last st, yo, k1
Row 10 (WS): k2, *p1, k1* repeat from * to last 2 sts, k2
Repeat Rows 9-10 until the wrap measures about 55 inches from the cast-on edge, ending with a WS row. This will take some patience, but the result is worth it. The alternating knit and purl stitches create a subtle ribbed texture that adds depth and warmth to the fabric.
Note: As you work the texture section, you'll notice that the pattern naturally creates a beautiful rhythm. The knit-purl sequence flows across the rows, and the edge increases continue to shape the triangle. If you lose your place, count your stitches and look for the yarn overs at the edges and center to reorient yourself.
Edging
When your wrap reaches the desired length, it's time to add the delicate eyelet border. This creates a beautiful, lacy finish that frames the textured body perfectly.
Row 11 (RS): k1, yo, *k2tog, yo* repeat from * to marker, yo, sm, k1, sm, yo, repeat * to last st, yo, k1
Row 12 (WS): k2, p to last 2 sts, k2
Repeat Rows 11-12 twice more (so you work a total of 6 rows of edging), then bind off loosely on a RS row. Important: Bind off very loosely to ensure the edge remains stretchy and doesn't pull the wrap out of shape. You can use a larger needle for binding off if needed.
Pockets (Make 2)
Now for the fun part—the secret pockets! These are knit separately in the Contrast Color (CC) and sewn onto the wrap.
With CC, cast on 30 stitches.
Work in stockinette stitch (knit RS, purl WS) for 6 inches, ending with a WS row.
Bind off all stitches.
Repeat to make a second pocket. The stockinette stitch creates a smooth, flat surface that contrasts beautifully with the textured body of the wrap.
Finishing and Blocking
Weave in all loose ends using your yarn needle. Take your time with this step—neatly woven ends make a professional-looking finished piece.
Block the wrap to shape. To do this, soak the wrap in lukewarm water with a gentle wool wash for about 20 minutes. Gently squeeze out excess water (don't wring!), then lay the wrap flat on a clean towel. Roll it up to remove more water, then lay it out on a blocking mat or dry towel. Gently stretch it to the desired dimensions, paying special attention to the edges and points. Pin if necessary and allow to dry completely. Blocking will even out the stitches and give your wrap a beautiful, polished drape.
Attach Pockets
Once your wrap is dry, it's time to attach the pockets. This is where the magic happens!
Fold each pocket in half to find the center. Place one pocket on each side of the wrap, about 8 inches from the bottom edge and 4 inches from the side edges, with the cast-on edge at the top. This positioning ensures the pockets are easily accessible when you wear the wrap.
Sew the sides and bottom of each pocket to the wrap using a whip stitch, leaving the top open. Use the CC yarn and your yarn needle for this step. Take care to sew through both layers securely, but don't pull too tightly—you want the pockets to lie flat against the wrap.
Ensure the pockets are symmetrical by measuring from the center and edges before sewing. A quick measurement now will save you from a lopsided result later.
Weave in any remaining ends. Your Emberfall Wrap is complete!
Wear Your Creation with Pride
Congratulations! You've created a stunning, one-of-a-kind Emberfall Wrap with secret pockets. This piece is perfect for cozying up on cool evenings, adding a layer of warmth and style to any outfit, or gifting to someone special. The hidden pockets are perfect for keeping your hands warm, stashing your phone, or holding a small treasure.
As you wear your wrap, you'll appreciate the thoughtful details—the gentle texture, the delicate eyelet border, and the surprising pops of color from the pockets. This is a piece you'll reach for again and again, and one that will be treasured for years to come. Happy knitting!