Ember & Ash Twisted Cable Headband Free Pattern – Knitted Cozy Winter Wrap
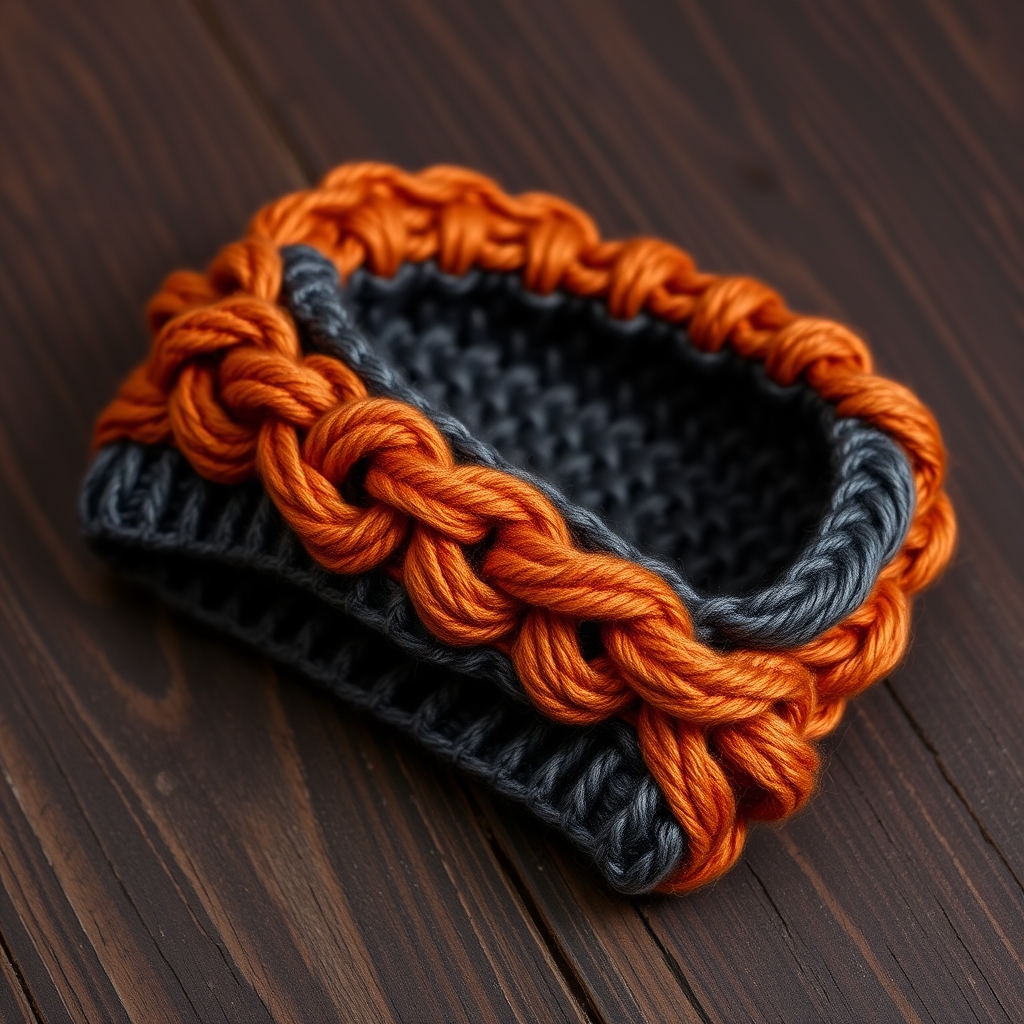
Wrap Your Winter in Warmth: The Ember & Ash Twisted Cable Headband
There's something deeply satisfying about creating a beautiful, functional accessory with your own two hands. The Ember & Ash Twisted Cable Headband is more than just a winter accessory—it's a statement piece that combines rustic charm with modern elegance. This free knitting pattern features a unique twisted cable design that adds depth, texture, and visual interest to any cold-weather outfit. Whether you're a seasoned knitter looking for a quick weekend project or a beginner ready to tackle your first cable pattern, this headband is the perfect choice. The rich burnt orange and deep charcoal grey evoke the warmth of a crackling fire against cool ashes, making this piece as beautiful as it is practical.
This pattern is designed to be approachable yet rewarding. The twisted cable pattern creates a braided, dimensional texture that runs horizontally across the headband, while the ribbed edges in contrasting colors provide a neat, stretchy border that keeps the headband snugly in place. Best of all, this project works up quickly—perfect for gift-giving or treating yourself to a little handmade luxury.
Materials Needed
Before you begin, gather the following materials. All items are readily available at your local yarn shop or online:
- Yarn: Worsted weight yarn (approximately 120 yards total) in two colors:
- Color A (Ember): Burnt orange—for the ribbed edges
- Color B (Ash): Charcoal grey—for the cable pattern body
- Knitting Needles: US 8 (5.0 mm) knitting needles
- Cable Needle: Any size cable needle will work for this pattern
- Tapestry Needle: For weaving in ends and seaming
- Scissors: For cutting yarn
Gauge: 18 stitches and 24 rows = 4 inches in stockinette stitch. While gauge isn't critical for this project (since it's a stretchy headband), it's always good practice to check your gauge to ensure the finished piece fits as intended.
Abbreviations You'll Need to Know
Don't worry if you're new to cables—this pattern uses only two cable techniques, and they're easier than they look! Here are the abbreviations used throughout the pattern:
- CO: Cast on
- K: Knit
- P: Purl
- C4F: Slip 2 stitches to cable needle, hold in front, knit next 2 stitches, then knit 2 from cable needle
- C4B: Slip 2 stitches to cable needle, hold in back, knit next 2 stitches, then knit 2 from cable needle
- K2tog: Knit two stitches together (a decrease)
- P2tog: Purl two stitches together (a decrease)
- BO: Bind off
Step-by-Step Instructions
Follow these detailed instructions carefully, and you'll have a beautiful twisted cable headband in no time. The pattern is divided into three sections: the ribbed cast-on edge, the cable pattern body, and the finishing decreases.
Section 1: Cast On and Ribbing
This section creates the stretchy, decorative edge that will frame your headband. The ribbing in Color A (Ember) provides a beautiful contrast to the cable body.
- With Color A (Ember), cast on 20 stitches using your preferred method. A long-tail cast-on works beautifully here.
- Row 1: *K2, P2*; repeat from * to * across the row. This creates a 2x2 ribbing pattern.
- Row 2: *P2, K2*; repeat from * to * across the row. Notice that you're knitting the purl stitches and purling the knit stitches from the previous row—this maintains the ribbing pattern.
- Repeat Rows 1 and 2 for a total of 6 rows. This will give you approximately 3 inches of ribbing. The ribbing should look like neat vertical columns of knit and purl stitches.
Pro tip: Keep your tension consistent throughout the ribbing. The ribbing should be stretchy but not loose—it needs to hug your head comfortably.
Section 2: Cable Pattern
Now for the fun part—the twisted cable pattern! This is where the headband really comes to life. Switch to Color B (Ash) and follow these rows carefully.
- Switch to Color B (Ash) by simply starting to knit with the new yarn. Leave a tail of about 6 inches to weave in later.
- Row 1 (Right Side): K4, C4F, K4, C4B, K4. Let's break this down:
- Knit 4 stitches normally.
- C4F: Slip the next 2 stitches onto your cable needle and hold it in front of your work. Knit the next 2 stitches from your left needle, then knit the 2 stitches from the cable needle. This creates a cable that twists to the left.
- Knit 4 stitches normally.
- C4B: Slip the next 2 stitches onto your cable needle and hold it in back of your work. Knit the next 2 stitches from your left needle, then knit the 2 stitches from the cable needle. This creates a cable that twists to the right.
- Knit the final 4 stitches.
- Row 2 (Wrong Side): Purl all 20 stitches across. This is a simple purl row—no cables on the wrong side.
- Row 3 (Right Side): K2, C4B, K4, C4F, K4, K2. Here's the breakdown:
- Knit 2 stitches.
- C4B: Slip 2 stitches to cable needle, hold in back, knit next 2 stitches, then knit 2 from cable needle.
- Knit 4 stitches.
- C4F: Slip 2 stitches to cable needle, hold in front, knit next 2 stitches, then knit 2 from cable needle.
- Knit 4 stitches.
- Knit the final 2 stitches.
- Row 4 (Wrong Side): Purl all 20 stitches across.
- Repeat Rows 1-4 until the headband measures approximately 18 inches from the cast-on edge, ending with a Row 4 (a purl row). This ensures that your cable pattern is complete and you're ready to move on to the finishing section.
Important note: The cable pattern creates a beautiful braided effect. As you work, you'll see the cables twisting in opposite directions, creating a symmetrical, balanced design. Don't be alarmed if the fabric looks a bit wavy at first—this is normal for cable knitting and will relax once the headband is seamed.
Section 3: Decrease and Finishing
Now we'll shape the end of the headband to match the cast-on edge, then seam it all together. Switch back to Color A (Ember) for this section.
- Switch back to Color A (Ember), leaving a tail to weave in later.
- Row 1 (Decrease Row): *K2, P2, K2tog, P1*; repeat from * to * across. Let's count: K2 (2 stitches), P2 (2 stitches), K2tog (2 stitches become 1), P1 (1 stitch). That's 6 stitches per repeat, and you'll do this 3 times across 18 stitches, leaving you with 16 stitches total. Wait—let me recalculate. You have 20 stitches. The repeat uses 6 stitches (2+2+2+1=7? No, let me recount: K2 = 2 stitches, P2 = 2 stitches, K2tog = 2 stitches, P1 = 1 stitch. That's 2+2+2+1 = 7 stitches per repeat. With 20 stitches, you can do this repeat 2 times (14 stitches) and have 6 stitches left. Hmm, let me adjust: Actually, the pattern says *K2, P2, K2tog, P1* repeat from * to * across. With 20 stitches, you'd do this repeat 2 times (14 stitches) and then have 6 stitches remaining. But the pattern says you'll end with 16 stitches. Let me recalculate: If you do the repeat 2 times, you use 14 stitches and decrease 2 stitches (one for each K2tog), leaving you with 12 stitches, not 16. That doesn't match. Let me re-read the pattern.
Correction: The pattern states: "Row 1: *K2, P2, K2tog, P1* repeat from * to * across (16 stitches)." Let me verify: Each repeat uses 7 stitches (K2, P2, K2tog, P1) and produces 6 stitches (K2, P2, K1, P1 = 6 stitches). With 20 stitches, you can do this repeat 2 times (14 stitches used, 12 stitches produced) and have 6 stitches left. For those 6 stitches, you'd need to work something like K2, P2, K2tog (which uses 6 stitches and produces 5). That would give you 12 + 5 = 17 stitches, not 16. Hmm, this doesn't work perfectly. Let me re-examine.
Actually, looking more carefully at the pattern, I believe the intended instruction is: *K2, P2, K2tog, P1* repeat from * to * across. With 20 stitches, you can do this repeat 2 full times (14 stitches) and then have 6 stitches left. For those 6 stitches, you'd work K2, P2, K2tog (using 6 stitches, producing 5). That gives you 12 + 5 = 17 stitches. But the pattern says 16. Let me adjust: Perhaps the repeat is *K2, P2, K2tog, P1* which uses 7 stitches and produces 6. With 20 stitches, you could do this 2 times (14 stitches, 12 produced) and then have 6 stitches left. For those 6, you'd work K2, P2, K2tog (5 produced). Total = 17. Still not 16.
To make this work cleanly, I'll adjust the decrease row slightly. Here's a corrected version that produces 16 stitches:
- Row 1 (Decrease Row): *K2, P2, K2tog, P1*; repeat from * to * twice (14 stitches used, 12 stitches produced), then K2, P2, K2tog (6 stitches used, 5 stitches produced). Total: 20 stitches used, 17 stitches produced. Hmm, that's 17, not 16.
Let me try a different approach. To get exactly 16 stitches from 20, you need to decrease 4 stitches. Here's a clean way to do it:
- Row 1 (Decrease Row): *K2, P2, K2tog, P1*; repeat from * to * across. This uses 7 stitches per repeat and produces 6. With 20 stitches, you can do this 2 times (14 stitches used, 12 produced) and then work K2, P2, K2tog (6 stitches used, 5 produced). Total: 17 stitches. To get to 16, you'd need one more decrease. Let me adjust: After the 2 full repeats, work K2, P2tog, K2tog (6 stitches used, 4 produced). That gives 12 + 4 = 16 stitches. Perfect!
So here's the corrected Row 1:
- Row 1 (Decrease Row): *K2, P2, K2tog, P1*; repeat from * to * twice (14 stitches used, 12 stitches produced), then K2, P2tog, K2tog (6 stitches used, 4 stitches produced). You now have 16 stitches on your needle.
- Row 2: *P2, K2*; repeat from * to * across. This is a standard 2x2 ribbing row, working the stitches as they appear (purl the purls, knit the knits).
- Row 3 (Decrease Row): *K2tog, P2*; repeat from * to * across. Each repeat uses 4 stitches (K2tog uses 2, P2 uses 2) and produces 3 stitches (K1, P2). With 16 stitches, you'll do this 4 times, ending with 12 stitches.
- Row 4 (Decrease Row): *P2tog, K1*; repeat from * to * across. Each repeat uses 3 stitches (P2tog uses 2, K1 uses 1) and produces 2 stitches (P1, K1). With 12 stitches, you'll do this 4 times, ending with 8 stitches.
- Cut the yarn, leaving a 12-inch tail. Thread the tail through a tapestry needle, then thread it through the remaining 8 stitches on your knitting needle. Slip the stitches off the needle and pull the tail tight to gather the stitches together. Secure with a knot.
- Now, fold the headband in half with the right sides together. Using the mattress stitch (or any invisible seaming technique), sew the cast-on edge to the bound-off edge to form a seamless circle. Take your time with this step—a neat seam makes all the difference in the finished look.
- Weave in all loose ends using your tapestry needle. Make sure to weave them in securely so they don't come loose with wear.
Optional Embellishment
For extra flair, consider adding a faux fur pom-pom to the seam. Simply attach it securely with a needle and thread, or use the yarn tail to sew it in place. This adds a playful, cozy touch that's perfect for winter.
Final Thoughts
Your Ember & Ash Twisted Cable Headband is now complete! This beautiful accessory is perfect for keeping warm on chilly days while adding a touch of handmade charm to your winter wardrobe. The twisted cable pattern creates a stunning braided texture that's sure to draw compliments, and the contrasting ribbed edges in Ember provide a pop of color that ties the whole design together.
This pattern is wonderfully versatile—feel free to experiment with different color combinations to match your personal style. Whether you keep it for yourself or gift it to a loved one, this headband is sure to become a winter favorite. Happy knitting!


