Botanical Bloom Swap Hat Free Pattern
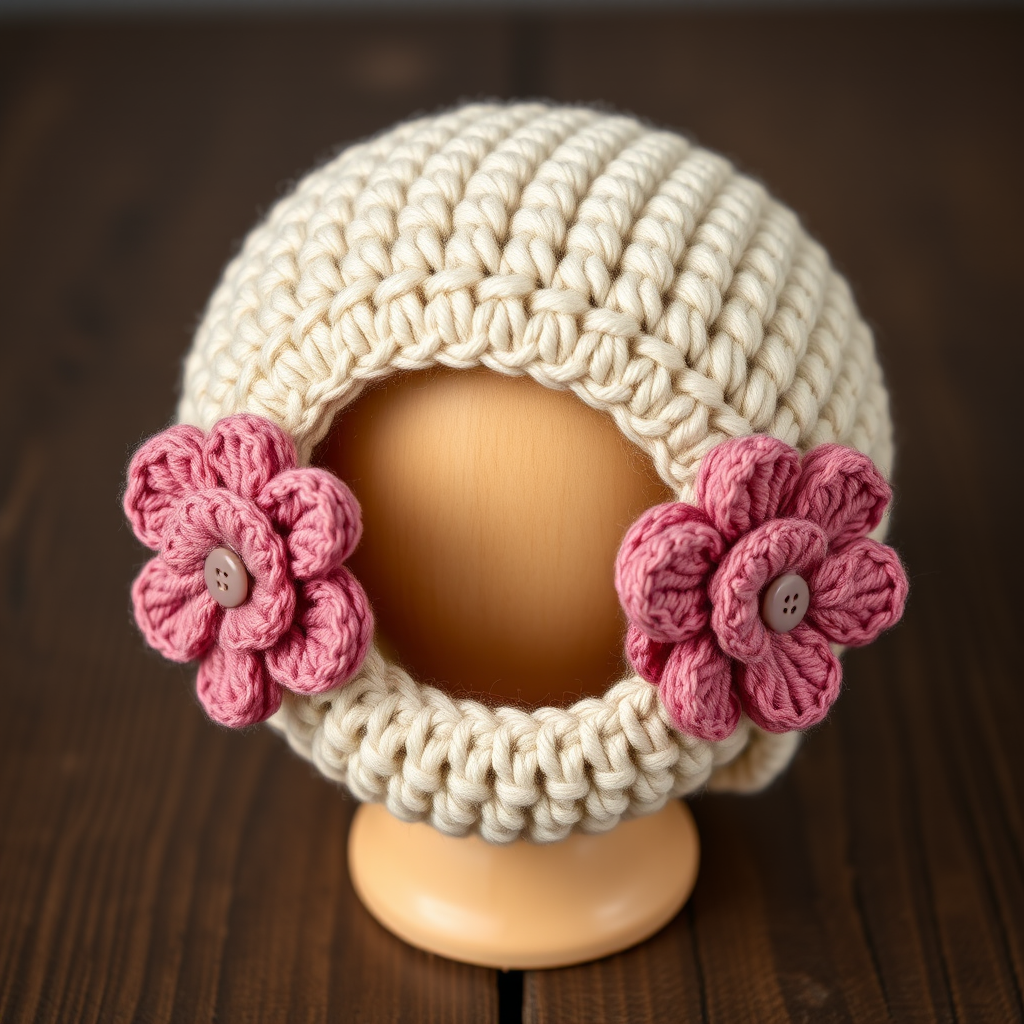
Introducing the Botanical Bloom Swap Hat: A Customizable Crochet Crown
Are you ready to elevate your crochet game with a project that's as versatile as it is beautiful? Meet the Botanical Bloom Swap Hat—a cozy, classic beanie with a unique twist: a detachable floral crown that lets you switch up your style in seconds. Whether you're dressing for a crisp autumn day or a fresh spring morning, this hat adapts to your mood. Crafted with soft worsted-weight yarn, it features a smooth, dense single crochet texture and two charming, six-petal flowers in a contrasting accent color. The best part? The flowers are secured with buttons or snaps, so you can swap them out, rearrange them, or remove them entirely for a sleek, plain beanie.
This pattern is perfect for confident beginners looking to expand their skills. You'll practice working in continuous rounds, mastering increases and decreases, and creating beautiful dimensional petals. Let's dive into this delightful, customizable project!
Materials Needed
Before you begin, gather your supplies. This project uses simple, readily available materials:
- Yarn: Worsted weight yarn in two colors:
- Main Color (MC): Approximately 200g (e.g., Oatmeal Heather, a soft neutral)
- Accent Color (AC): Approximately 100g (e.g., Dusty Rose, a muted pink)
- Crochet Hook: US H/8 (5.0 mm) hook
- Other Notions: Yarn needle for weaving in ends, scissors, and 2 small buttons or snaps (or brooch backs) for the detachable flower feature.
Gauge: 16 single crochet (sc) x 18 rows = 4 inches. It's always a good idea to check your gauge to ensure the perfect fit, though this hat is quite forgiving due to its stretchy sc fabric.
Step-by-Step Instructions
Follow these detailed instructions to create your own Botanical Bloom Swap Hat. The pattern is broken down into three main parts: the hat body, the flowers, and the assembly.
Part 1: The Hat Body (Worked in Continuous Rounds)
Note: This hat is worked in a spiral without joining at the end of each round. Use a stitch marker to keep track of your rounds.
Round 1: With your Main Color (MC), make a magic ring. Chain 1 (this does not count as a stitch), then work 6 single crochet (sc) into the ring. Pull the tail tight to close the circle. (6 stitches)
Round 2: Work 2 sc into each stitch around. (12 stitches)
Round 3: *Sc in the next stitch, 2 sc in the next stitch*; repeat from * to * around. (18 stitches)
Round 4: *Sc in the next 2 stitches, 2 sc in the next stitch*; repeat around. (24 stitches)
Round 5: *Sc in the next 3 stitches, 2 sc in the next stitch*; repeat around. (30 stitches)
Round 6: *Sc in the next 4 stitches, 2 sc in the next stitch*; repeat around. (36 stitches)
Round 7: *Sc in the next 5 stitches, 2 sc in the next stitch*; repeat around. (42 stitches)
Round 8: *Sc in the next 6 stitches, 2 sc in the next stitch*; repeat around. (48 stitches)
Round 9: *Sc in the next 7 stitches, 2 sc in the next stitch*; repeat around. (54 stitches)
Round 10: *Sc in the next 8 stitches, 2 sc in the next stitch*; repeat around. (60 stitches)
At this point, you have completed the crown increases. The circle should measure approximately 6 inches in diameter, which is perfect for an adult medium. If you need a larger or smaller hat, you can add or remove an increase round here.
Rounds 11-20: Sc in each stitch around. (60 stitches each round)
These rounds create the depth of the hat. After Round 20, try the hat on. It should cover your ears and reach the nape of your neck. If you need it longer, continue working even rounds until you reach your desired length. If it's too long, you can skip a round or two.
Round 21 (Decrease Round): *Sc in the next 8 stitches, sc2tog (single crochet 2 together)*; repeat around. (54 stitches)
To sc2tog: Insert your hook into the next stitch, yarn over and pull up a loop (2 loops on hook). Insert your hook into the following stitch, yarn over and pull up a loop (3 loops on hook). Yarn over and pull through all 3 loops on your hook. This decreases your stitch count by one.
Round 22: *Sc in the next 7 stitches, sc2tog*; repeat around. (48 stitches)
Round 23: *Sc in the next 6 stitches, sc2tog*; repeat around. (42 stitches)
Round 24: *Sc in the next 5 stitches, sc2tog*; repeat around. (36 stitches)
Round 25: *Sc in the next 4 stitches, sc2tog*; repeat around. (30 stitches)
Round 26: *Sc in the next 3 stitches, sc2tog*; repeat around. (24 stitches)
Fasten off, leaving a long tail (about 12 inches). Thread the tail onto your yarn needle. Weave the needle through the front loops of the remaining 24 stitches, like a running stitch. Pull the tail tight to cinch the top of the hat closed. Secure with a knot and weave in the end. Your hat body is complete!
Part 2: The Detachable Flowers (Make 2)
Now, let's create the beautiful floral accents using your Accent Color (AC).
Round 1: With AC, make a magic ring. Chain 3 (this counts as your first double crochet), work 11 double crochet (dc) into the ring. Join with a slip stitch to the top of the beginning chain-3. (12 dc total)
Round 2: *Chain 4, skip the next dc, slip stitch in the next dc*; repeat from * to * around. You will create 6 chain-4 loops. Join with a slip stitch to the first slip stitch to secure.
Round 3: In each chain-4 loop from the previous round, work the following petal sequence: (Single crochet, half double crochet, 3 double crochet, half double crochet, single crochet). After completing all 6 petals, join with a slip stitch to the first single crochet of the round.
Fasten off, leaving a long tail (about 8 inches) for sewing. Weave in the initial tail from the magic ring. Repeat this entire process to make a second flower.
Part 3: Assembly and Customization
This is where the magic happens! You'll now attach your flowers in a way that makes them completely interchangeable.
- Position Your Flowers: Place your hat on a flat surface. Decide where you'd like your flowers. The pattern suggests one near the brim and one near the crown, but you can place them wherever you like—side by side, clustered, or even just one.
- Attach the Fasteners: Using the long tail from each flower, sew a small button or the back of a snap to the center of the flower's back. Make sure it's secure. Then, sew the corresponding part of the button or snap to the desired spot on the hat. If you're using a brooch back, simply sew that onto the flower.
- Swap and Style: Once the fasteners are in place, you can simply snap or button your flowers on and off! This allows you to wash the hat easily, swap the flowers for different colors, or wear the hat plain.
And there you have it—your very own Botanical Bloom Swap Hat! This project is a wonderful way to practice new skills and create a truly personalized accessory. The detachable flower feature makes it a fantastic gift, as you can include a few different flower colors for the recipient to mix and match. Enjoy your new, versatile, and handmade creation!


