Aurora Ridge Fingerless Gloves Free Pattern – Knitted Nordic-Inspired Mitts
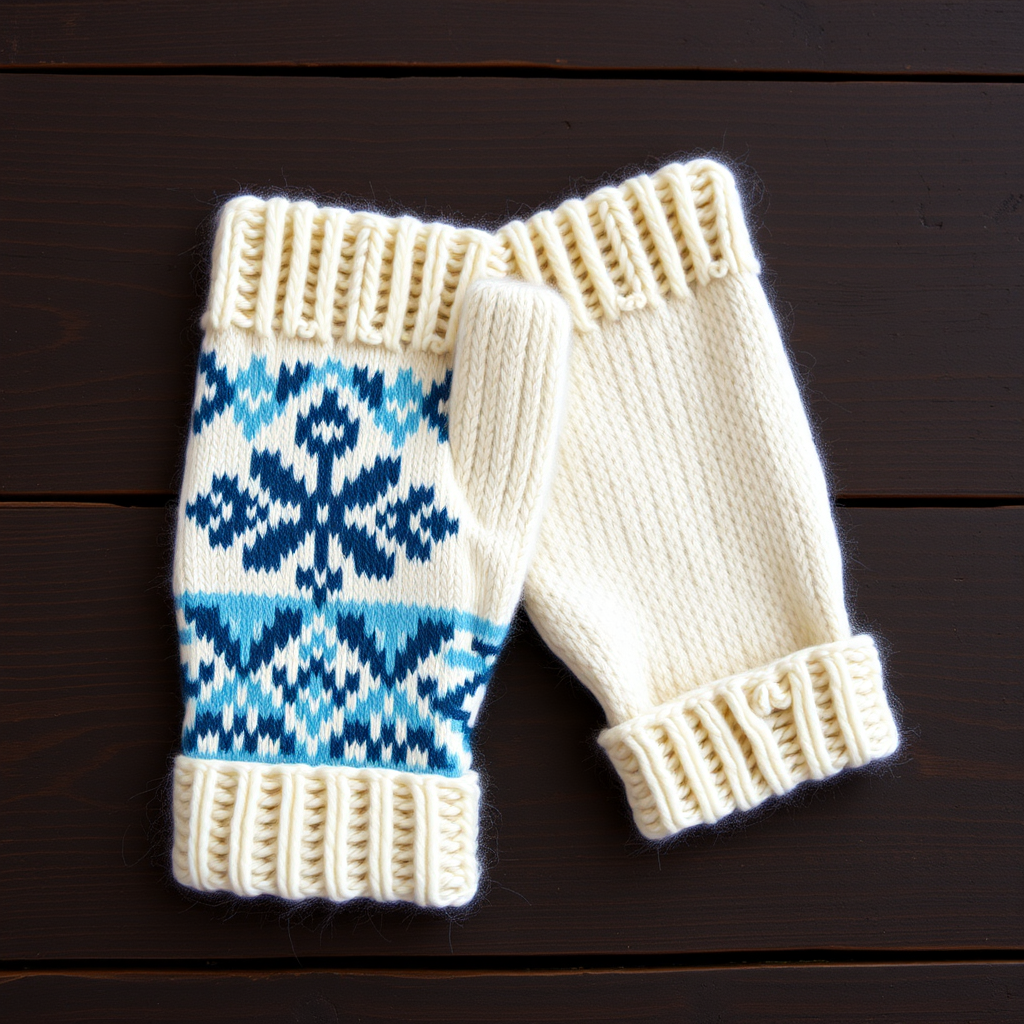
Wrap Your Hands in Nordic Charm: The Aurora Ridge Fingerless Gloves Pattern
There’s something deeply satisfying about wrapping your hands in a project that feels both timeless and fresh. The Aurora Ridge Fingerless Gloves are exactly that—a knitted accessory that blends the rich tradition of Nordic colorwork with a clean, modern silhouette. Featuring a stunning geometric snowflake and diamond motif in icy blues and warm cream, these mitts are perfect for crisp morning commutes, cozy coffee shop sessions, or simply adding a handcrafted touch to your winter wardrobe.
Whether you're a seasoned knitter looking for a quick, satisfying project or a brave beginner ready to dip your toes into colorwork, this free pattern is designed to guide you every step of the way. The result? A pair of beautifully textured, fingerless gloves that are as functional as they are gorgeous. Let’s dive into the details and get those needles clicking!
Materials Needed: Gather Your Supplies
Before you cast on, make sure you have everything you need. This project uses worsted weight yarn, which makes it quick to knit and wonderfully warm. Here’s your complete shopping list:
- Yarn: Worsted weight yarn in three colors:
- MC (Main Color): Cream – 100g (approx. 220 yards)
- CC1 (Color 1): Ice Blue – 50g (approx. 110 yards)
- CC2 (Color 2): Deep Teal – 50g (approx. 110 yards)
- Needles: US 6 (4.0 mm) double-pointed needles (or a circular needle if you prefer the magic loop method).
- Notions: Tapestry needle for weaving in ends, stitch markers (at least 4), and waste yarn or stitch holders for the thumb and fingers.
Gauge: 22 stitches and 28 rows = 4 inches in stockinette stitch (blocked). Getting the right gauge is crucial for a perfect fit, so take a moment to knit a swatch!
Step-by-Step Instructions: Knit Your Aurora Ridge Gloves
This pattern is worked in the round from the cuff up. We’ll start with the ribbed cuff, move into the stunning colorwork chart, and then shape the thumb and fingers. Don't be intimidated by the colorwork—the chart is simple to follow once you get into the rhythm.
Sizes: S/M (M/L) – shown in S/M. To adjust for M/L, simply add 4 stitches to your cast-on count.
Abbreviations:
k = knit, p = purl, k2tog = knit two together, ssk = slip slip knit, pm = place marker, sm = slip marker, MC = main color, CC1 = color 1, CC2 = color 2, m1 = make one (increase).
Part 1: The Ribbed Cuff
Let’s start with a solid foundation. The ribbed cuff provides a snug, comfortable fit that keeps the gloves in place.
- With your MC (Cream), cast on 40 (44) stitches.
- Divide the stitches evenly among your double-pointed needles. Join in the round, being extremely careful not to twist your stitches. Place a stitch marker to mark the beginning of the round.
- Work in a k1, p1 ribbing for 2 inches. This creates a stretchy, classic cuff that will hug your wrist comfortably.
Part 2: The Colorwork Hand Section
Now for the fun part—the beautiful Nordic pattern! We’ll switch to stockinette stitch (knit every round) and begin the colorwork chart.
- Round 1: Knit all stitches with MC. This establishes a clean base for the colorwork.
- Round 2: Begin the colorwork chart (provided below). The chart is a 20-stitch repeat. Work the 20-stitch chart repeat twice around the glove (for a total of 40 stitches, or 44 for the larger size—just work the extra stitches in MC at the beginning of the round).
- Continue working the chart in the round until the piece measures 4 inches from the cast-on edge. The chart is worked in 5 rounds, which you will repeat. Remember to carry your yarn loosely across the back of the work to prevent puckering.
Part 3: Thumb Gusset (Right Glove)
Time to add some shape! The thumb gusset is a series of increases that creates a comfortable space for your thumb. We'll work this for the right glove first.
- Round 1: With MC, k20 (22), pm, m1, k1, m1, pm, k19 (21). You have now increased 2 stitches and have 42 (46) stitches total.
- Round 2: Knit all stitches with MC.
- Round 3: K20 (22), sm, m1, k3, m1, sm, k19 (21). (You now have 3 stitches between the markers).
- Continue increasing every other round in this manner, knitting one more stitch between the increases each time. For example, the next increase round will be: k20 (22), sm, m1, k5, m1, sm, k19 (21).
- Repeat this increase sequence until you have 13 (15) stitches between the two markers.
- Next round: K20 (22), place the 13 (15) thumb stitches onto a piece of waste yarn, cast on 1 stitch (this bridges the gap), and k19 (21). You now have 41 (45) stitches on your needles for the hand.
Part 4: Thumb Gusset (Left Glove)
To make the left glove, you'll work the gusset symmetrically. Instead of placing the markers after k20 (22), you'll place them after k19 (21).
- Round 1: With MC, k19 (21), pm, m1, k1, m1, pm, k20 (22).
- Follow the same increase pattern as the right glove, but now the increases happen between the markers that are placed after the first 19 (21) stitches.
- Once you have 13 (15) stitches between the markers, the next round is: K19 (21), place the 13 (15) thumb stitches on waste yarn, cast on 1 stitch, k20 (22).
Part 5: The Hand (Continued)
With the thumb gusset complete, we'll continue knitting the main body of the glove.
- Continue in stockinette stitch (knit every round) with MC only.
- Knit until the hand measures 7 inches from the cast-on edge, or until it reaches about 1 inch before your knuckles. This is a good time to try it on!
Part 6: Finger Separation
This is where the gloves become truly fingerless! We'll create individual tubes for your fingers. This is easier than it sounds—just follow along carefully.
Index Finger:
- K5 (6) stitches. Place the next 10 (11) stitches on waste yarn (for the middle finger).
- Cast on 2 stitches (this bridges the gap between fingers).
- K5 (6) stitches (for the ring finger). Place the next 10 (11) stitches on waste yarn (for the pinky).
- K5 (6) stitches (for the index finger). You now have 12 (14) stitches on your needles for the index finger.
- Work in stockinette stitch (knit every round) for 1.5 inches. Bind off loosely.
Middle Finger:
- Pick up the 2 cast-on stitches from the index finger, plus the 10 (11) stitches from the waste yarn, plus 2 cast-on stitches from the ring finger side. You should have 14 (15) stitches.
- Work in stockinette stitch for 1.75 inches. Bind off loosely.
Ring Finger:
- Pick up 2 stitches from the middle finger, 10 (11) stitches from the waste yarn, and 2 stitches from the pinky side. You should have 14 (15) stitches.
- Work in stockinette stitch for 1.5 inches. Bind off loosely.
Pinky Finger:
- Pick up 2 stitches from the ring finger and 10 (11) stitches from the waste yarn. You should have 12 (13) stitches.
- Work in stockinette stitch for 1.25 inches. Bind off loosely.
Part 7: The Thumb
Almost there! Let's finish the thumb.
- Pick up the 13 (15) stitches from the waste yarn, plus 1 stitch from the cast-on edge of the hand. You should have 14 (16) stitches.
- Work in stockinette stitch for 1.5 inches. Bind off loosely.
Part 8: Finishing Touches
You've done the hard work—now it's time to make it perfect.
- Weave in all loose ends with your tapestry needle. Take your time to make sure they are secure and invisible.
- Block your gloves gently. This is a crucial step for colorwork. It evens out the stitches and helps the motifs lay flat. Soak the gloves in lukewarm water with a little wool wash, gently squeeze out excess water (don't wring!), and lay them flat to dry on a towel.
The Aurora Ridge Colorwork Chart
Here is the chart you'll use for the hand section. Work these 5 rounds, then repeat them until the hand measures 4 inches. Remember, the chart is a 20-stitch repeat.
- Round 1: *k2 MC, k1 CC1, k1 MC, k2 CC2, k1 MC, k1 CC1, k2 MC, k1 CC2, k1 MC, k1 CC1, k2 MC, k1 CC2, k1 MC, k1 CC1, k1 MC* (repeat from * to * around)
- Round 2: *k1 MC, k2 CC1, k1 MC, k1 CC2, k2 MC, k1 CC1, k1 MC, k2 CC2, k1 MC, k1 CC1, k1 MC, k2 CC2, k1 MC, k1 CC1, k2 MC*
- Round 3: *k1 CC1, k1 MC, k2 CC2, k1 MC, k1 CC1, k2 MC, k1 CC2, k1 MC, k1 CC1, k2 MC, k1 CC2, k1 MC, k1 CC1, k2 MC, k1 MC*
- Round 4: *k2 CC1, k1 MC, k1 CC2, k2 MC, k1 CC1, k1 MC, k2 CC2, k1 MC, k1 CC1, k2 MC, k1 CC2, k1 MC, k1 CC1, k2 MC, k1 MC*
- Round 5: *k1 CC2, k2 MC, k1 CC1, k1 MC, k2 CC2, k1 MC, k1 CC1, k2 MC, k1 CC2, k1 MC, k1 CC1, k2 MC, k1 CC2, k1 MC, k1 CC1*
And there you have it—your very own pair of Aurora Ridge Fingerless Gloves! These make wonderful gifts for loved ones (or a special treat for yourself). The combination of the cozy cream base and the striking ice blue and deep teal motifs is sure to turn heads. Happy knitting!


