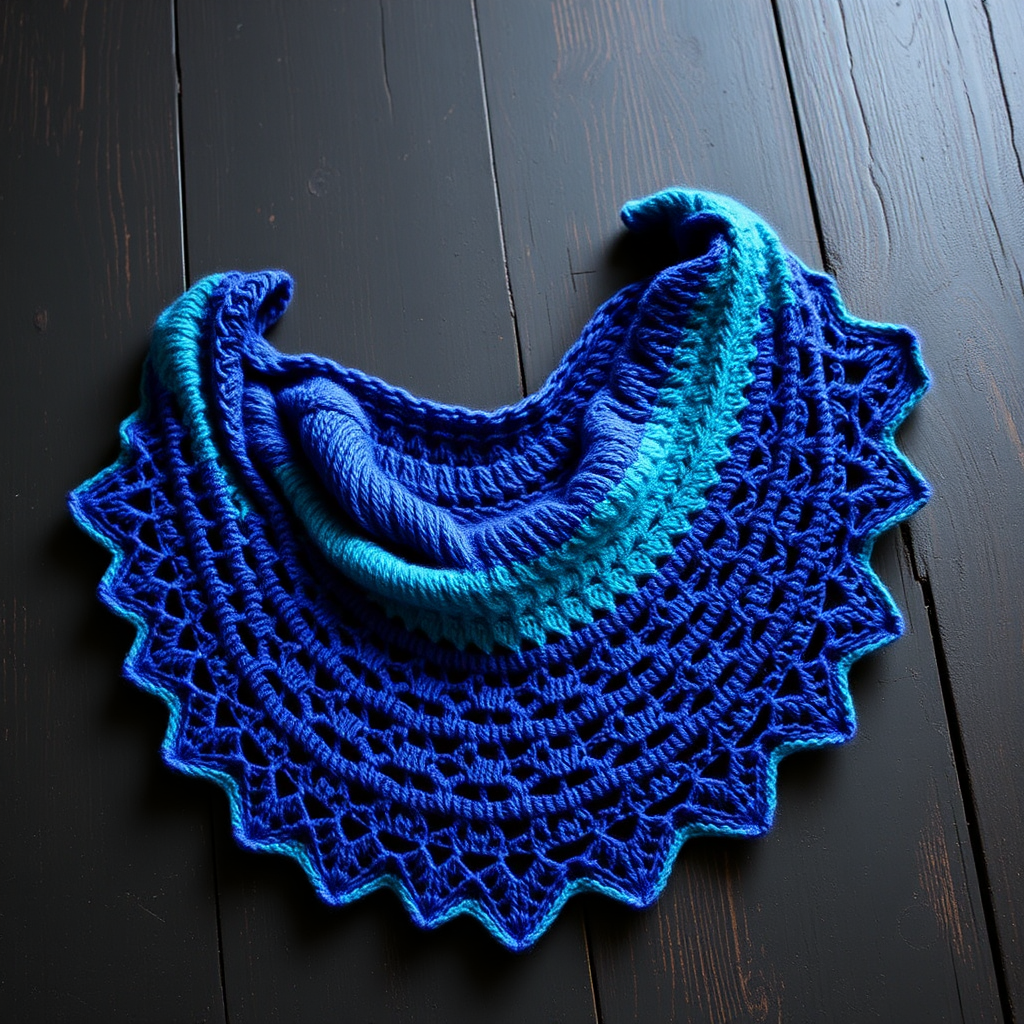
Aurora Borealis Driftwood Shawl Free Pattern – Gradient Lace Knit

Aurora Borealis Driftwood Shawl: A Free Gradient Lace Knitting Pattern
Imagine wrapping yourself in the ethereal dance of the northern lights—swirling ribbons of indigo, teal, and lavender that shift and glow with every movement. The Aurora Borealis Driftwood Shawl captures that celestial magic in a beautifully textured, gradient lace knit. This free pattern is perfect for intermediate knitters ready to explore lacework, or ambitious beginners who want a rewarding, show-stopping project. With its gentle driftwood-inspired texture and elegant drape, this shawl is more than an accessory—it's a wearable piece of art.
Knitted from the top center down, this triangular shawl uses simple increases and a rhythmic lace repeat to create an airy, organic fabric. The variegated yarn does the heavy lifting, blending colors seamlessly like a night sky painted by nature itself. Whether you're cozying up by a fire or adding a touch of celestial charm to an evening outfit, this shawl is destined to become a treasured handmade heirloom.
Materials Needed
Before you begin, gather these supplies to ensure a smooth knitting experience:
- Yarn: Fingering weight yarn in a gradient colorway (e.g., Malabrigo Sock in "Arco Iris" or similar), approximately 400–450 yards. Look for a gradient that transitions through blues, teals, and purples for the full aurora effect.
- Needle: US 6 (4.0 mm) circular knitting needle, 32 inches or longer. The long cord is essential for accommodating the growing number of stitches.
- Gauge: 20 stitches and 28 rows = 4 inches in stockinette stitch (blocked). Gauge is important for achieving the correct drape and size, but this shawl is forgiving—just keep your tension consistent.
- Notions: Stitch markers (at least 2), a tapestry needle for weaving in ends, and a lifeline (scrap yarn or specialized lifeline thread) for safety.
Understanding the Pattern Structure
This shawl is worked from the top center down, increasing on both sides and at the center to form a triangle. The construction is elegant and logical:
- Garter stitch borders (first and last 3 stitches of every row) keep edges neat and prevent curling.
- Yarn over increases are placed at the beginning, center, and end of each right-side row to shape the triangle.
- The lace pattern is a simple two-row repeat (worked on right-side rows, with wrong-side rows purled) that creates a delicate eyelet texture.
Pro Tip: Place a lifeline every 10 rows. If you make a mistake in the lace, you can easily rip back to the lifeline without losing all your progress.
Abbreviations
- k = knit
- p = purl
- yo = yarn over
- k2tog = knit two together (right-leaning decrease)
- ssk = slip slip knit (left-leaning decrease)
- pm = place marker
- sm = slip marker
- RS = right side
- WS = wrong side
Step-by-Step Instructions
Setup: Casting On and Establishing the Base
Step 1: Cast on 3 stitches using your preferred method (long-tail cast-on works well).
Step 2: Knit 6 rows in garter stitch (knit every row). This creates a small square base.
Step 3: Now you'll pick up stitches to create the foundation for the triangle. Pick up 3 stitches along the side edge of your garter square, then 3 stitches from the cast-on edge. You should now have a total of 9 stitches on your needle.
Step 4: Place markers as follows: pm after stitch 3, pm after stitch 6 (this marks the center), and pm after stitch 9. You now have three sections of 3 stitches each. The first and last sections will become the garter borders, and the center section will grow with increases.
Increasing Rows (Garter Stitch Body)
Now you'll work the increase rows that establish the shawl's shape. These rows are simple and repetitive.
Row 1 (RS): k3, yo, sm, k3, yo, sm, k3 — you now have 11 stitches.
Row 2 (WS): k3, p to last 3 stitches, k3. (Always knit the first and last 3 stitches for the garter border; purl everything in between on wrong-side rows.)
Row 3 (RS): k3, yo, k to marker, yo, sm, k to marker, yo, sm, k to last 3 stitches, yo, k3 — you now have 15 stitches.
Row 4 (WS): k3, p to last 3 stitches, k3.
Repeat Rows 3–4 until you have a total of 45 stitches on your needle (15 stitches per section). End with a wrong-side row. This establishes the base of your shawl with clean, even increases.
Begin Lace Pattern
Now the magic begins! The lace pattern is worked on right-side rows, with wrong-side rows purled (keeping garter borders). The pattern creates a beautiful, rhythmic eyelet texture that mimics the organic flow of the aurora.
Lace Row 1 (RS): k3, yo, *k2tog, yo* repeat from * to * until 3 stitches before the first marker, k3, yo, sm, k3, yo, *k2tog, yo* repeat until 3 stitches before the center marker, k3, yo, sm, k3, yo, *k2tog, yo* repeat until 3 stitches before the end, k3, yo, k3.
Lace Row 2 (WS): k3, p to last 3 stitches, k3.
Lace Row 3 (RS): k3, yo, *yo, k2tog* repeat from * to * until 3 stitches before the first marker, k3, yo, sm, k3, yo, *yo, k2tog* repeat until 3 stitches before the center marker, k3, yo, sm, k3, yo, *yo, k2tog* repeat until 3 stitches before the end, k3, yo, k3.
Lace Row 4 (WS): k3, p to last 3 stitches, k3.
Repeat Lace Rows 1–4 until the shawl measures approximately 24 inches from the center cast-on edge, measured straight down the middle. End with a wrong-side row. At this point, you should have approximately 200–220 stitches total. Don't worry if your count varies slightly—the lace pattern is forgiving, and blocking will even everything out.
Edging: A Delicate Finish
The edging adds a final flourish of lace and ensures a beautiful, stretchy bind-off that complements the airy fabric.
Edging Row 1 (RS): k3, yo, *k2tog, yo* repeat from * to * until 3 stitches before the end, k3, yo, k3.
Edging Row 2 (WS): k3, p to last 3 stitches, k3.
Edging Row 3 (RS): k3, yo, *yo, k2tog* repeat from * to * until 3 stitches before the end, k3, yo, k3.
Edging Row 4 (WS): k3, p to last 3 stitches, k3.
Binding Off Loosely
Bind off on the right side using a stretchy method to ensure the edge doesn't pull or pucker:
k2, *k2tog, pass the first stitch over the second, k1* repeat from * to * until all stitches are bound off. This creates a picot-like, elastic edge that beautifully frames the lace.
Finishing Touches
Step 1: Weave in all loose ends using a tapestry needle. Be careful not to pull too tightly, as this can distort the lace.
Step 2: Block aggressively. This step is crucial for lace knitting. Soak the shawl in lukewarm water with a gentle wool wash for 20–30 minutes. Gently squeeze out excess water (never wring!), then lay the shawl on a blocking mat. Pin out the edges to open up the lace pattern and create the full triangular shape. The yarn overs will stretch to reveal the beautiful eyelet design. Allow to dry completely before unpinning.
Step 3: Once dry, your Aurora Borealis Driftwood Shawl is ready to wear or gift. The gradient colors will glow, and the lace will drape elegantly around your shoulders.
Tips for Success
- Use a lifeline: Thread a contrasting scrap yarn through the stitches every 10 rows. If you need to rip back, you'll have a safe stopping point.
- Count your stitches regularly: Especially after lace rows, to catch mistakes early.
- Embrace imperfection: Handmade items have character. Small variations in tension add to the organic, driftwood-inspired texture.
- Choose your gradient wisely: The yarn does the heavy lifting in this pattern. Look for a gradient with long color transitions for a smooth, aurora-like effect.
This shawl is a joy to knit and a stunning piece to wear. The combination of simple lace and gradient yarn creates something truly special—a wearable reminder of the night sky's most beautiful phenomenon. Happy knitting!