Whispering Woods Fawn Free Pattern
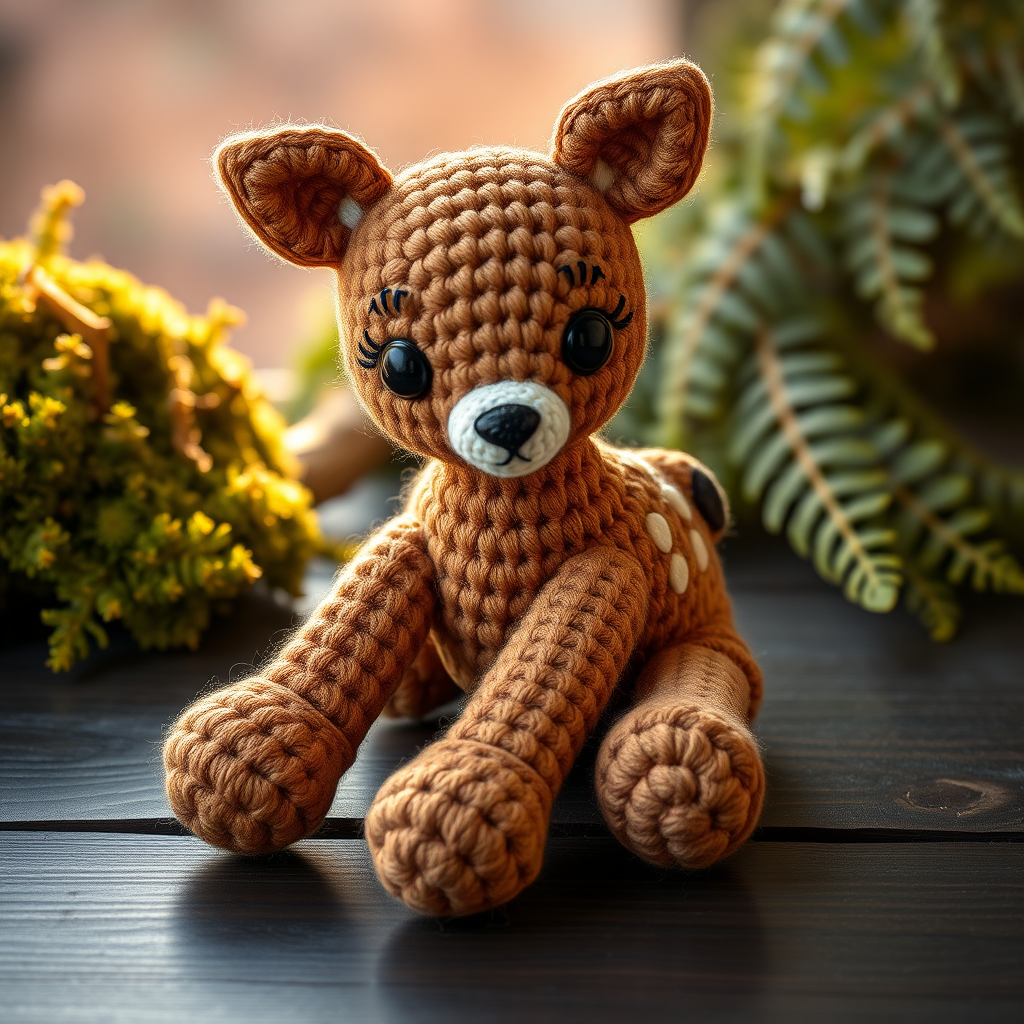
Whispering Woods Fawn: A Free Amigurumi Crochet Pattern
There is something truly magical about bringing a gentle woodland creature to life with your own two hands. This amigurumi fawn pattern is designed to capture the soft, innocent charm of a forest friend, making it the perfect handmade gift for a baby shower, a nature-inspired nursery, or simply a heartfelt keepsake for someone special. With its warm brown tones, delicate cream spots, and sweet embroidered face, this little fawn will quickly become a treasured companion. Whether you are a seasoned crocheter or a confident beginner looking for a rewarding project, this pattern offers a soothing, step-by-step journey into the art of amigurumi. Let’s pick up our hooks and create a little piece of woodland wonder together.
Materials Needed
Before we begin, let’s gather all the supplies you will need to bring your fawn to life. This project uses simple, accessible materials that are easy to find at any craft store.
- Yarn: Worsted weight (#4) yarn in the following colors:
- Warm brown (main body and head)
- Cream (for the tail and muzzle)
- Dark brown (for the spots)
- Small amounts of black and white for the facial details
- Crochet Hook: 3.5 mm (E) hook
- Stuffing: Polyester fiberfill or your preferred amigurumi stuffing
- Yarn needle: For sewing pieces together and embroidering details
- Scissors
- Stitch marker (optional, but helpful for keeping track of rounds)
Gauge Note: Gauge is not critical for this project. However, it is essential to maintain a tight tension throughout your work. This ensures that the stuffing does not show through your stitches and that your fawn holds its shape beautifully.
Step-by-Step Instructions
This pattern is worked in continuous spirals unless otherwise stated. Do not join rounds; simply work continuously, using a stitch marker to track the beginning of each round. Let’s start with the head, as it is the heart of your fawn’s expression.
Head
Using your warm brown yarn:
- Round 1: Make a magic ring, work 6 single crochet (sc) into the ring. Pull tight to close. (6 stitches)
- Round 2: Increase (inc) in each sc around. This means working 2 sc into each stitch. (12 stitches)
- Round 3: (Sc in the next sc, inc) around. This creates a gentle curve. (18 stitches)
- Round 4: (Sc in the next 2 sc, inc) around. (24 stitches)
- Round 5: (Sc in the next 3 sc, inc) around. (30 stitches)
- Rounds 6-10: Sc in each sc around for 5 rounds. This builds the height of the head without increasing. (30 stitches)
- Round 11: (Sc in the next 3 sc, decrease (dec)) around. To decrease, insert your hook into the next stitch, yarn over and pull up a loop, insert into the following stitch, yarn over and pull up a loop, then yarn over and pull through all three loops on your hook. (24 stitches)
- Round 12: (Sc in the next 2 sc, dec) around. (18 stitches)
- Stuffing: Begin stuffing the head firmly. Make sure to shape it well, filling out the cheeks and the top of the head. Continue to add stuffing as you close.
- Round 13: (Sc in the next sc, dec) around. (12 stitches)
- Round 14: Dec around. You will work a decrease in every stitch. (6 stitches)
- Finishing: Fasten off, leaving a long tail (about 12 inches). Thread the tail onto your yarn needle. Weave the needle through the front loops of the remaining 6 stitches, then pull tight to close the hole. Weave the tail securely into the head and trim.
Ears (Make 2)
These sweet little ears are quick to make and add so much character.
- Round 1: With warm brown yarn, make a magic ring and work 4 sc into the ring. (4 stitches)
- Round 2: Inc in each sc around. (8 stitches)
- Rounds 3-4: Sc in each sc around for 2 rounds. (8 stitches)
- Finishing: Do not stuff. Flatten the ear so the opening is at the bottom. Work a sc through both layers across the opening to close it. Fasten off, leaving a long tail for sewing onto the head.
Body
The body is worked similarly to the head but is slightly longer, giving your fawn a cute, plump shape.
- Round 1: With warm brown yarn, make a magic ring and work 6 sc into the ring. (6 stitches)
- Round 2: Inc in each sc around. (12 stitches)
- Round 3: (Sc in the next sc, inc) around. (18 stitches)
- Round 4: (Sc in the next 2 sc, inc) around. (24 stitches)
- Rounds 5-8: Sc in each sc around for 4 rounds. (24 stitches)
- Round 9: (Sc in the next 2 sc, dec) around. (18 stitches)
- Round 10: Sc in each sc around. (18 stitches)
- Stuffing: Stuff the body firmly, shaping it into a rounded pear-like form.
- Round 11: (Sc in the next sc, dec) around. (12 stitches)
- Round 12: Dec around. (6 stitches)
- Finishing: Fasten off, leaving a long tail. Weave through the front loops of the remaining stitches, pull tight, and secure the tail inside the body.
Legs (Make 4)
These stubby legs are what give the fawn its adorable, grounded posture. Note that the front legs are slightly shorter than the back legs to create a seated pose.
- Round 1: With warm brown yarn, make a magic ring and work 6 sc into the ring. (6 stitches)
- Rounds 2-4: Sc in each sc around for 3 rounds. (6 stitches) For the front legs, stop here after Round 3 (only 2 rounds of sc).
- Stuffing: Stuff the leg lightly. It should be soft but hold its shape.
- Finishing: Fasten off, leaving a long tail for sewing. Flatten the opening and sew it closed or leave it open to attach directly to the body.
Tail
A tiny cream tail adds a lovely pop of contrast.
- Round 1: With cream yarn, make a magic ring and work 4 sc into the ring. (4 stitches)
- Round 2: Inc in each sc around. (8 stitches)
- Finishing: Fasten off, leaving a tail. Flatten the piece and sew it to the back of the body.
Assembly
Now that all your pieces are ready, it’s time to bring your fawn together. Take your time with this step to ensure a polished, professional finish.
- Head to Body: Position the head on top of the body, slightly offset toward the front so the fawn looks upward. Using the long tail from the head, sew the head securely to the body with a whip stitch, going through stitches on both pieces. Weave in the end.
- Ears: Sew the ears to the top of the head, positioning them slightly forward and angled outward. Fold the base of the ear slightly before sewing to give them a perky, natural look.
- Legs: Sew the legs to the bottom of the body. Position the two shorter front legs slightly forward and the two longer back legs slightly back. This will create a stable, seated pose. Ensure they are evenly spaced.
- Tail: Sew the tail to the back of the body, just above the back legs.
Embroidery and Finishing Details
This is where your fawn truly comes to life. The facial features and spots are created with simple embroidery techniques.
- Spots: Using dark brown yarn, embroider small, scattered spots on the back and upper legs. Use a satin stitch: bring the needle up through the yarn, lay the thread flat across the surface, and insert the needle back down close to where you started. Repeat to create small oval or round shapes.
- Eyes: With black yarn, embroider two small eyes. Place them about 4 rounds apart on the face, roughly at the level of Round 7 or 8. Use French knots for a raised, cute look, or a simple satin stitch for a flatter eye. For a French knot: bring the needle up, wrap the yarn around the needle 2-3 times, insert the needle back down close to where it came up, and pull through gently.
- Muzzle: With white yarn, embroider a small, oval-shaped muzzle below the eyes. Use a satin stitch, filling in the area with parallel stitches.
- Nose and Mouth: With black yarn, embroider a small nose at the top of the white muzzle. Add a tiny vertical line downward from the nose, then a small "V" shape for the mouth.
Final Touches
Once all embroidery is complete, take a moment to review your fawn. Weave in any remaining loose ends securely, trimming off any excess yarn. Gently fluff the yarn with your fingers to remove any lint or loose fibers. Your Whispering Woods Fawn is now complete, ready to bring a touch of gentle woodland magic to its new home.
This pattern is a wonderful way to practice your amigurumi skills while creating a truly special keepsake. Enjoy the process, and don’t hesitate to make it your own with different yarn colors or personal touches. Happy crocheting!


